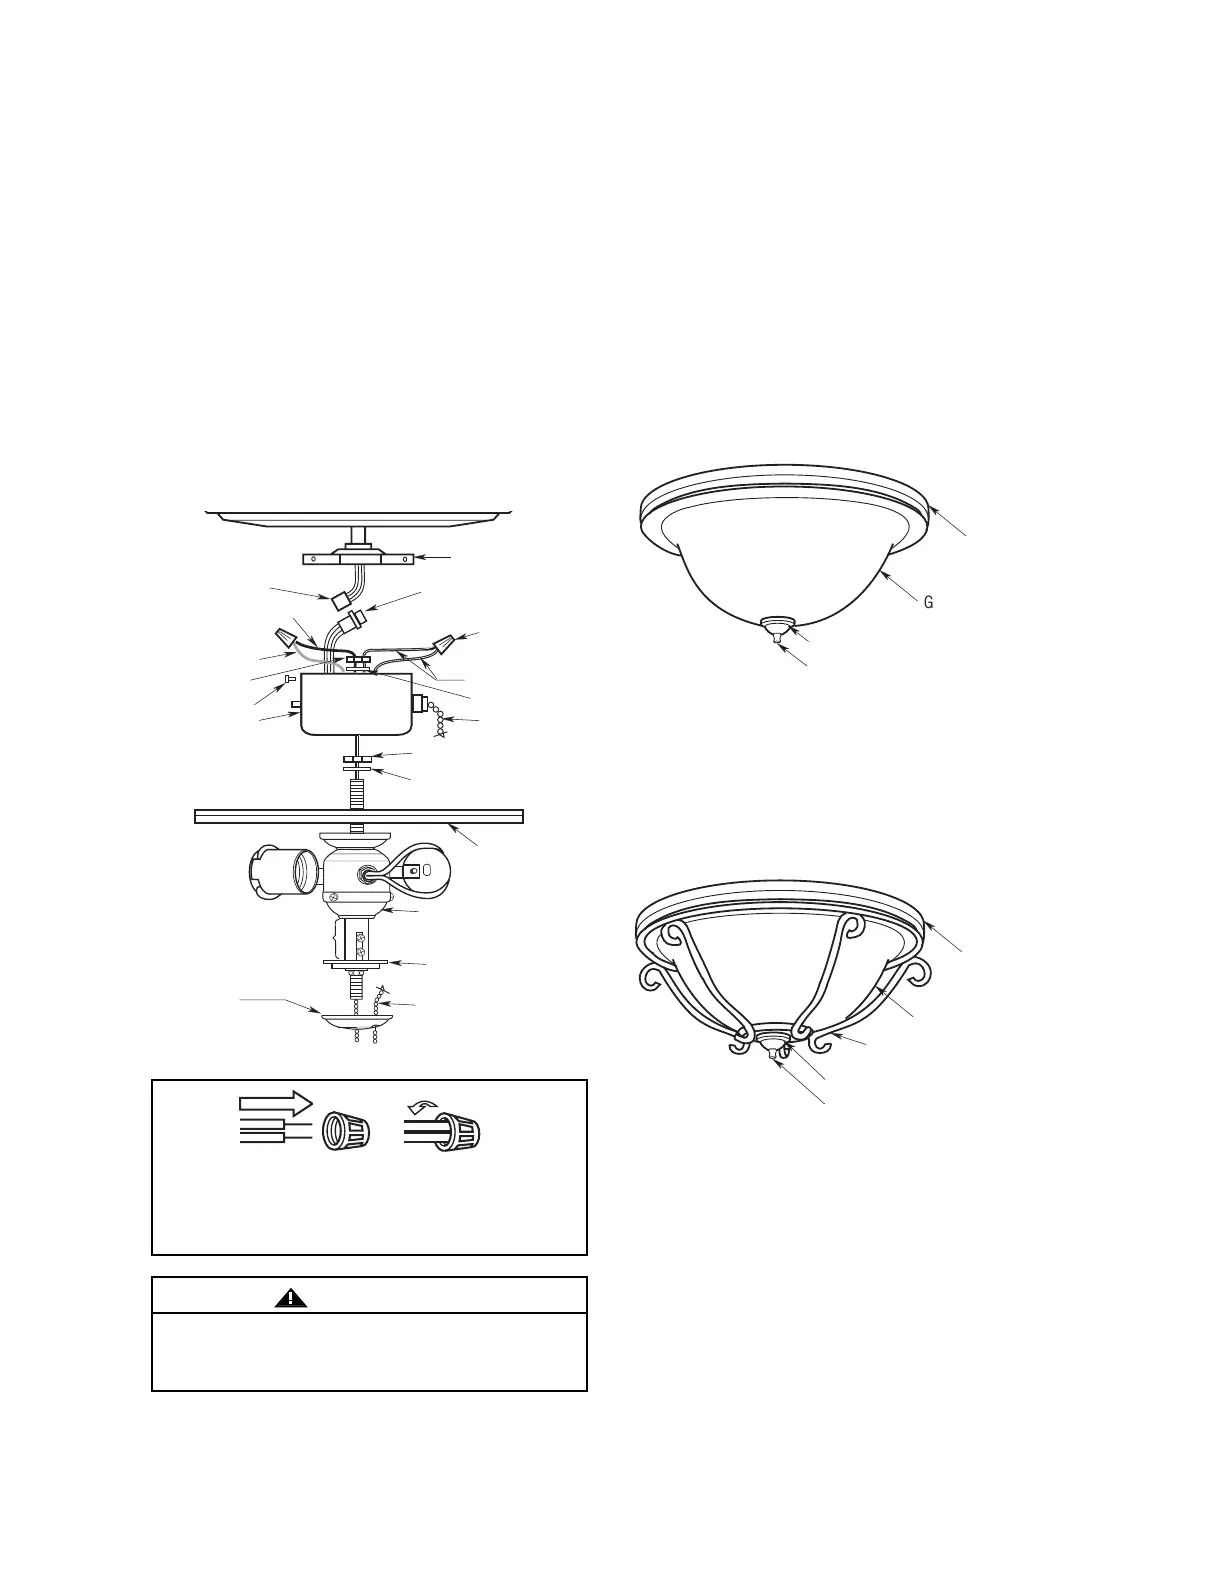
8. Insert the black and white wires through the lock-
washer and hex nut (supplied), firmly tighten the
hex nut to secure the light kit fitter to the switch
cup. Connect the white wire from the switch cup
to the white wire of the light fitter (Figure 2).
Connect the blue wire from the switch cup to the
black wire of the light fitter. Use listed wire con-
nectors (previously removed in Step 5) to make
connections (Figures 2 and 3).
9. Carefully tuck all wires and splices into the switch
cup. (Figure 2.)
10. Connect the motor connector to the switch cup
connector.
11. Position the cup/light fitter in the cover plate and
install the three screws that were previously
removed in Step 2 and tighten securely.
12. Install three 13-watt medium base compact
fluorescent bulbs into the light sockets.
3
SCREWS
SWITCH CUP
MOTOR
CONNECTOR
SWITCH CUP
CONNECTOR
LOCKWASHER
WHITE WIRES
COVER PLATE
WIRE
CONNECTOR
HEX NUT
BLACK WIRE
BLUE WIRE
LIGHT
FITTER
WET LOCATION
PLATE (sold
separately)
LOCKWASHER
HEX NUT
FINIAL
(sold separately)
BOWL CAP
FAN SWITCH
CHAIN
FAN SWITCH
CHAIN
ADJUSTABLE
LIGHT FITTER
Figure 2
Figure 3
WARNING: To avoid possible fire or electrical
shock, make certain no bare wire strands are
exposed outside wire connectors.
To avoid possible fire or electric shock, be careful
not to pinch wires between switch cup and the cover
plate.
WARNING
!
GLASS BOWL
WET LOCATION
PLATE
(OPTIONAL)
FINIAL (sold separately)
FINIAL NUT (Taller Nut)
(sold separately)
Figure 4
NOTE: The FN100 finial pack (sold separately)
comes with three options: no holes, one hole and
two holes for pull chain options.
NOTE: Two finial nuts are supplied with FN100
kit. Use the taller finial nut when a frame is not
being installed.
14. Gently place the glass bowl onto the light fixture
(Figure 4). Then place the finial (sold separate-
ly) onto the threaded light fixture. Tighten the
taller finial nut (supplied with finial) onto the
threaded light fixture (Figure 4).
13. Depending on the model purchased, insert the
fan speed control switch chain through the
offset hole in the glass bowl or the hole in the
bowl cap.
FRAME (OPTIONAL)
GLASS BOWL
WET LOCATION
PLATE
(OPTIONAL)
HEX NUT & FINIAL (sold separately)
FINIAL NUT (Shorter Nut)
(sold separately)
Figure 5
15. If installing an optional frame: Gently slide the
frame over the glass bowl then secure the frame
to the light fixture by placing the hex nut, finial
and shorter finial nut (both sold separately) onto
the threads of the light fixture. Tighten the short-
er finial nut onto the threaded light fixture
(Figure 5).
NOTE: The 9” pull chain extending from the light fixture
is without a chain coupling attached, two chain
couplings are included and pre-installed to the
9” extension pull chain located in the parts bag.
16. Connect the wood pendant (supplied) to the
switch pull chain by sliding the wood pendant
(small hole first) onto the pull chain. Attach the
chain coupling to the end of the chain and allow
the wood pendant to fall down over the
coupling.
NOTE: It is advisable to periodically check the tight-
ness of the finial.
 Loading...