3
GB | Wireless Weather Station
Read this manual carefully before using the product.
Specications
radio-controlled clock
time format: 12/24 h
indoor temperature: -10 °C to +50 °C, 0.1 °C resolution
outdoor temperature: -40 °C to +60 °C, 0.1 °C resolution
temperature measurement accuracy: ±1.5 °C
indoor humidity: 1 to 99 % RH, 1 % resolution
outdoor humidity: 20 to 95 % RH, 1 % resolution
indoor and outdoor humidity measurement accuracy: 5 %
radio signal range: up to 30 m in an open area
transmission frequency: 433 MHz, 10 mW e.r.p. max.
number of sensors: max. 3
power supply:
main station: 2× 1.5 V AAA batteries (not included)
sensor: 2× 1.5 V AA batteries (not included)
dimensions and weight without batteries:
main station: 23 × 76 × 126 mm
sensor: 21 × 38 × 100 mm
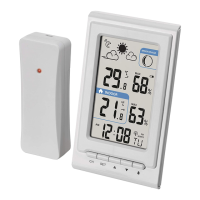
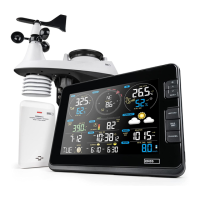
Weather Station Description (Fig. 1)
1 – CH button
2 – SET button
3 – Up arrow button
4 – Down arrow button
5 – Alarm button
6 – Battery compartment
7 – Stand
8 – Hole for hanging
9 – SNOOZE touch button
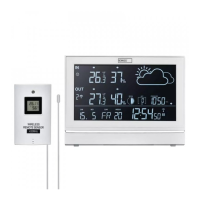
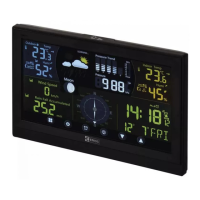
Display Description (Fig. 2)
1 – Sensor number
2 – Weather forecast
3 – Moon phase
4 – Low batteries in the sensor / Memory of
max. and min. outdoor temperature and
humidity
5 – Outdoor humidity
6 – Outdoor temperature trend
7 – Indoor temperature trend
8 – Memory of max. and min. indoor temper-
ature and humidity
9 – Outdoor humidity
10 – DCF signal reception
11 – Daylight saving time
12 – Day of the week
13 – Alarm snooze
14 – Time
15 – Alarm
16 – Indoor temperature
17 – Outdoor temperature
Sensor Description (Fig. 3)
1 – LED
2 – Hole for hanging
3 – Sensor channel number 1/2/3 setting
4 – Battery compartment
Attention
Only use 1.5 V alkaline batteries of the same type; do not use rechargeable 1.2 V batteries.
Lower voltage may cause both of the units to not function.
Getting Started
1. First, insert batteries into the weather station (2× 1.5 V AAA), then into the wireless sensor
(2× 1.5 V AA). Make sure the polarity is correct when inserting the batteries to avoid damaging
the weather station or sensor.