5
Charging mode Accumulator capacity (Ah) Explanation
12 V 1,2–30 Ah
Charging 12 V lead-acid accumulators with liquid electrolyte –
WET, maintenance-free (MF), Ca/Ca, AGM and GEL.
Charging voltage 14.5 V
Charging current 0.8 A
Lithium
12,8 V
LiFePO₄
2–15 Ah
Charging 4-cell LiFePO₄ 12.8 Vaccumulators.
Press and hold the MODE button for 3 seconds to charge 4-cell
LiFePO₄ accumulators. The selected programme is indicated
by a red 12.8 VLITHIUM LED indicator.
Charging voltage 11.6–14.5 V
Charging current max. 0.8 A
7. Press the MODE button and select the required charging programme. The individual charging programmes are described
in the table above.
8. The accumulator is fully charged once the green 100 % LED icon lights up. The icon for the selected charging programme
will be glowing as well. The charger moves to Stage 7 for maintenance charging mode II.
9. After charging is complete, unplug the adapter from the socket. Then disconnect the terminal from the negative pole.
Finally, disconnect the terminal from the positive pole.
10. Charging can be stopped at any time by unplugging the power cable from the socket. If the charger is disconnected from
the power socket, whether intentionally or not, the charger will remember the previously selected charging mode once
power is restored. It will then continue charging until the accumulator is fully recharged.
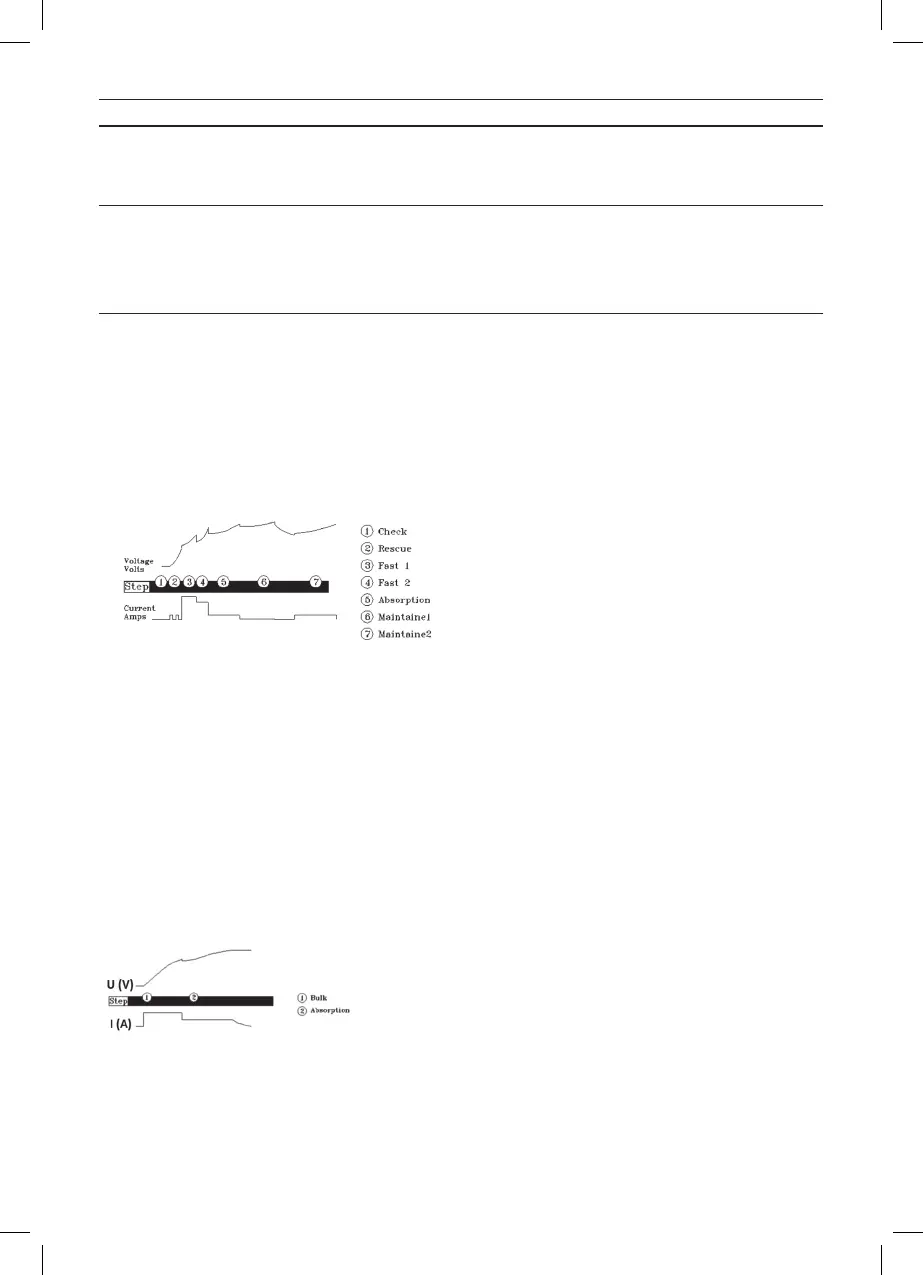
Charging Stages for 6 V/12 V Lead-Acid Accumulators
Stage 1 – Diagnostics: The charger performs diagnostics of the connected accumulator (detects voltage). Determines the
condition of the accumulator. The diagnostics take approximately 3 s.
Stage 2 – Restoration: If the voltage of a highly discharged accumulator is 2–5.25 V (in 6 V accumulators) and 7–10.5 V
(in 12Vaccumulators), the charger begins pulse CC charging to restore the accumulator. Once voltage reaches
10.5Vin 12 Vaccumulators and 5.25 Vin 6 Vaccumulators, the charger switches to charging mode I. If the voltage in
the accumulator is over 10.5 Vor 5.25 V, the charger skips the restoration process and switches to charging mode I.
Stage 3 – Charging I: Charging with lower current of 0.4 A to approximately 80 % of accumulator capacity. Lasts until
voltage reaches 12 Vfor 12 V accumulators and 6 Vfor 6 V accumulators.
Stage 4 – Charging II: Charging with higher current of 0.8 A until voltage in the accumulator reaches 14.1 Vfor 12 Vaccu-
mulators and 7.05 Vfor 6 V accumulators.
Stage 5 – Absorption: Charging with low current of 0.4 A to increase voltage from14.1 Vto 14.5 V (for 12 Vaccumula-
tors) and from7.05 Vto 7.3 V (for 6 Vaccumulators). In this stage, the accumulator is almost 100 % charged.
Stage 6 – Maintenance charging I: Maintains voltage in the accumulator at maximum by providing constant charging
voltage.
Stage 7 – Maintenance charging II: Maintains the accumulator at 95–100 % of its capacity. The charger monitors the
voltage in the accumulator and sends an impulse when needed to keep the accumulator fully charged.
Charging Stages for LiFePO₄ 12.8 V Accumulators
Stage 1 – Diagnostics: The charger performs diagnostics of the connected accumulator – detects voltage: the value must
be 11.6–13.8 V. If voltage is not within this range, the charger will not begin the charging process for safety reasons.
Determines the condition of the accumulator. The diagnostics take approximately 3 s.
Stage 2 – Charging I: Charging with higher current of 0.8 A until voltage in the accumulator reaches 14.1 V.
Stage 3 – Absorption: Charging with low current of 0.4 A to increase voltage from14.1 Vto 14.5 V.