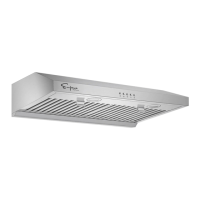
This document describes the Empava Undercabinet Range Hood, models EMPV-30RH11 and EMPV-36RH12, an appliance designed to vent cooking fumes and odors from a kitchen. The manual provides comprehensive instructions for installation, operation, and maintenance, emphasizing safety precautions throughout.
Function Description
The Empava Undercabinet Range Hood serves as a ventilation system for kitchen cooktops, effectively removing smoke, grease, and cooking odors from the air. It operates by drawing air through baffle filters and expelling it outside the home via a duct system. The range hood features multiple fan speeds to accommodate different cooking intensities, from light simmering to high-heat cooking and flambeing. It also includes integrated LED lighting to illuminate the cooking surface, enhancing visibility and safety during food preparation. The design allows for flexible installation, either under a cabinet or directly on a wall, catering to various kitchen layouts. The range hood is equipped with a control panel that allows users to easily manage fan speeds and lighting.
Usage Features
The range hood's operation is straightforward, managed through a user-friendly control panel.
- Fan Speed Control: The panel includes buttons for "Stop," "Low," "Mid," and "High" fan speeds. Pressing "Stop" turns off the motor. Selecting "Low," "Mid," or "High" activates the motor at the corresponding speed, with a buzzer sounding once to confirm the selection. This allows users to adjust the ventilation power based on the intensity of their cooking. For instance, lower speeds are suitable for light cooking, while higher speeds are recommended for heavy cooking or when dealing with strong odors.
- Lighting Control: A dedicated "Light" button on the control panel toggles the integrated LED lights on and off. When pressed, two lights illuminate the cooking area. Pressing it again turns the lights off. This feature provides essential illumination for the cooktop, improving visibility and safety.
- Adapter Options: The range hood comes with three different adapters to facilitate various venting configurations: a 6" Top Round Adapter, a 3-1/4" x 10" Top Rectangular Adapter, and a 3-1/4" x 10" Rear Rectangular Adapter. These options allow for versatile ducting to the roof or wall, ensuring compatibility with different kitchen designs and existing ventilation systems. Three adapters and one top cover are included, offering flexibility for installation.
- Pre-Installation Testing: Before full installation, the manual strongly recommends a test run to check for any defects or shipping damage. This involves carefully unpacking the hood, inspecting for dents, removing loose parts, plugging it into a 120V AC power source, and verifying all fan speeds and lights are working correctly. This crucial step helps identify potential issues early, preventing the installation of a faulty unit.
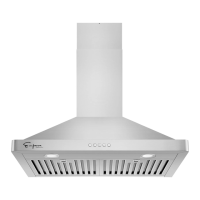
- Installation Flexibility: The range hood can be installed either under a cabinet or directly on a wall without a cabinet. For under-cabinet installation with a recessed bottom, a 4" wide wood filler strip (not provided) is required on each side. For wall-mounted installation, the baffle filters are temporarily removed, and mounting brackets are used to secure the hood to studs or lumbers. This adaptability ensures the hood can be integrated into various kitchen designs.
- Safety Warnings: The manual includes important safety instructions, such as wearing gloves to protect against sharp edges during installation and maintenance. It also warns against operating the hood without safety grills and filters, disposing of ignitable substances into blowers, leaving cooking appliances unattended, and cooking with open flames directly under the hood. These warnings are crucial for preventing fires, electrical shocks, and personal injury.
Maintenance Features
Regular maintenance is essential to ensure the range hood operates efficiently and safely. The manual outlines clear procedures for cleaning and replacing components.
- Cleaning Exterior Surfaces: To maintain the aesthetic and functionality of the range hood, the exterior surfaces should be cleaned regularly. It is crucial to use non-corrosive and non-abrasive detergents, avoiding steel wool, scoring pads, or harsh chemicals like salt solutions, disinfectants, bleaches, or cleaning compounds containing harmful chemicals. The recommended method involves using a damp paper towel or soft cloth with a liquid detergent, rinsing with clean water, and wiping dry with a towel. For stainless steel surfaces, a non-abrasive stainless steel polisher can be applied after cleaning to restore luster and grain.
- Cleaning or Replacing Baffle Filters: The baffle filters are critical for collecting oil and grease. They should be cleaned every 2 to 3 months, or more frequently depending on cooking habits. To clean, pull the spring release handle and remove the filter by pulling it down. The filters can be washed in a dishwasher or soaked in hot or warm water with dish detergent for at least half an hour, then wiped clean until no oil residue remains. After cleaning, the filters must be thoroughly dried before reinstallation, ensuring the spring release handle faces the front. If filters become worn out due to aging or prolonged usage, they should be replaced immediately.
- Replacing LED Lamps: The range hood uses 120V LED lamps (Model No.: GU10). Before replacing a lamp, it is imperative to disconnect power to prevent electrical shock. This can be done by unplugging the range hood or turning off the breaker. To remove a defective lamp, press on its rim and twist counter-clockwise to unlock it. A flathead screwdriver may be used if needed. To install a new lamp, align it, put it back into position, press on the rim, and twist clockwise to lock it. After replacement, plug in the range hood or turn on the breaker and check if the new lamp is working properly.
- Duct System Maintenance: The manual emphasizes the importance of keeping the duct system clean to ensure proper airflow. It also advises sealing all joints in the venting duct system with aluminum foil tape or duct tape and using caulking silicone to seal exterior wall or roof openings around the cap. These steps prevent air leakage and maintain the efficiency of the ventilation.
- Troubleshooting Guide: The manual includes a troubleshooting section to help users address common issues such as the hood not turning on, lights not working, vibrations, weak blower performance, or improper venting. This guide provides possible causes and solutions, encouraging users to attempt basic fixes before contacting customer service. For instance, if the blower seems weak, users are advised to check if the duct is clogged or if the damper is installed correctly. If the hood vibrates, tightening mounting screws is suggested. This self-help section empowers users to resolve minor problems quickly.