This document is an installation and operation manual for an Empava range hood.
Function Description
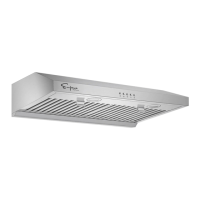
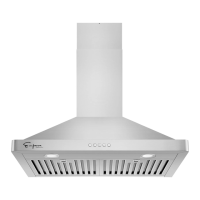
Empava range hoods are designed to provide efficient and high-quality ventilation for residential kitchens. They are engineered to keep the kitchen clean and fresh by powerfully exhausting air. The range hoods feature fan blades coated with Teflon, which contributes to their performance. They are equipped with stainless steel baffle filters, designed to simplify cleaning, and a stainless steel grease collection tray. The range hoods offer three levels of exhaust power, allowing users to adjust the ventilation according to different cooking styles, optimize energy use, and reduce noise levels.
Usage Features
The range hood is intended for general residential kitchen ventilation. It should not be used to expel hazardous or explosive materials or vapors. For optimal performance, the range hood should always be turned on when cooking, especially when cooking at high heat or with foods on flame. The unit features an ultra-quiet motor and a touch control panel with three speed settings. For models with push buttons, there are separate buttons for turning the light on/off, selecting high speed, medium speed, and low speed, and turning the unit on/off.
The installation height is crucial for proper operation; the distance between the stove surface and the underside of the range hood must be between 26 and 30 inches (30 inches if using a gas stove). The vent duct length should be minimized to avoid air turbulence. The range hood must be installed level to prevent improper operation, leaks, and oil spillage.
The touch control panel includes a timer setting, allowing users to set a specific time for operation. There is also a 1-minute delay turning off function, which can be overridden to turn off immediately. The clock setting allows users to set the hour and minute.
Electrical power provision requires turning off electricity at the circuit panel before installation to prevent electrocution. If the range or stove needs to be moved, its power or gas supply must be turned off. The range hood comes with two wiring locations, and the user should choose the one best suited for their situation, ensuring it does not affect the level or stability of the unit. The range hood must be firmly attached to the cabinet, with wooden straps installed if necessary for mounting.
Maintenance Features
Regular cleaning and maintenance are essential for the range hood's longevity and performance. Before any cleaning, the power supply must be disconnected. A neutral detergent should always be used to clean the surface of the hood after each use. Both the exterior and interior of the hood should be cleaned regularly to maintain its condition, and abrasive cleaners should be avoided.
The fan's baffle filters are detachable and dishwasher safe, simplifying their cleaning process. They must be reinstalled after cleaning. The grease collection pan, located in the center of the hood, can also be detached and cleaned regularly to prevent spills. It is recommended to turn on the hood fan before starting to cook to avoid high heat accumulation in the kitchen.
For deeper cleaning, the range hood does not need to be dismantled entirely. A degreaser can be sprayed directly into the dual vane guards and vanes, allowed to sit for 3-4 minutes, and then the unit can be turned on. The centrifugal force of the turbo fans will drain the grease into the oil container, which then simply needs to be emptied.
When dismantling parts for cleaning, such as the oil container, base plate, vane, vane cap, and stainless steel baffle filters, they should be immersed in water with neutral detergent for 30 minutes, then washed with a nylon brush. All parts must be completely dry before reinstallation. During dismantling, re-installation, or cleaning, it is important to wear latex or rubber gloves for safety. Water or any other liquid should never be spilled or sprayed on or inside the motors. If any power cord is damaged, it should only be replaced by an authorized person or qualified electrician. Users should not attempt to repair the range hood themselves. Before dismantling, cleaning, or re-installing, users should note the name, quantity, and location of all parts to prevent loss or incorrect installation.
The replacement of LED lights involves ensuring all control switches are off and the range hood is unplugged. A flat head screwdriver can be used to pop out the LED light assembly, disconnect the internal wires, and remove the old light. A new LED light assembly is then installed by reconnecting the internal wires and pushing the assembly back into the lamp hole. After re-plugging the range hood, the light switch should be checked to confirm all connections.
Troubleshooting guidance is provided for common issues such as no power, motor not running, body vibration, noise vibration, weak suction, and light not working, along with recommended solutions and necessary tools (Philips screwdriver). It is emphasized that the power supply must be disconnected before servicing.