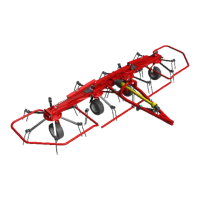
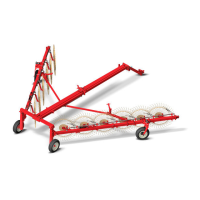
This document describes the VORTEX G6-740 - G8-980 PROFI LINE Hay Tedder, an agricultural machine designed for spreading, aerating, and turning cut forage to ensure uniform and early drying, leading to high-quality forage. Once dried, the forage can be collected by a baling press.
The hay tedder operates when connected to a tractor's towing hook and its working units are rotated by a cardan shaft attached to the tractor's Power Take-Off (PTO).
Important Technical Specifications
The manual provides the following technical specifications for the G6-740 PROFI LINE and G8-980 PROFI LINE models:
- Working width:
- G6-740: 745 cm
- G8-980: 980 cm
- Transport width:
- Tine holder arms:
- Tines:
- PTO speed: 540 rpm for both models
- Tractor power:
- G6-740: 60 Hp
- G8-980: 70 Hp
- Tractor working speed: 8 ÷ 15 km/h for both models
- Cardan shaft with torque limiter: 1200 Nm for both models
- Tires mounted on towing chassis: 340/55 R16 (2 tires for both models)
- Bearing wheels: Ballon 16.650-8 (6 wheels for both models)
- Weight:
- G6-740: 1600 kg
- G8-980: 2000 kg
The data provided for working width, transport width, tractor power, and weight are indicative and not binding.
Usage Features
The hay tedder is designed for use by a qualified, adult operator trained in its operation. The operator must be familiar with this manual, all adhesive labels, and safety regulations.
Installation:
The hay tedder can be installed on any tractor with a long hitch, rear auxiliary hydraulic outlets, and the technical requirements specified in the manual (e.g., 540 rpm PTO speed). Installation must be performed by qualified operators in a flat, clear area.
- Centring: Slowly approach the hay tedder with the tractor. An operator on the ground uses the bearing foot crank to align the hay tedder's coupling point horizontally with the tractor's.
- Coupling: Insert the locking pin into the coupling holes and secure it with an R cotter pin or safety pin.
- Bearing Foot Adjustment: After coupling, lift the bearing foot from the ground using its crank. For transport and working phases, rotate the bearing foot 90° and secure it with the handle pin and R cotter pin.
- Cardan Shaft Installation: The cardan shaft (standard length) must be adapted to the tractor. Remove protections, attach one half to the hay tedder PTO and the other to the tractor PTO, ensuring safety spring pins click into place.
- Important: Before installation, ensure the cardan shaft meets power and PTO speed requirements.
- Important: When the cardan shaft is pulled out to the maximum, the two tubes must overlap by at least 1/3 of L. When fully inserted, the minimum backlash allowed is 4 cm.
- Block protection tubes with chains on both the hay tedder and tractor to prevent rotation. Overlap between guard and cardan shaft must be at least 5 cm.
- Hydraulic Connections: Connect the piping for opening/closing outer sections and lifting rotary units to the tractor's auxiliary hydraulic circuit. Piping 2 (red and green lines) connects to double-effect outlets, and piping 1 (yellow line) connects to a simple-effect outlet.
- Electrical Connections: Plug the hay tedder's electrical connector (7 poles - E3) into the tractor's auxiliary circuit socket to power the rear signaling panels and headlights.
Preliminary Checks Before Operation:
- PTO disengaged, 540 rpm selected. Never engage PTO with the engine off.
- All disc mower parts are in correct positions and securely fastened.
- Equipment is correctly hooked to the tractor.
- Guards are efficient, and transmission is not blocked (clean around cardan shaft and rotating units).
- Perform daily maintenance checks if not already done.
Working Configuration (Activation):
- Ensure the area around the machine is clear of objects, people, and animals.
- Transition from transport to working configuration (or vice versa) only with the tractor stopped, on a flat surface, and with the PTO disengaged.
- In the cabin, lift the lateral sections using the corresponding lever until they reach the end field configuration.
- Important: The operating sequence involves extending the central front cylinder first, followed by the lateral ones. Three limit switches ensure correct execution.
- Adjust valve B2 (green line) if operating speed is too slow or fast.
- Lower lateral sections into working configuration using the lever in the cabin.
- Adjust valve C2 (yellow line) if operating speed is too slow or fast.
- Ensure the distance between the teeth and the ground is 2-4 cm. Adjust using the lever on the towing bar if necessary.
- Ensure no people or animals are in the dangerous areas.
- Return to the tractor, release the parking brake, and engage the PTO.
Working Process:
With the tractor moving and the rotary units and tines rotating, the hay aeration process begins.
Adjustments:
- Forage/Dampness: Adjust rotary groups to maximum distance (4 cm) for a lot of forage or damp forage. Use 2 cm distance for little or dry forage.
- Changing Direction/Reverse: Lift the equipment into end field configuration before reversing or changing direction at the end of the field.
Transport Configuration:
- Disengage PTO.
- Switch off the tractor engine.
- Pull the parking brake.
- Put the gear lever in neutral.
- Remove the ignition key.
- Lower lateral sections until they rest on the chassis for transport.
- Adjust valve D2 (red line) if operating speed is too slow or fast.
- Road Transport:
- Do not carry passengers, people, animals, or things on the tractor or equipment.
- PTO must be disengaged.
- Adapt driving speed to road conditions, not exceeding 32 km/h (20 mph).
- Apply specific reflective and fluorescent panels (yellow and red stripes) to highlight equipment dimensions.
- If the hay tedder obscures tractor lights, duplicate them on a rear bar.
- Total weight (tractor + hay tedder) must not exceed 20% of the tractor's normal weight. Drive at moderate speed, especially on rough roads.
- Follow local road circulation regulations.
Safety:
- Always wear Personal Protective Equipment (PPE) during any intervention (assembly, disassembly, installation, removal, adjustment, maintenance). This includes safety glasses, ear defenders, safety shoes, gloves, helmet, and tight-fitting clothing.
- Do not use mobile phones or headphones while driving or using machinery.
- Loading and unloading operations are dangerous; always proceed with caution on level ground, away from edges.
- Ramps must be robust, firmly anchored, parallel, and perpendicular to the vehicle side, and clean of oil/grease/ice.
- Never change direction on ramps during ascent or descent.
- Do not use the equipment with broken or damaged parts.
- Perform maintenance only with the equipment stopped, PTO disengaged, and tractor engine off.
- Do not use the equipment if the cut product is wet or damp, on stony ground (stones over 10 cm diameter), or on ground with many shrubs.
- Do not operate near masonry.
- Stop work immediately if noisy vibrations occur, or if in proximity to resistant objects (manholes, wells, trees) to avoid damage and projection of pieces.
- The hay tedder must only be used on tractors equipped with protective roll bars or ROPS/FOPS homologated cabins.
- The Manufacturer is not liable for accidents due to operator negligence or non-compliance with safety regulations.
- The warranty is void if the equipment is used improperly, modified without authorization, or with non-original spare parts.
Maintenance Features
Maintenance interventions are for information only and refer to normal use conditions. More burdensome conditions may require increased frequency of interventions.
Precautions During Maintenance:
- Perform interventions on a flat, well-lit surface, clear of people, animals, or objects.
- Equipment must be firmly on the ground, tractor blocked, parking brake pulled, engine switched off, and ignition key removed.
- If lifting the hay tedder, secure it with wood or metal pieces.
- Display a "Machine under Maintenance" warning sign on the tractor dashboard.
- Complete all maintenance and repair operations once started.
- Always read and accurately follow instructions in this manual.
- Do not use improper tools or substances (e.g., gasoline for cleaning).
- After maintenance, clean the area of water, oil, grease, rags, tools.
Maintenance Tasks Table:
| Task |
First |
Daily |
Bi-weekly |
Monthly |
Yearly |
| Check screws and nuts tightening |
X |
|
|
|
|
| Greasing of joints and internal parts of cardan shafts |
|
X |
|
|
|
| Grease nipples top-up (*1) |
|
|
X |
|
|
| Check screws and nuts tightening |
|
|
X |
|
|
| Check of parts subject to wear and pressure (tines / wheel tires) |
|
|
X |
|
|
| Check presence and integrity of pins and relative safety pins |
|
|
X |
|
|
| Check for leaks or spillage of hydraulic oil (*2) |
|
|
|
X |
|
| Check lubricant oil of gear box (*3) |
|
|
|
X |
|
| Check tyre wear and pressure (see page 33) |
|
|
|
X |
|
| Check integrity of adhesive labels and pictograms |
|
|
|
|
X |
| Check entire structure |
|
|
|
|
X |
| Check integrity of hydraulic pipes protective sleeves (*2) |
|
|
|
|
X |
| Replacement lubricant oil of gear box |
|
|
|
|
X |
- Note 1 (Grease): Refuel grease nipples using a specific pump. Use Grease MU EP 2.
- Note 2 (Hydraulic Leaks): Check for leaks of pressurized fluid with extreme caution. Use protective gloves and goggles. Use cardboard or wood to check for leaks.
- Note 3 (Gearbox): All hay tedders have an oil-immersed transmission gearbox.
Tine Replacement:
To replace worn or broken tines, unscrew the locking nut (5), extract the fastening screw (3) with its tine-stop plate (2), and pull the pair of teeth (4) from the equipment arm (1). Insert a new pair and reverse the removal steps.
Installation of Tine-Holder Clamp (Optional):
To install the protective clamp (1) in case of tine breakage, insert it from the bottom, position it after the tines bend, and secure it with locking screws and nuts (2).
Tyres:
- 16.650.8 type: Max pressure 2.9 bar (42.06 PSI), operating pressure 1.6 ÷ 2 bar (23.20 ÷ 29 PSI).
- 340/55-R16 type: Max pressure 4.2 bar (60.91 PSI), operating pressure 4 bar (58.01 PSI).
- Hazard: Avoid excessive inflation pressure to prevent tire explosions.
Troubleshooting:
- Jerky hydraulic cylinders:
- Cause: Air in hydraulic circuit.
- Remedy: Run the hay tedder empty for several minutes to bleed air. Check oil level in tractor hydraulic tank.
- Hydraulic cylinder not activating:
- Cause: Cylinder gasket worn out.
- Remedy: Replace the gasket.
- Partial or insufficient forage harvesting:
- Cause: Tines too high from the ground.
- Remedy: Adjust the distance of teeth from the ground (see page 15).
- Rapid tine wear:
- Cause: Tines continuously in contact with the ground.
- Remedy: Adjust the distance of teeth from the ground (see page 15).
Noise Level:
The sound level at the driver's seat varies by tractor cab type. Operators must wear appropriate hearing protection if the sound level reaches or exceeds 85 dB(A). This device should be available on the tractor if the sound level reaches or exceeds 80 dB(A).
Material Disposal:
When decommissioning, make parts harmless. Materials (iron, lubricating oil, rubber) must be disposed of according to applicable laws.