The Entel DX-IS Series is a range of commercial-grade intrinsically safe radios, certified to UL913 5th Ed by SGS. These radios are designed and manufactured in the United Kingdom and are available in various configurations, including models with and without a display, and for UHF and VHF frequencies (VHF models are analogue only). The DX-IS Series can be configured with both Digital and Analogue channels, tailored to meet specific user requirements by an Entel Dealer.
Function Description:
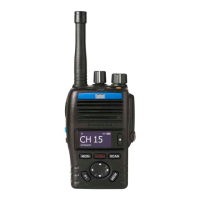
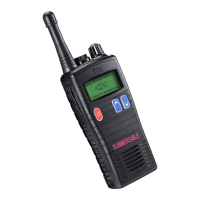
The DX-IS Series radios are primarily used for two-way communication. Users can transmit and receive audio signals, with the ability to select different channels. The radios feature a Push-To-Talk (PTT) button for initiating transmissions and an on/off/volume control for managing power and audio levels. Display models offer enhanced functionality such as channel navigation, quick access to specific channels, and scanning of memorised channels.
Important Technical Specifications:
- Certification: Intrinsically safe certified to UL913 5th Ed by SGS.
- Channel Types: Supports Digital and Analogue channels (VHF models are analogue only).
- Battery Type: Rechargeable Li-Ion battery (CNB450E-IS).
- Charging Time: A fully discharged battery pack takes approximately 3 hours to recharge.
- Storage Temperature: -20°C to +25°C.
- Humidity Range: 65 ±20%RH.
Usage Features:
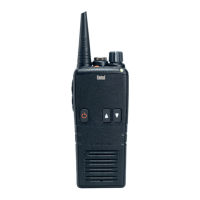
Controls & Indicators:
- On/Off/Volume Control (1): Rotates clockwise to turn on and increase volume, and anticlockwise to reduce volume and turn off.
- Channel Control (2): Used to select different communication channels.
- Accessory Socket (3): For connecting external accessories.
- Push-To-Talk (PTT) Button (4): Press to speak, release to listen.
- Dealer Programmable Buttons (5): Customisable buttons configured by the Entel Dealer for specific functions.
- LED Indicator (6): Provides visual feedback on the radio's status:
- Red Steady: Transmitting
- Red Double Flash: Low Battery
- Red Fast Flash: Error
- Green Steady: Receiving
- Green Steady (AM): Monitoring Channel
- Green Slow Flash (DM): Digital call hang time
- Amber Steady: Receiving invalid signal
- Amber Flash every 5-seconds: Radio in standby
- Amber Rapid Flash: Scanning
- Navigation Key (7) (Display Models): Channel up/down control.
- Microphone (8): For voice input during transmission.
- Monitor (9) (Display Models): Activates the monitor function.
- Quick Access Channel 16 (10) (Display Models): Direct access to channel 16.
- Scan Memorised Channels (11) (Display Models): Initiates scanning of pre-programmed channels.
- Programmable Button (12) (Display Models): A customisable button.
- Memorise Channels for Scan (13) (Display Models): Used to add channels to the scan list.
Preparing Your Radio for Use:
- Attaching/Removing the Antenna: Align the antenna with the socket and screw clockwise until finger-tight. To remove, unscrew anticlockwise. Ensure the accessory cover's rubber ring is seated firmly between the antenna and the radio top.
- Attaching/Removing the Battery Pack: Locate the pegs on the battery bottom into the radio's slots. Pull the two latches downwards, push the battery into the radio, and then release the latches to secure it. To remove, pull down the latches and pull the battery away from the radio.
Switching On, Reception, and Switching Off:
- Rotate the on/off/volume control clockwise until a click is heard.
- The radio will emit a fanfare tone after diagnostic tests.
- It enters standby mode, indicated by an amber LED flash every 5 seconds.
- Adjust volume with the volume control.
- Select the desired channel using the channel control.
- Upon receiving a valid signal, the LED illuminates steady green, and audio is emitted from the speaker or accessory.
- To switch off, rotate the on/off/volume control anticlockwise until it clicks.
Transmitting:
- Ensure the radio is on and the correct channel is selected.
- Monitor the channel to ensure it is clear before transmitting.
- Wait for any ongoing signals to stop, as the radio cannot transmit and receive simultaneously.
- Press the PTT button (4) to begin transmission. The LED will illuminate red.
- For optimal speech quality, speak directly into the microphone (8) at approximately 4cm from your mouth. Speaking into the top of the radio or from a greater distance will result in poor quality speech.
- Release the PTT button when transmission is finished.
- Charging: Connect the AC adapter to the charger pod and plug in. Turn the radio off. Insert the battery pack (with or without the radio) into the charger pod. The charger LED will turn red during charging and green when complete. A flashing red LED indicates a battery problem.
- Precautions: Do not recharge an already full battery. Remove the battery after charging is complete. Ensure the radio is off before placing it in the charger. Only use battery pack product code CNB450E-IS. Do not short battery terminals or dispose of in fire. Do not charge wet radio/battery packs. Risk of explosion if replaced by incorrect type. Dispose of used batteries properly. Keep out of reach of children.
- Danger: Do not disassemble or modify the battery. The battery pack includes a safety circuit; damaging or bypassing it can lead to extreme heat, smoke, rupture, and flames.
Maintenance Features:
- Accessory Connector Protection: To prevent corrosion or damage to the accessory connector terminals, ensure either the accessory cover is fitted or an accessory is securely fitted. Never leave the terminals exposed.
- Approved Accessories: Only use Entel original accessories. Use of non-approved 3rd party accessories will invalidate the intrinsically safe approval.
- Repair & Maintenance: Repair and maintenance of this product can only be carried out by Entel. Any damage to the anti-tamper seal will invalidate the product approval. For support, contact your Entel Dealer.