5
English
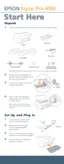
Setting up the printer
Connecting the power cord
1. Check the label on the back of the printer to
make sure the voltage required by the printer
matches that of the power outlet you will be
pulled it into. Also, make sure that you have
the correct power cable for your power source.
c
Caution:
It is not possible to change the printer’s
voltage. If the rated voltage and your outlet
voltage do not match, do not plug in the
power cord, and contact your dealer for
assistance.
2. Connect the power cord to the AC inlet on the
back of the printer.
3. Plug the power cord into a properly grounded
electrical outlet.
c
Caution:
Do not use an outlet that is controlled by an
automatic timer or wall switch. Otherwise,
accidental shut down or damage to your
printer may occur.
Installing the paper tray
Insert the paper tray into the slots at the front of
the printer.
Installing the Ink Cartridges
w
Warning:
The ink cartridges are self-contained units.
Under ordinary use, ink will not leak from the
cartridges. If ink does get on your hands, wash
them thoroughly with soap and water. If ink gets
into your eyes, flush them immediately with
water.
Note:
❏ The ink cartridges packed with your printer are
only for the initial ink charging.
❏ Because the initial ink charging consumes a large
quantity of ink, you may need to replace the ink
cartridges soon.
❏ The initial ink charging requires approximately 8
minutes.
❏ The UltraChrome ink cartridges for Stylus Pro
7600/9600 can also be used with this printer.
AC inlet

 Loading...