7
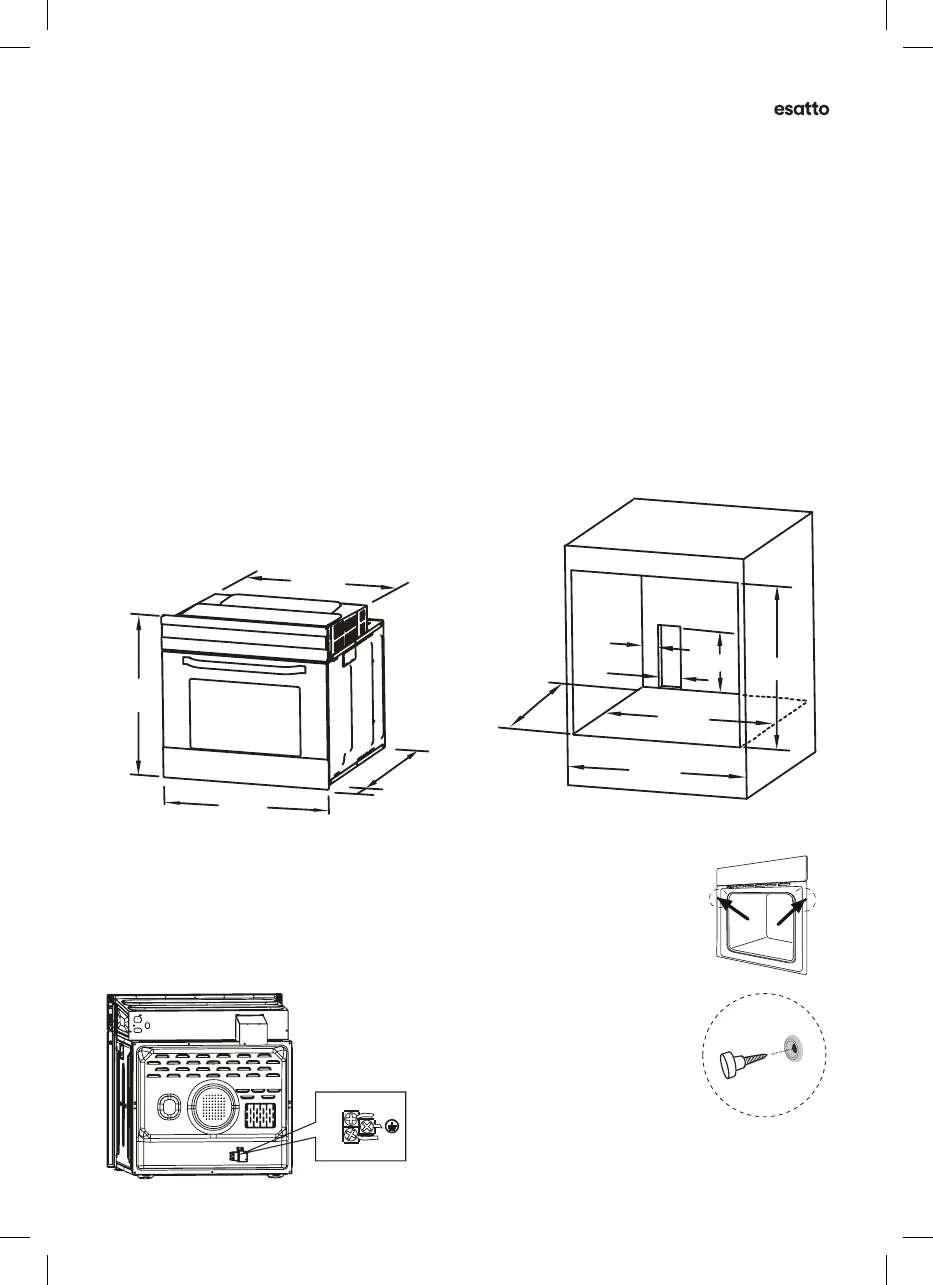
FITTING THE OVEN INTO THE KITCHEN UNIT
Fit the oven into the space provided in the kitchen unit; it may be tted underneath a work
top or into an upright cupboard. Fix the oven in position by screwing into place, using the two
xing holes in the frame. To locate the xing holes, open the oven door and look inside. To allow
adequate ventilation, the measurements and distances adhered to when xing the oven.
IMPORTANT: If the oven is to work properly, the kitchen housing must be suitble. The pnels of the
kitchen unit tht re next to the oven must be mde of het resistnt mteril. Ensure tht the glues
of units tht re mde of veneered wood cn withstnd tempertures of t lest 120º C. Plstics or
glues tht cnnot withstnd such tempertures will melt nd deform the unit, once the oven hs
been lodged inside the units, electricl prts must be completely insulted. This is legl sfety
requirement. All gurds must be rmly xed into plce so tht it is impossible to remove them
without using specil tools. Remove the bck of the kitchen unit to ensure n dequte current
of ir circultes round the oven. The hob must hve rer gp of t lest 45mm.
Note:
• The cvity is not to include the power switch or socket.
• The oven cbinet dimensions re in millimetres (mm)
SECURING THE OVEN TO THE CABINET
1. Fit oven into the cbinet recess.
2. Open the oven door nd determine the loction of the mounting screw holes.
3. Fix the oven to the cbinet with two screws..
CONNECTION OF THE OVEN
Instlltion Instructions
NOTE: The number of accessories included depends on the particular appliance purchased.
INSTALLATION
Remark:
1.Only plus deviations are admissible for all dimension.
2.The cabinet is not include the power switch or socket.
CONNECTION OF THE OVEN
L
N
VENTILATING OPENINGS
When cooking is finished or in pause state or in waiting state, if the oven's center temperature is
over 75 degree, the cooling fan will continue working for 15 minutes. Or when the oven's center
temperature becomes lower than 75 degree, the cooling fan will stop in advance.
Ventilating openings
555
20
595
595
560
570
min.
560
606
600
80
250
100
NOTE: The number of accessories included depends on the particular appliance purchased.
INSTALLATION
570
min.
560
606
600
80
250
100
Remark:
1.Only plus deviations are admissible for all dimension.
2.The cabinet is not include the power switch or socket.
VENTILATING OPENINGS
CONNECTION OF THE OVEN
Ventilating openings
L
N
When cooking is finished, if the temperature of ventilating openings is over 70 degree, the cooling
fan will continue working. The cooling fan will not stop working until the temperature becomes
lower than 60 degree.
555
20
595
595
560
BULB REPLACEMENT
For replacement, process as follows:
1> Disconnect power from the mains outlet or switch off the circuit breaker of the unit's mains outlet.
2> Unscrew the glass lamp cover by turning it counter-clockwise (note, it may be stiff) and replace
the bulb with a new one of the same type.
3> Screw the glass lamp cover back in place.
NOTE: Only use 25-40W/220V-240V , T300°C halogen lamps.
SHELF PLACEMENT WARNING:
OR
To ensure the oven shelves operate safely, correct placement of the shelves between the side
rail is imperative. Shelves and the pan only can be used between the first and fifth layers.
The shelves should use with the right direction, it will ensure that during careful removal of the
shelf or tray, hot food items should not slide out.
SECURING THE OVEN TO THE CABINET
1. Fit oven into the cabinet recess.
2. Open the oven door and determine the location of the mounting
screw holes.
3.
Fix the oven to the cabinet with two screws.
 Loading...