Do you have a question about the ESCALADE SILVERBACK B8403 and is the answer not in the manual?
Read manual, check parts, use hardware identifier, and prepare tools before starting assembly.
Ensure solid mounting surface and inspect area for integrity and wiring before installation.
Maintain minimum 122" height and heed assembly weight warnings requiring two adults.
Avoid dunking, wear safety gear, inspect equipment regularly, and address rust promptly.
Do not hang on the system or lift items; follow proper use to avoid damage and voided warranty.
Identifies wall bracket, lower/upper board arm assemblies, and actuator components.
Details the actuator, actuator cover, and related parts.
Lists lower/upper actuator braces, board arm braces, actuator crank, and spacer.
Lists backboard, mounting plates, channel, break-away rim, net, and cover plate.
Details various hex head bolts, HHCS, and thread forming screws with quantities.
Lists M12, M10, and M8 lock nuts and associated washers with quantities.
Consult professionals for mounting and avoid brick surfaces to ensure safety.
Maintain 122" clearance from wall bracket to playing surface for proper operation.
Use caution on ladders; assembly is heavy, requiring two adults for safety.
Verify pre-installed plastic bushings in arm sleeves before proceeding with assembly.
Use M10 hardware and tighten loosely until assembly is complete, as per diagram.
Assemble using M10 and M8 hardware, tightening loosely to allow for other parts.
Use M10 hardware, tighten loosely, and orientate parts as per the assembly diagram.
Ensure plastic bushings are correctly installed in metal sleeves of upper arms.
Assemble using M10 bolts and nuts, tightening loosely as instructed.
Use M8 hardware, tighten loosely to attach remaining parts.
Requires two people to attach actuator to braces, tightening hardware loosely.
Use actuator handle to align holes in upper board arms for proper attachment.
Ensure bolt heads are on the inside of the bracket; tighten hardware securely.
Note the correct orientation for mounting plate item #14 during installation.
Turn the actuator clockwise to lower the board arms parallel to the playing surface.
Requires two people; rest backboard on arms and slide to align holes with bracket.
Exercise extreme caution when using ladders for assembly steps.
Helper secures upper arms to mounting plates while holding backboard, arms inside brackets.
Rotate lower arms up, then rotate backboard down onto threaded studs from the mounting channel.
Attach rim after removing protective coating, level it, and fully tighten hardware.
Never use the rim with its coverplate removed to avoid damage or injury.
Tighten all bolts and nuts starting from wall bracket to board arm joints, moving towards the backboard.
Tighten snug but do not crush tubes; back off half a turn after feeling snug.
Raise unit to 10' height, measure from playing surface, and mark actuator for consistent height.
Clean backboard with a 100% cotton cloth and glass cleaner only.
Lubricate pivot points every 6 months and address rust by sanding, priming, and painting.
Do not crank goal over 10' and do not allow children to adjust the system.
Covers defects in material and workmanship, void if damaged by accident, negligence, or improper use.
Excludes public assembly use, abuse, vandalism, paint, rust, and hanging on the rim.
Requires proof of purchase and a return authorization number for warranty claims.
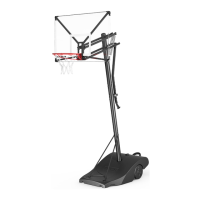
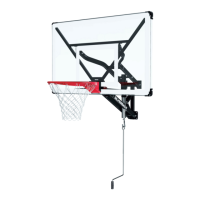
This document is an assembly and maintenance manual for the Silverback 54" Wall Mount Basketball System, Model No. B8403.
The Silverback 54" Wall Mount Basketball System is designed for normal recreational use. It is a wall-mounted basketball hoop system that allows for height adjustment. The system includes a backboard, a break-away rim, and a net, all supported by a wall bracket and a series of board arms and braces that allow for the adjustment mechanism.
| Brand | ESCALADE |
|---|---|
| Model | SILVERBACK B8403 |
| Category | Sports & Outdoors |
| Language | English |