Do you have a question about the ESCALADE Stiga T8612 and is the answer not in the manual?
Read manual carefully, check parts, use hardware identifier, do not overtighten, use proper tools, and save receipt.
Instructions not to return product to store, providing contact phone, fax, email, and mailing address.
Information on visiting the website for troubleshooting, parts requests, technical assistance, and FAQs.
Align and secure U-supports and U-legs to the table top, ensuring correct orientation and using plastic caps.
Align and secure U-clips to the table top using screws, ensuring proper orientation for play position.
Position side rails around the table top and attach vinyl end caps to the ends of the side rails.
Line up rail holes with pilot holes, secure rails with screws, and attach corner caps to the table bottom.
Align U-supports, slide them to see screw holes, and insert screws through U-clips into U-supports.
Attach end linkages to U-legs and U-supports, and attach safety straps to U-legs and linkages.
Tap caster sockets into U-supports using a piece of wood, then insert casters into the sockets.
Repeat assembly steps 1 through 12 on the second table half.
Gently tap caster sockets into U-supports on the second table half and insert casters.
Slide the second table half against the first, align holes, and secure with bolts and locknuts.
Install safety latches on name panels, ensuring they pivot freely and are attached diagonally.
Instructions for opening the table, involving pulling legs, pivoting latches, and lowering the halves.
Instructions for closing the table, involving lifting halves to vertical and ensuring latches are locked.
Information on how the table top is affected by atmospheric changes and how to minimize effects.
Guidelines for indoor storage to prevent damage from dampness and extreme temperatures.
How to clean the table surface using a soft, damp cloth and avoiding chemicals.
Advice to oil all moving parts and pivot points for safety and ease of use.
How to address uneven floors and adjust the table for proper play.
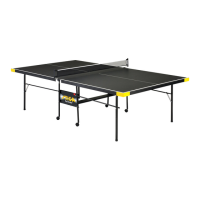
This document serves as an owner's manual for a STIGA Table Tennis Table, specifically models T8612 and T8612A. It provides comprehensive instructions for assembly, usage, and maintenance, ensuring the longevity and proper functioning of the table.
The STIGA Table Tennis Table is designed for recreational and competitive table tennis play. It consists of two independent table halves that can be assembled to form a full playing surface or folded into various positions for storage or playback. The table's primary function is to provide a stable and regulation-sized surface for the sport of table tennis. Its design allows for versatile use, including a "playback" position where one half of the table is folded vertically, enabling a single player to practice against the rebound. When not in use, the table can be folded into a compact "storage" position, minimizing its footprint. The two-half design is crucial for both ease of assembly and the ability to configure the table for different uses.
The manual outlines a detailed assembly process, starting with laying the table top painted side down and attaching the U-Support and U-Leg components. It emphasizes the correct orientation of U-clips, which are critical for the table's structural integrity and proper operation when opening to the playing position. Incorrect installation of these clips can lead to irreparable damage. The U-Leg is noted to be larger and wider than the U-Support, and its correct placement is essential to avoid gaps between table halves. Plastic caps are installed on the U-legs for protection and aesthetics. Side rails and corner caps are then secured to the table top, further enhancing its structure.
Linkages, name panels, and a bottom board are attached to the U-legs and U-supports, forming the undercarriage. Caster sockets are tapped into the U-supports, and casters are inserted, allowing for easy mobility of the table halves. A key feature is the safety strap, which is attached to the U-Leg and linkage, providing stability. The assembly process is repeated for the second table half, with a crucial note to leave certain locknuts finger-tight until the two halves are connected.
Connecting the two table halves is a critical step that requires at least two adults for safety and proper alignment. The first table half, with name panels attached, should be stable and placed against a wall. The second table half is then slid against the first, aligning holes in the name panels and U-supports. Hex bolts and locknuts are used to secure the connection, ensuring the joints pivot freely.
Safety latches are an integral usage feature, designed to secure the table in its various positions. These latches must be installed correctly, with the flange extending over the name panel and attached diagonally across from each other on opposite sides of the table. The manual explicitly warns against operating the table until these safety latches are installed and the assembly is complete.
The manual provides clear instructions for opening and closing the table. To open, both legs are pulled away slightly, and the safety latch is pivoted to allow the table edge to pass over it. The table half is then lowered to the floor. To close, the table half is lifted upward and inward to a vertical position, ensuring it locks into the safety latch. These steps are repeated for the other table half. The manual highlights "playback" and "storage" positions, demonstrating the table's versatility. For safety, it strongly advises against children opening the table and emphasizes that at least two adults are needed to move the table halves. It also warns against sitting, standing, leaning, walking, or jumping on the table, as this is a game table, not a toy, and such actions could result in personal injury or property damage.
The manual includes a dedicated section on "Care and Maintenance" to help users extend the life of their table. The table top, made of particle board, is susceptible to atmospheric changes like temperature and humidity, which can cause slight sagging or distortion. To minimize these effects, the table should be stored in the folded-up position in a dry area when not in use. Damp and humid conditions are specifically noted to amplify warping, swelling, cracking, or blistering of the wood.
For cleaning, users are instructed to use only a soft, damp (NOT WET) cloth. It is crucial to avoid any chemicals, abrasive, or cleaning products on the playing surface to prevent damage.
Regular maintenance includes oiling all moving parts, especially the pivot points. This ensures the safety and ease of use of the table, preventing stiffness or wear over time.
The manual also addresses unlevel floors. If the table does not seem level, it is likely due to an uneven floor. Users are advised to set the table in its playing position and move it several inches in different directions to find the best location. If the floor is extremely unlevel, shims can be placed under the outer U-legs to level the table, ensuring proper playability.
In summary, the STIGA Table Tennis Table is a versatile and robust product designed for table tennis enthusiasts. Its usage features emphasize a structured assembly process, critical safety mechanisms like U-clips and safety latches, and clear instructions for opening, closing, and configuring the table for play or storage. Maintenance guidelines focus on protecting the particle board top from environmental factors, proper cleaning, and lubricating moving parts to ensure long-term functionality and safety.
| Brand | Stiga |
|---|---|
| MPN | T8612 |
| Sport/Activity | Table Tennis |
| Blade Material | Wood |
| ITTF Approved | Yes |
| Category | Table Tennis |
| Color | Black/Red |
| Playing Style | All-Around |