EasyManua.ls Logo

ESCALADE GOALIATH B2253 User Manual

Default Icon
18 pages
To Next Page IconTo Next Page
Page #1 background imageLoading...
Page #1 background image
MODEL NO.
GB54ig2.0
BASKETBALL SYSTEM
2L-7540-01
Escalade
®
Sports products may be manufactured and/or licensed under the following patents:
6419596, 6179733, 5919102, 5071120, 4798381, 4424968, D326128, 7244046
Additional patents may be pending. One or more of the listed patents and/or pending patents may cover specific product.
2017 Escalade Sports
1. Read this manual carefully before starting assembly. Read each step completely before beginning
each step.
2. Some smaller parts may be shipped inside larger parts. Check inside all parts and cartons
before assembling or ordering parts.
3. To make assembly of your basketball system easier, use the Hardware Identifier on page 4
to identify and sort all fasteners. Check all cartons for kits. All hardware is not located
in one kit.
4. Do not tighten hardware until instructed to do so. If hardware is tightened too soon, mounting holes
may not align and parts may not easily fit together. Leave locknuts slightly loose until you are instructed to
tighten them.
O W N E R ' S M A N U A L
B2253
©
Please Do Not Return This Product To The Store!
Contact Escalade
®
Sports customer service department at:
Phone: 1-888-USA-GOAL Toll Free!
Fax: 1-866-873-3536 Toll Free!
E-mail: basketball@escaladesports.com
Mailing Address (correspondence only):
Escalade Sports
PO Box 889
Evansville, IN 47706
Please visit our World Wide Web site at: www.escaladesports.com
ON-LINE TROUBLE SHOOTING TECHNICAL ASSISTANCE
ON-LINE PARTS REQUESTS FREQUENTLY ASKED QUESTIONS
ADDITIONAL ESCALADE
®
SPORTS PRODUCT INFORMATION
5.
An electric screwdriver is helpful in assembly. However, please set at low torque and use caution
because you could overtighten the hardware and strip the screws.
6.
Save this instruction and your proof of purchase (receipt) in the event that the manufacturer
has to be contacted for replacement parts.
ITEMS NEEDED (not included)
11-
1-
1-
1-
1-
1-
6-
2-
1-
1-
1-
1-
1-
1-
1-
50 lbs bags of concrete
Post hole digger (optional)
Wheel barrow
Garden hose
Level
Tape Measure
2X4’s
50 lbs sand bags
Standard masonry block
9/16”, 3/4” & adjustable wrench
Cordless drill & 9/64” drill bit
5/16” socket driver (for cordless drill)
Pair of Safety Glasses
Phillips Screwdriver
Ladder
Question and Answer IconNeed help?

Do you have a question about the ESCALADE GOALIATH B2253 and is the answer not in the manual?

ESCALADE GOALIATH B2253 Specifications

General IconGeneral
BrandESCALADE
ModelGOALIATH B2253
CategorySports & Outdoors
LanguageEnglish

Summary

Owner's Manual and Support

Customer Service Contact Information

Provides contact information for customer support and mailing address.

Required Tools and Materials

Lists materials and tools required for assembly that are not provided.

Online Resources and Support

Directs users to the company's website for additional resources and information.

Safety Instructions and Warnings

General Player and Owner Safety Rules

Outlines essential safety rules for players and owners to prevent injury.

Assembly Safety Precautions

Details safety measures to follow during the assembly process.

Backboard Usage and Height Adjustment Warnings

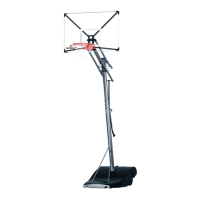
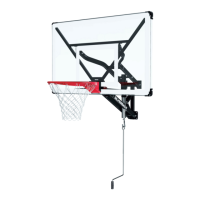
Warns against hanging on the unit and emphasizes parental supervision for height adjustments.

Key Warning Labels on Pole

Top Pole Warning Label

Warning label for the top post, advising against dunking or hanging.

Bottom Pole Warning Label

Warning label for the bottom post regarding pole engagement for stability.

Hardware Identification Guide

Basketball System Hardware Components

Identifies and illustrates various hardware parts with their descriptions and quantities.

Day 1: Post Installation Instructions

Hole Excavation and Dimensions

Instructions and diagrams for digging the hole for the pole base.

Masonry Block Placement for Pole Base

Guidance on positioning a masonry block at the bottom of the hole.

Pole Assembly Instructions

Joining Pole Sections and Securing with Screws

Steps for joining the upper and bottom pole sections using screws.

Pole Assembly Safety and Tool Recommendations

Important notes on safety, tools, and screw installation for pole assembly.

Concrete Pouring and Pole Setup

Concrete Mixing and Pouring Procedure

Instructions for mixing and pouring concrete around the pole base.

Pole Alignment and Verticality Check

Ensuring the pole is vertical and stable before concrete cures.

Concrete Curing and Pole Stabilization

Stabilizing the Pole During Curing

Using 2x4s and sandbags to stabilize the pole during concrete curing.

Minimum Concrete Curing Time

Specifies the minimum curing time for the concrete before proceeding.

Day 3: Goaliath Assembly Instructions

Attaching Post Ears to Top Pole

Steps for attaching post ears to the top pole using bolts and nuts.

Actuator Mechanism Assembly

Instructions for assembling the actuator sleeve, cap, and pivot tube.

Securing Actuator and Stop Spacers

How to attach the actuator to post ears and secure stop spacers.

Lower Arm Assembly

Attaching Lower Arms to Top Pole

Attaching lower arms to the top pole using bolts and washers.

Connecting Actuator to Lower Arms

Connecting the actuator to the lower arms and ensuring free pivot.

Inserting Tube Plugs into Lower Arms

Inserting plugs into the open ends of the lower arms.

Upper Arm Assembly

Attaching Upper Arms to Top Pole

Attaching upper arms to the top pole using bolts and spacers.

Inserting Tube Plugs into Upper Arms

Inserting plugs into the open ends of the upper arms.

Actuator Crank and Backboard Lowering

Connecting the actuator crank and lowering the backboard.

Backboard to Board Arm Attachment

Attaching Lower Board Arms to Backboard

Attaching lower board arms to the backboard mounting tubes.

Attaching Upper Board Arms to Backboard

Attaching upper board arms to the backboard mounting tubes.

Goal Assembly and Pad Installation

Mounting Goal Assembly and Leveling Rim

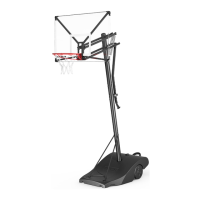
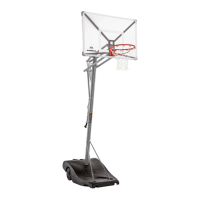
Attaching the goal assembly to the backboard and leveling the rim.

Attaching Rim Cover Plate

Securing the rim cover plate with screws.

Backboard Pad Marking and Attachment

Using pads as templates to mark and attach them to the backboard frame.

Height Adjustment and Decal Application

Setting 10 FT. Height and Marking Actuator

Raising the backboard to 10 ft and marking the actuator.

Applying Height Decal to Actuator

Aligning and applying the height decal onto the steel actuator.

Post Pad Installation

Securing Post Pad to Pole

Attaching the post pad to the front of the pole using straps.

Limited 5 Year Warranty Information

Warranty Coverage and Exclusions

Details what the warranty covers and its exclusions.

Warranty Claim Guidelines

Outlines the requirements for making a warranty claim.

Goliath Care and Maintenance

Backboard Cleaning Instructions

Instructions for cleaning the backboard using specific materials.

Rim Care, Maintenance, and Warranty

Guidance on rim usage, maintenance, and warranty voiding conditions.

Rust Prevention and Pole Maintenance

Advice on inspecting, treating, and preventing rust on the pole.

Replacement Parts List B2253

Replacement Parts Identification

A comprehensive list of replacement parts with key numbers and descriptions.

Related product manuals