EasyManua.ls Logo

ESCALADE SILVERBACK SBX50 User Manual

ESCALADE SILVERBACK SBX50
41 pages
To Next Page IconTo Next Page
Page #1 background imageLoading...
Page #1 background image
Escalade® Sports products may be manufactured and/or licensed under the following patents.
6120397, 5816957, 5769744, 5119741, 4911085, 4717157, D460140, D420563, 8414431
Additional patents may be pending. One or more of the listed patents and/or pending patents may cover specific product.
A S S E M B L Y I N S T R U C T I O N S
Contact Escalade® Sports customer service department at:
Phone: 1-888-USA-GOAL Toll-Free!
Fax: 1-866-873-3536 Toll-Free!
E-mail: customerservice@escaladesports.com
Please Do Not Return This
Product to the Store!
2020 Escalade Sports
2L-7874-01
MODEL NO.
B8405F
S B X 5 0
P O R T A B L E B A S K E T B A L L
Question and Answer IconNeed help?

Do you have a question about the ESCALADE SILVERBACK SBX50 and is the answer not in the manual?

ESCALADE SILVERBACK SBX50 Specifications

General IconGeneral
BrandESCALADE
ModelSILVERBACK SBX50
CategorySports & Outdoors
LanguageEnglish

Summary

Base Frame Assembly

Connect Frame Components

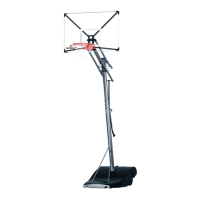
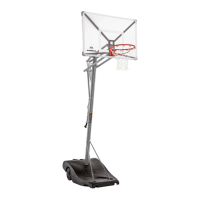
Assemble parts 2 and 3 of the base frame using provided hardware.

Wheel and Axle Installation

Install Axle Bushings

Insert axle bushings into steel tubes, ensuring proper alignment with the groove.

Ballast and Brace Attachment

Secure Ballast to Lower Pole

Carefully slide the ballast assembly onto the lower pole.

Pole Section Assembly

Connect Middle and Lower Poles

Position and connect the middle pole into the lower pole, aligning all holes.

Top Pole Installation

Insert Top Pole into Middle Pole

Insert the top pole into the middle pole, aligning spring and actuator brackets.

Arm Attachment

Attach Arms to Upper Pole

Attach the arms to the upper pole using hardware, finger tightening nuts initially.

Backboard Box Mounting

Connect Backboard Box to Arms

Attach the backboard box to the lower and upper arms with specified hardware.

Spring Installation

Install and Connect Spring

Insert the spring into the bracket and connect it to the upper board arms.

Backboard Mounting

Secure Backboard with Hitch Pins

Attach the backboard to the supports using hitch pins for initial securing.

Rim and Net Installation

Attach Rim and Net

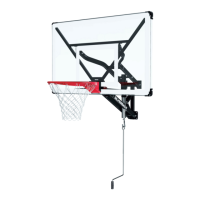
Mount the rim to the backboard and attach the net by looping over the horn.

Actuator Bar Mechanism

Install and Engage Actuator Bar

Slide the actuator bar into the bracket and engage the lock mechanism.

Actuator Grip Installation

Secure Actuator Grip

Insert and secure the actuator grip onto the actuator bar using screws.

System Height Adjustment

Adjust System to 8 Feet

Adjust the system's height to the specified 8 feet using the actuator pin.

Final System Placement

Fill Ballast and Position System

Fill the ballast with water and carefully move the system to its desired location.

Product Information and Safety

General Safety Warnings

Critical safety warnings and precautions for system operation and use.

Limited 5 Year Warranty

Details of the product's limited 5-year warranty coverage and terms.

Warranty Guidelines and Claims

Procedures and requirements for submitting warranty claims and support.

Related product manuals