Do you have a question about the EST Centurion W and is the answer not in the manual?
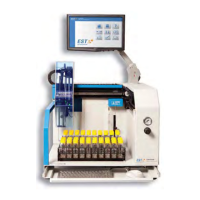
Detailed overview of the Centurion W and WS Purge and Trap Autosamplers' capabilities.
Highlights key features like dual trays, rugged platform, Windows OS, and inert pathways.
Lists technical details such as tray capacity, sample volume, operating conditions, and power requirements.
Details safety precautions, warnings, and symbols to be observed during operation and installation.
Provides guidelines for proper disposal and recycling of the product according to local regulations.
Outlines the importance of following setup and installation instructions for warranty and product integrity.
Specifies the physical footprint and ventilation needs for instrument placement.
Details voltage, frequency, current draw, and circuit breaker specifications.
Provides instructions for safely unpacking the instrument and retaining shipping materials.
Guides through the process of connecting cables, lines, and setting up the system components.
Instructions for safely powering on the autosampler and its operating system.
Steps to launch the software, log in, and home the instrument axes for operation.
Procedure for safely shutting down the Centurion application and the instrument.
Overview of the main interface icons for navigating application functions.
Information on accessing the diagnostics screen for manual operation and calibration.
Explains the dual purpose of the Home/Log On icon for user access and axis homing.
How to exit the Centurion application and return to the operating system desktop.
Describes how to access and configure instrument options via the Options screen tabs.
Guide to creating sample sequences for water and soil analysis.
Instructions for creating and configuring analysis methods for water or soil samples.
Details on monitoring the autosampler during a run and using Start/Stop/Hold functions.
Information on viewing and managing the run log for tracking instrument functions.
Accessing the integrated help system for user assistance and manual viewing.
Contact information and advice for obtaining technical assistance and service for the instrument.
Procedures for cleaning the exterior of the autosampler using appropriate materials.
Steps for safely depressurizing, filling, and repressurizing the instrument's water reservoir.
Overview of the diagnostics screen for manual operation, calibration, and system checks.
Guides on performing manual operations like rinsing, draining, and maintenance tasks.
Detailed procedures for performing auto and manual calibration of instrument axes and components.
Steps for verifying the integrity of the soil pathway using leak checks.
Instructions for safely removing and replacing the sampling station needle.
Procedure for removing and installing the water needle assembly.
Information on identifying and replacing fuses on the instrument's circuit boards.
Information on where to find a complete list of available spare parts for the instrument.
| Brand | EST |
|---|---|
| Model | Centurion W |
| Category | Laboratory Equipment |
| Language | English |