ETC Setup Guide
Analog IO Gateway (Rack-Mount)
Analog IO Gateway (Rack-Mount) Page 3 of 5 ETC
Switch the Network Port
The Response Analog IO Gateway can have the Ethernet connector installed on the front or back of
the unit. To switch the location, perform the following steps:
1. Using a Phillips screwdriver, remove
the four screws on the bottom of the
gateway and slide the cover off from
front to back.
2. Using a Phillips screwdriver, remove
the two screws from the nuts securing
the blank plate to the gateway.
3. Remove the two screws securing the
Ethernet connector to the gateway.
4. Move the Ethernet connector to the
desired location on the gateway and
secure with the two screws removed in
step 3.
5. Secure the blank plate to the other
location using the screws and nuts
removed in step 2.
6. Slide the cover back on the gateway, from back to front and secure with the four screws you
removed in step 1.
Optional Accessories
The following accessories are available for use with the Analog IO Gateway (Rack-Mount):
Rack Mount Kit
4260K1001: The Gateway Rack Mount kit is capable of
holding up to two gateways for mounting into a standard 19in
rack enclosure. If you only need to mount one unit, a blanking
plate is provided with the kit. This blanking plate can be
installed on either side of the rack mount bracket.
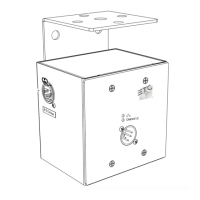
Hanging Hardware Kit
4260K1005: The Hanging Hardware Kit allows pipe mounting
of a gateway in a variety of orientations. You can vary the way
the U-bolt (or c-clamp) attaches to the bracket and the way the
bracket mounts to the gateway. The bracket attaches to any
edge on the bottom of your gateway.
 Loading...