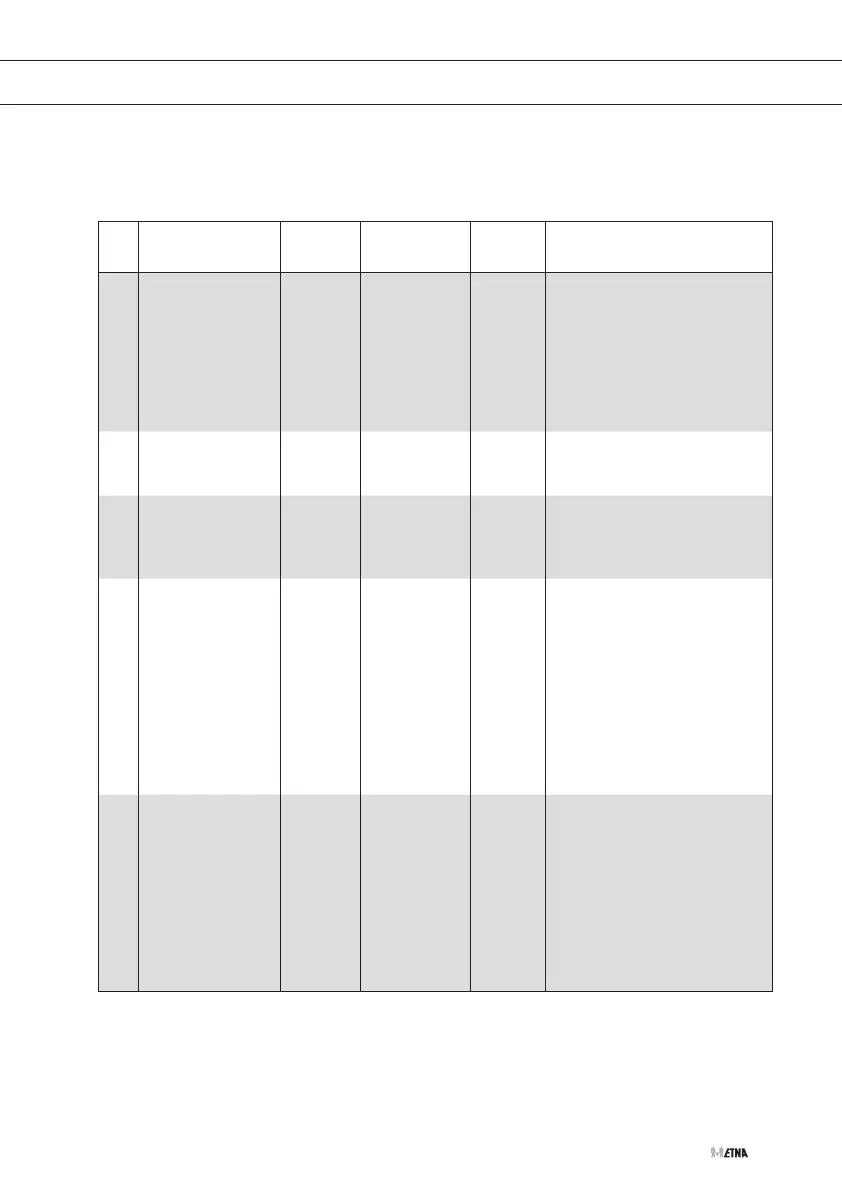
EN 37
Guidelines for automatic cooking
The following table shows you 10 automatic programmes for warming up, cooking, roasting
and baking. The quantities, standing times and corresponding recommendations aregiven.
These automatic programmes contain special, useful cooking settings.
No. Dish Weight
(kg)
Accessories Level Instructions
A:01 Complete meal
0.3 - 0.35
0.4 - 0.45
Ceramic
baking tray
1
Put the food on a ceramic plate
and cover the food with cling film.
This programme is suitable for
meals which consist of 3 dishes
(e.g. meat with sauce, vegetables
and potatoes, rice or pasta). Let
the meal stand for 3minutes after
cooking.
A:02 Frozen pizza
0.3 - 0.35
0.4 - 0.45
Grill rack +
ceramic
baking tray
2
Put the frozen pizza on thegrill
rack with the ceramic baking tray
and place it in the oven.
A:03 Frozen lasagne
0.4 - 0.45
0.6 - 0.65
Grill rack +
ceramic
baking tray
2
Put the frozen lasagne in a
suitableglass Pyrex dish or on a
ceramic plate. Let it stand for 2 to
3minutes after warming up.
A:04 Whole chicken
1.1 - 1.15
1.2 - 1.25
Grill rack +
ceramic
baking tray
2
Mix olive oil or butter with pepper
and salt. Rub this thoroughly into
the chicken on the inside and the
outside. Put the chicken with the
breast downwards on thegrill
rack with the ceramic baking tray
in the oven. Turn the chicken
over when the ovengives a
signal, and press START. Let the
meal stand for 3minutes after
cooking.
A:05 Chicken pieces
0.6 - 0.7
0.9 - 1.0
Grill rack +
ceramic
baking tray
4
Mix olive oil or butter with pepper
and salt. Rub this thoroughly
into the chicken pieces. Put the
chicken pieces with the skin
side down on thegrill rack with
ceramic baking tray in the oven.
Turn the chicken pieces over
when the ovengives a signal,
and press START. Let the meal
stand for 3minutes after cooking.
USING THE AUTOMATIC MENU SETTINGS