20
www.evolutionpowertools.com
ABB. 1
ABB. 4
ABB. 3
BETRIEBSANLEITUNG
WARNUNG: Um die Brand- oder Explosionsgefahr zu reduzieren,
darf dieser Sauger nicht in Bereichen mit brennbaren Gasen,
Dämpfen oder explosivem Staub in der Luft betrieben werden. Zu
den brennbaren Gasen oder Dämpfen gehören unter anderem:
Flüssiggas für Feuerzeuge, lösungsmittelhaltige Reiniger,
Ölfarben, Benzin, Alkohol oder Aerosolzerstäuber. Zu den
explosiven Stäuben gehören unter anderem: Kohle, Magnesium,
Aluminium oder Schießpulver. Saugen Sie keine explosiven Stäube,
flammbaren oder brennbaren Flüssigkeiten oder heiße Asche
auf. Verwenden Sie diesen Sauger nicht zum Versprühen von
brennbaren oder entflammbaren Flüssigkeiten. Um das Risiko einer
Gesundheitsgefährdung durch Dämpfe oder Stäube zu verringern,
saugen Sie keine giftigen Materialien auf.
VORSICHT: Um das Risiko eines Gehörschadens zu vermeiden,
tragen Sie einen Gehörschutz, wenn Sie den Sauger über längere
Zeit oder in einer lauten Umgebung verwenden. Dieser 15-Liter
Nass-/Trockensauger wird im Werk zusammengebaut und ist
einsatzbereit, wenn Sie ihn aus der Verpackung nehmen. Das
Gerät ist bereit zum Trockensaugen oder -blasen. Nachdem Sie das
Netzkabel in die Wandsteckdose eingesteckt haben, schalten Sie
das Gerät „ON“, indem Sie den Schalter von Position „O“ auf Position
„I“ schieben. Die Position „O“ ist die Position „OFF“ und die Position
„I“ ist die Position „ON“.
EINSCHALTAUTOMATIK
WARNUNG: Achtung Verletzungsgefahr und Schadensrisiko!
Einschaltautomatik für automatisches Saugen. Diese Funktion
ermöglicht das Einschalten des Saugers, wenn Sie Ihr
Elektrowerkzeug einschalten, so dass der Sauger zwischen den
Schnitten nicht läuft.
HINWEIS: Die Steckdose ist nur für den Anschluss von
Elektrowerkzeugen an den Sauger vorgesehen. Jede andere
Verwendung der Steckdose ist nicht zulässig.
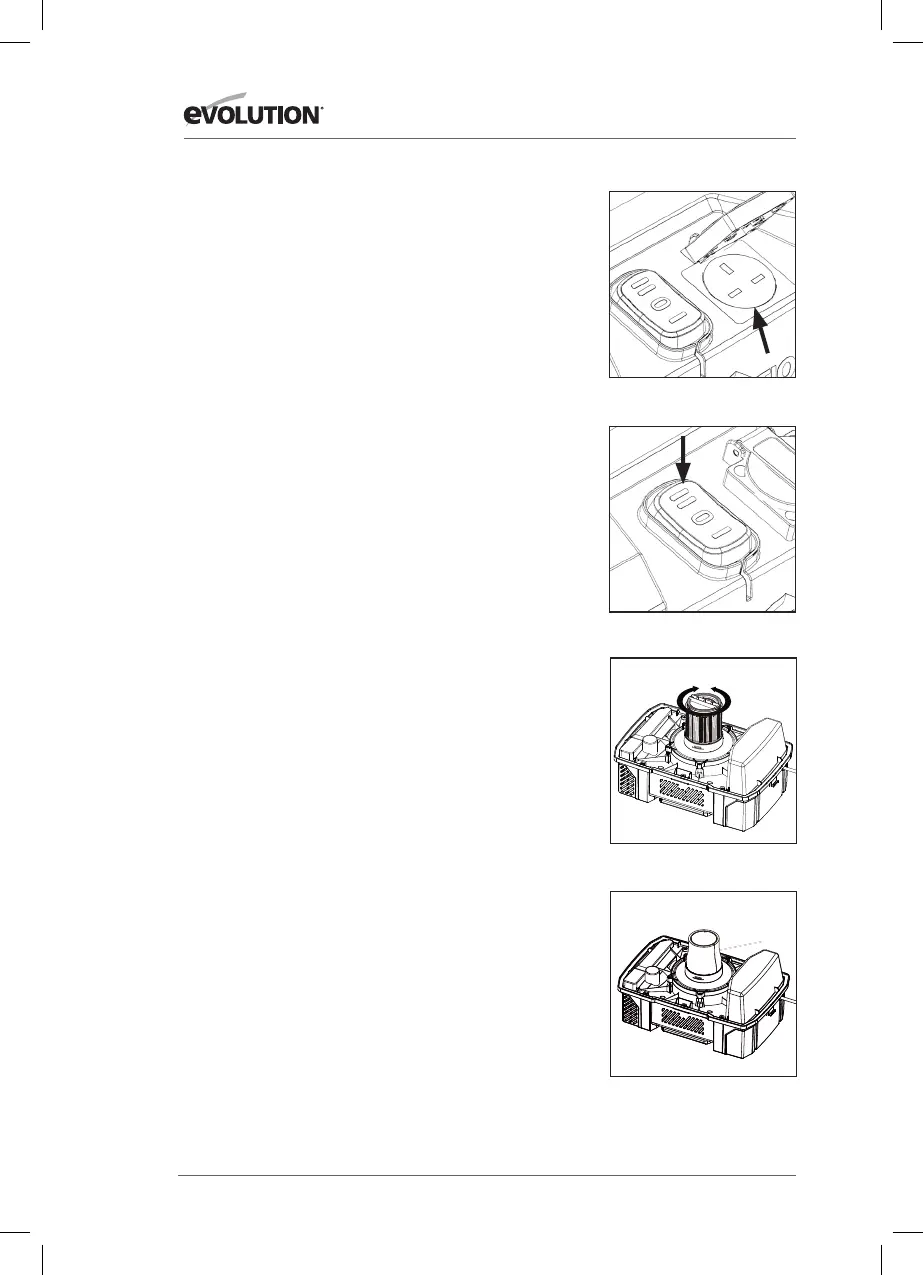
• Schließen Sie den offenen Staubschlauch des Saugers an den
Staubanschluss Ihres Elektrowerkzeugs an.
• Verbinden Sie den Netzstecker des Elektrowerkzeugs mit der
Steckdose am Gehäuse des Saugers. (Abb. 1)
• Schließen Sie das Kabel des Saugers an die Wandsteckdose an.
• Schalten Sie nun den Kippschalter auf Stellung II -
Staubsauger befindet sich im Standby-Modus. (Abb. 2)
• Wenn Sie Ihr Elektrowerkzeug einschalten, wird der Sauger
automatisch eingeschaltet - verwenden Sie das Werkzeug wie
für die Ausführung der Arbeit vorgesehen.
• Wenn Sie das Elektrowerkzeug ausschalten, wird der Sauger
automatisch gestoppt.
• Einstellung II des Antriebs ist nicht für Transformatoren mit
110 V geeignet.
7
WARNING!
To reduce the risk of injury from accidental starting, unplug power cord before emptying
the dust tank.
1. Remove the power head assembly of the wet/dry vac by pulling outward on the lid
clips located on each side of the vac. Lift off the power head assembly.
2. Dump the tank contents into the proper waste disposal container.
INSTALLING ACCESSORY BRACKET
1.Push the accessory bracket (A) in the recess.
2.Secure in place using the screws (B).
A
B
WET PICK-UP
1. Remove cartridge filter and replace it with foam filter when you do wet pickups.
2. This wet/dry vac is equipped with a float mechanism which will rise automatically
to cut off the airflow when the liquid in the tank reaches a predetermined level. When
this happens, turn off vac, unplug the power cord, and empty the dust tank. You will
know that the float has shut the airflow off because the suction ceases and the motor
noise becomes higher in pitch due to increased motor speed. The liquid capacity may
vary with the rate of pickup.
EMPTY THE TANK
Foam filter
Float in raised position
SPERREN
ENTSPERREN
ABB. 2
 Loading...