21
www.evolutionpowertools.com
DE
ABB. 5
SCHWIMMER IN ANGEHOBENER
POSITION
ABB. 6
ABB. 7
Your vac contains a blowing feature. It has the capability to blow sawdust and other
debris. It can be used to blow dust and debris out of garages or off patios and
driveways. Follow the steps below to use your vac as a blower.
1. Locate blowing port on your vac.
2. Insert one end of the 1-1/4 in. x 6 ft. hose into the blowing port.
3. Turn vac “ON”.
8
WARNING: To reduce the risk of injury from accidental starting, unplug power
cord before changing
WARNING: To avoid injury to bystanders, keep them clear of blowing debris.
CAUTION: Wear a dust mask if blowing creates dust which might be inhaled.
CAUTION: To reduce the risk of hearing damage, wear ear protectors when
using the vac/blower for extended hours or when using it in a noisy area.
CARE AND MAINTENANCE
FILTER REPLACEMENT
WARNING!
To reduce the risk of injury from accidental starting, unplug power cord before changing
or cleaning filter.Your filter should be cleaned often to maintain peak vacuum
performance.
IMPORTANT
To avoid damage to the blower wheel and motor, always reinstall the reusable dry filter
before using the vacuum for dry pickups and always reinstall the foam filter before
using the vacuum for wet pickups.
IMPORTANT
After cleaning, check the filter for tears or small holes. Do not use a filter with holes or
tears in it. Even a small hole can cause dust to come out of your vacuum.
Replace it immediately.
NOTE
Before installing the filter on the vacuum, clean the area of the lid so that the clamp ring
will seal the bag against the lid and stop small particles from bypassing the filter bag. If
the filter is clean and not damaged, replace it on the filter cage. If it cannot be reused,
place a new filter over the filter cage.
NOTE
Clean the filter in an open area.
BLOWING OPERATION
7
WARNING!
To reduce the risk of injury from accidental starting, unplug power cord before emptying
the dust tank.
1. Remove the power head assembly of the wet/dry vac by pulling outward on the lid
clips located on each side of the vac. Lift off the power head assembly.
2. Dump the tank contents into the proper waste disposal container.
INSTALLING ACCESSORY BRACKET
1.Push the accessory bracket (A) in the recess.
2.Secure in place using the screws (B).
A
B
WET PICK-UP
1. Remove cartridge filter and replace it with foam filter when you do wet pickups.
2. This wet/dry vac is equipped with a float mechanism which will rise automatically
to cut off the airflow when the liquid in the tank reaches a predetermined level. When
this happens, turn off vac, unplug the power cord, and empty the dust tank. You will
know that the float has shut the airflow off because the suction ceases and the motor
noise becomes higher in pitch due to increased motor speed. The liquid capacity may
vary with the rate of pickup.
EMPTY THE TANK
Foam filter
Float in raised position
TROCKENSAUGUNG
HINWEIS: Wenn sich der Schaumstofffilter über dem Filterkäfig
befindet, muss dieser vor dem Einbau des Patronenfilters entfernt
werden. Der Patronenfilter kann zur Nass- oder Trockensaugung
verwendet werden; die Installation ist
für beide gleich. Wenn Sie große Flüssigkeitsmengen aufsaugen
möchten, lesen Sie bitte den Abschnitt mit den Anweisungen zur
Nasssaugung in dieser Bedienungsanleitung. Für das Aufsaugen
von normalen trockenen Abfällen
setzen Sie den Patronenfilter über dem Filterkäfig ein.
• Schieben Sie den Patronenfilter mit dem Antriebskopf in
umgekehrter Stellung über den Filterkäfig nach unten und
drücken Sie die Filterdichtungen gegen den Antriebskopf.
• Setzen Sie die Filterhalterung oben in den Patronenfilter ein,
halten Sie den Antriebskopf mit einer Hand fest, drehen Sie
den Griff an der Filterhalterung im Uhrzeigersinn fest, um
somit den Filter zu fixieren. (Abb. 3)
• Um den Patronenfilter zum Reinigen zu entfernen, halten
Sie den Antriebskopf wieder fest und drehen Sie die
Filterhalterung gegen den Uhrzeigersinn, um sie zu lösen und
zu entfernen, schieben Sie dann den Patronenfilter aus dem
Filterkäfig.
• Um den Patronenfilter zu reinigen, schütteln oder bürsten
Sie überschüssigen Schmutz ab oder spülen Sie ihn (von
der Innenseite des Filters) mit Wasser ab, trocknen Sie ihn
vollständig (ca. 24 Stunden) und setzen Sie ihn wieder ein.
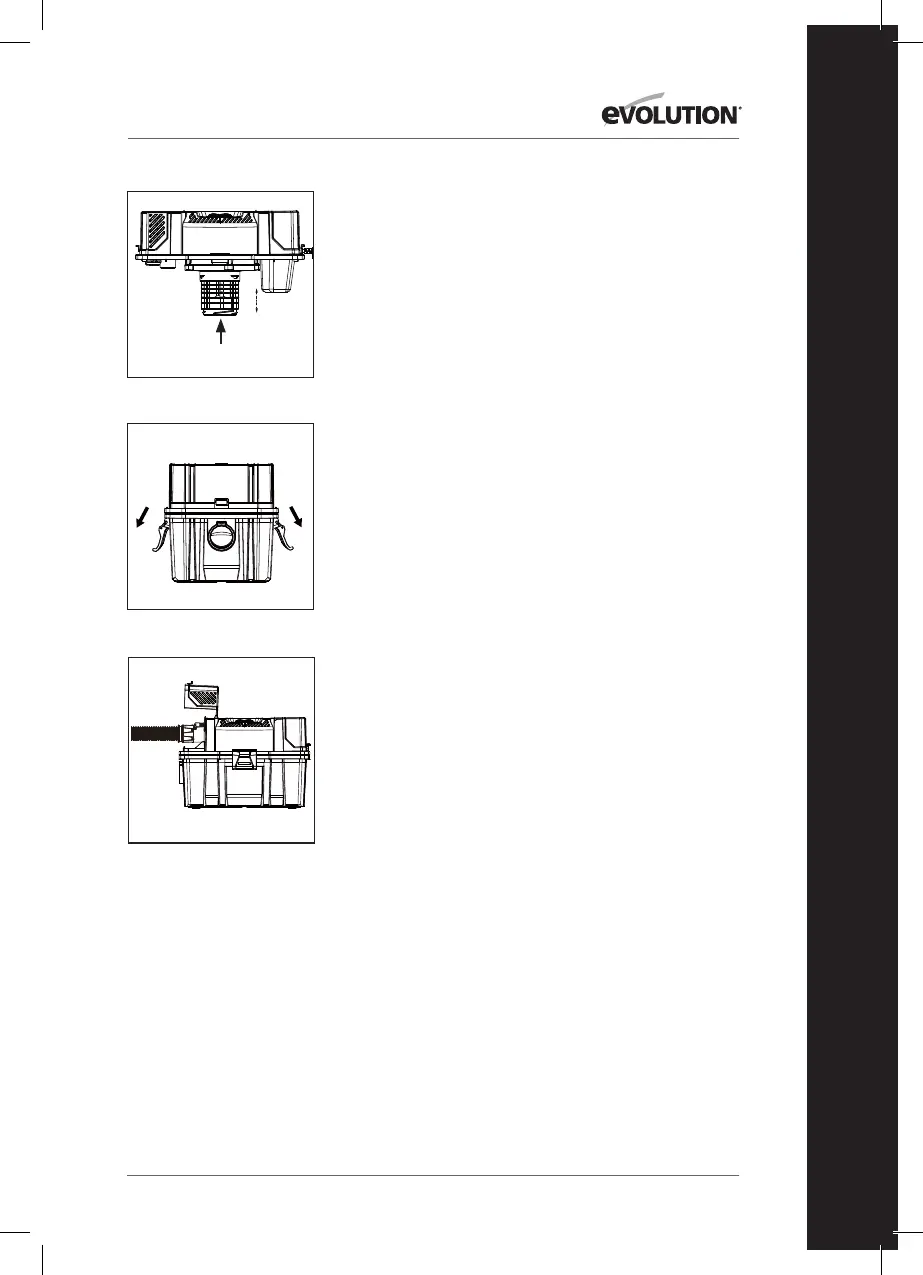
NASSSAUGUNG
• Für das Aufsaugen von Flüssigkeiten entfernen Sie den
Patronenfilter und ersetzen ihn durch einen Schaumstofffilter.
(Abb. 4)
• Dieser Nass-/Trockensauger ist mit einem
Schwimmermechanismus ausgestattet, der automatisch
aufsteigt, um den Luftstrom zu unterbrechen, wenn die
Flüssigkeit im Tank ein vorbestimmtes Niveau erreicht.
Schalten Sie in diesem Fall den Staubsauger aus, ziehen
Sie den Netzstecker und entleeren Sie den Staubbehälter.
Sie werden merken, dass der Schwimmer den Luftstrom
unterbrochen hat, weil die Saugkraft wegfällt und das
Motorgeräusch durch die erhöhte Motordrehzahl in der
Höhe zunimmt. Die Flüssigkeitskapazität kann je nach
Aufnahmegeschwindigkeit variieren. (Abb. 5)
ENTLEEREN DES BEHÄLTERS
WARNUNG: Um die Verletzungsgefahr durch unbeabsichtigtes
Starten zu verringern, ziehen Sie vor dem Entleeren des
Staubbehälters den Netzstecker.
• Entfernen Sie den Antriebskopf des Nass-/Trockensaugers,
indem Sie die Deckelklammern, die sich auf den beiden Seiten
des Saugers befinden, nach außen ziehen. Heben Sie den
Antriebskopf ab. (Abb. 6)
• Entleeren Sie den Behälterinhalt in den entsprechenden
Entsorgungsbehälter.
BLASMODUS
WARNUNG: Um die Verletzungsgefahr durch unbeabsichtigtes
Starten zu verringern, ziehen Sie vor dem Wechsel des Modus den
Netzstecker. Halten Sie umstehende Personen von umherfliegenden
Trümmerteilen fern, um Verletzungen zu vermeiden.
 Loading...