68
www.evolutionpowertools.com
RYS. 1
RYS. 4
RYS. 3
INSTRUKCJE OBSŁUGI
OSTRZEŻENIE: Aby ograniczyć ryzyko pożaru lub eksplozji,
nie należy korzystać z tego odkurzacza w miejscach, w których
występują łatwopalne gazy, opary lub pył wybuchowy. Łatwopalne
gazy lub opary obejmują między innymi: płyn do zapalniczek,
środki czyszczące z grupy rozpuszczalników, farby olejne, benzynę,
alkohol lub aerozole. Pyły wybuchowe to między innymi: węgiel,
magnez, aluminium oraz proch. Nie odkurzać pyłu wybuchowego,
łatwopalnych płynów ani gorącego popiołu. Nie stosować tego
odkurzacza do natryskiwania palnych płynów. Nie odkurzać
materiałów toksycznych, aby ograniczyć zagrożenie dla zdrowia na
skutek ekspozycji na opary lub pył.
UWAGA: Aby ograniczyć ryzyko uszkodzenia słuchu, podczas
korzystania z odkurzacza przez wiele godzin lub w strefie o
wysokim natężeniu hałasu należy stosować środki ochrony uszu.
15-litrowy odkurzacz do pracy na sucho i mokro jest montowany
fabrycznie i gotowy do użytku po wyjęciu z opakowania.
Urządzenie jest gotowe do odkurzania substancji suchych lub
nadmuchiwania. Po podłączeniu przewodu zasilającego do gniazda
sieciowego należy włączyć urządzenie (ON) przez naciśnięcie
przełącznika kołyskowego z pozycji O do pozycji I. „O” oznacza
pozycję „OFF” (wyłączone), zaś „I” oznacza pozycję „ON” (włączone).
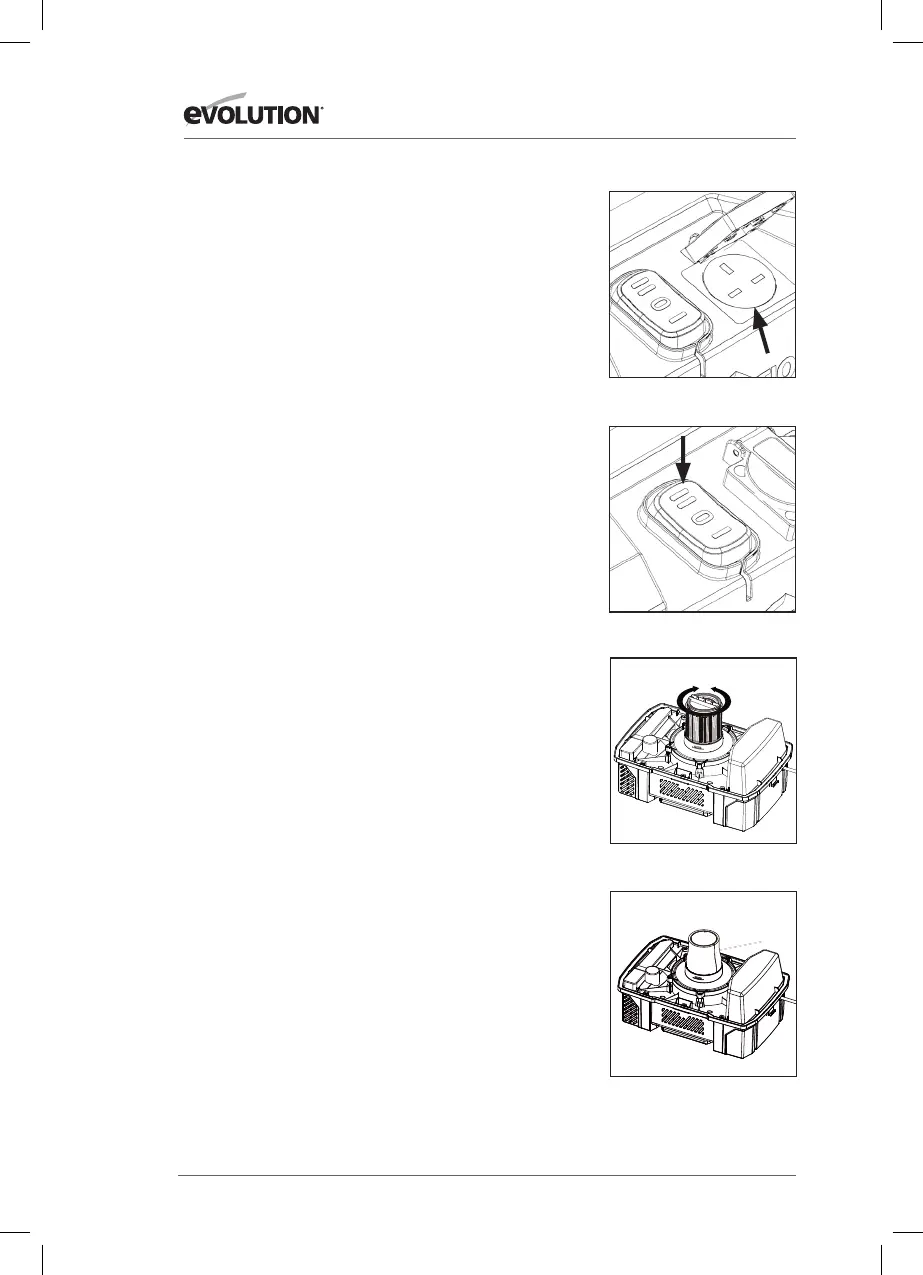
FUNKCJA PRZYSTAWKI ODBIORU MOCY
OSTRZEŻENIE: Niebezpieczeństwo doznania urazów i wystąpienia
uszkodzeń!
Przełącznik odbioru mocy dla odkurzacza automatycznego.
Funkcja ta umożliwia włączenie odkurzacza w momencie włączenia
elektronarzędzia, dzięki czemu nie jest on włączony między
operacjami cięcia.
UWAGA: Gniazdo wtyczkowe jest przeznaczone wyłącznie
do podłączania elektronarzędzi do odkurzacza. Wszelkie inne
wykorzystanie gniazda wtyczkowego jest niedozwolone.
• Podłącz otwarty wąż zasysania pyłu z odkurzacza do dyszy
pyłowej elektronarzędzia.
• Podłącz wtyczkę elektronarzędzia do gniazda na głównym
korpusie odkurzacza. (Rys. 1)
• Podłącz przewód odkurzacza do ściennego gniazda zasilania.
• Teraz naciśnij przełącznik kołyskowy tak, aby znalazł się w
ustawieniu II – odkurzacz jest w trybie gotowości. (Rys. 2)
• Po włączeniu elektronarzędzia nastąpi automatyczne
uruchomienie odkurzacza – posługuj się elektronarzędziem
zgodnie z zamierzeniem, aby wykonać pracę.
• Po wyłączeniu elektronarzędzia odkurzacz zatrzyma się
automatycznie.
• Ustawienie II wału odbioru mocy nie jest odpowiednie dla
transformatorów 110V.
7
WARNING!
To reduce the risk of injury from accidental starting, unplug power cord before emptying
the dust tank.
1. Remove the power head assembly of the wet/dry vac by pulling outward on the lid
clips located on each side of the vac. Lift off the power head assembly.
2. Dump the tank contents into the proper waste disposal container.
INSTALLING ACCESSORY BRACKET
1.Push the accessory bracket (A) in the recess.
2.Secure in place using the screws (B).
A
B
WET PICK-UP
1. Remove cartridge filter and replace it with foam filter when you do wet pickups.
2. This wet/dry vac is equipped with a float mechanism which will rise automatically
to cut off the airflow when the liquid in the tank reaches a predetermined level. When
this happens, turn off vac, unplug the power cord, and empty the dust tank. You will
know that the float has shut the airflow off because the suction ceases and the motor
noise becomes higher in pitch due to increased motor speed. The liquid capacity may
vary with the rate of pickup.
EMPTY THE TANK
Foam filter
Float in raised position
RYS. 2
ZABLOKOWANE ODBLOKOWANE
 Loading...