10 11
www.evolutionpowertools.com www.evolutionpowertools.com
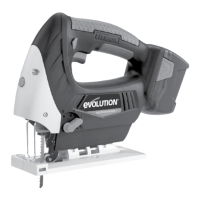
The Trigger Switch is also tted with a rotary control (Fig 3b) that
allows the operator to select a constant speed and then lock the
trigger in this position.
3. TRIGGER SWITCH LOCKING BUTTON (Fig. 3c)
• Pull the trigger fully and rotate the rotary control until the desired
speed is obtained.
• Push in the speed locking button to lock the trigger at the selected
speed.
• Press the trigger switch gently and then release to disengage the
selected speed and to switch the machine off.
4. CUTTING ACTION SELECTION SWITCH (Fig. 4)
This jigsaw has a 4 position switch (0-3) located on the Left Hand
side of the machine just behind the blade. Only operate this switch
when the machine is switched ‘Off’ and the blade is stationary.
Position ‘0’ Straight cutting action
Positions ‘1 – 3’ Orbital cutting actions
Orbital cutting action has an aggressive blade cutting motion and is
especially suited for cutting soft materials.
During orbital cutting the blade moves forwards as well as up and
down. Position 1 is the least aggressive of the orbital cutting actions,
with position 3 being the most aggressive.
The Table below gives some typical examples of the use of the
orbital cutting facility. We recommend that the operator always
practices on a piece of unwanted material to determine the most
suitable selection for the task at hand.
POSITION TYPICAL APPLICATION
0 Thin materials. Fine cuts. Tight curves. All metals.
1 Hard materials such as chipboard, MDF, Plywood etc.
2 Thick materials such as constructional timber and plastic.
3 Fast cuts when cutting with the grain in softwood material.
Fig 3 (b)
Close up view
of Rotary Control.
Fig 3 (c)
Close up view
Locking Button.
Fig 4
Close up view of
Selection Switch Lever.
5. LASER CUTTING GUIDE
This jigsaw is tted with a Laser Guide which can be useful when
cutting straight lines. Only switch the Laser Guide on when you are
about to make a straight cut, and switch it off when the cut has been
completed. The switch is located on the front of the machine. Press
the ‘I’ side of the rocker switch to turn the Laser Guide ‘On’. Press
the ‘O’ side of the rocker switch to turn the Laser Guide ‘Off’.
WARNING: Do not stare directly at the laser beam. A hazard may
exist if you deliberately stare into the beam. Please observe all of
the following safety rules.
• The laser beam must not be deliberately aimed at personnel and
must be prevented from being directed towards the eyes of a
person or animal.
• Always ensure that the laser beam is used only on workpieces that
have non-reective surfaces, i.e natural wood or matt surfaces etc.
• Never exchange the laser module assembly for a different type or
class of laser.
• Repairs to the laser module must only be conducted by Evolution
Power Tools or their authorized agent.
REPLACEMENT OF LASER BATTERIES
Power for the Laser Guide is provided by two (2) ‘AAA’ Cells. When
exhausted these should be replaced.
Access to the battery compartment is gained by loosening the screw
and removing the battery compartment cover. (Fig. 5)
Observe the polarity of the cells and replace the cover after cell
replacement.
Fig 5
Close up view of battery
compartment cover
and xing screw.