Assignable MIDI Buttons
Assign Description Program (Press Twice) Bank LSB (Press Twice) Data MSB (Press Twice)
0-119 Standard MIDI CC’s - Toggle Value 2 Toggle Value 1
120-127 Channel Mode Messages - Toggle Value 2 Toggle Value 1
128
Pitch Bend Sensitivity - Sensitivity Value -
129
Channel Fine Tune - Tuning Amount -
130 Channel Coarse Tune - Tuning Amount -
131
Channel Pressure - Pressure Amount -
132 RPN Coarse Value RPN LSB RPN MSB
133
RPN Fine Value RPN LSB RPN MSB
134
NRPN Coarse Value NRPN LSB NRPN MSB
135
NRPN Fine Value NRPN LSB NRPN MSB
136 Ma
ster Volume* - Volume LSB Volume MSB
137
Master Pan* - Pan LSB Pan MSB
138
Master Coarse Tune* - Tuning LSB Tuning MSB
139
Master Fine Tune* - Tuning LSB Tuning MSB
140
Chorus Mod rate** - Mod Rate -
141 Chorus Mod Depth** - Mod Depth -
142 Fee
dback** - Feedback Level -
143
Send to Reverb** - Reverb Send Level -
144
Pitch Bend - Pitch Shift LSB Pitch shift MSB
145 Program/Bank Preset Program Bank LSB Bank MSB
146
MIDI CC (On/Off) MIDI CC Button Release Value Button press value
147
Note (On/Off) Note Velocity Off Velocity on
148
Note (On/Off Toggle) Note Velocity Off Velocity on
149
MMC Command*** - Command Select -
150
Reverb Type ** - Type -
151
Reverb Time ** - Time -
152
Chorus Type ** - Type -
255 Co
ntroller Off**** - - -
* General MIDI SysEx messages - for details please see pages XXX & XXX.
** General MIDI 2 SysEx messages
*** MMC Sysex messages, for details please see page XXX.
**** This value cannot be typed in using the numerical keypad.
Selecting A Controller For Editing
Before you can assign a MIDI cc to one of the UC-33’s controllers, you will need to select it for editing. There are 2 methods for doing this:
1.
Press CONTROL SELECT. The LCD will display the CONTROLLER symbol. The symbol will be flashing to indicate the controller settings
can be altered. The 3-digit display will show the number of the currently selected controller, proceeded by a ‘C’, or an ‘F’ if the controller is a
fader.
2. Type in the number of the controller using the numeric keypad, or the +/- buttons.
or
Move a fader/rotary controller.
Simply moving a fader/rotary controller will make it the currently selected controller, ready for editing.
You can also select any of the 4 assignable buttons labelled with the transport bar icons by simply pressing them. It is however
not possible to select any of the 10 numerical buttons by pressing them, since during edit mode, they are used to enter
numerical values. To program these buttons, please use the first method.
Assigning MIDI CC’s
Once the controller you want to edit has been selected, you can change the assigned MIDI cc number in the following way:
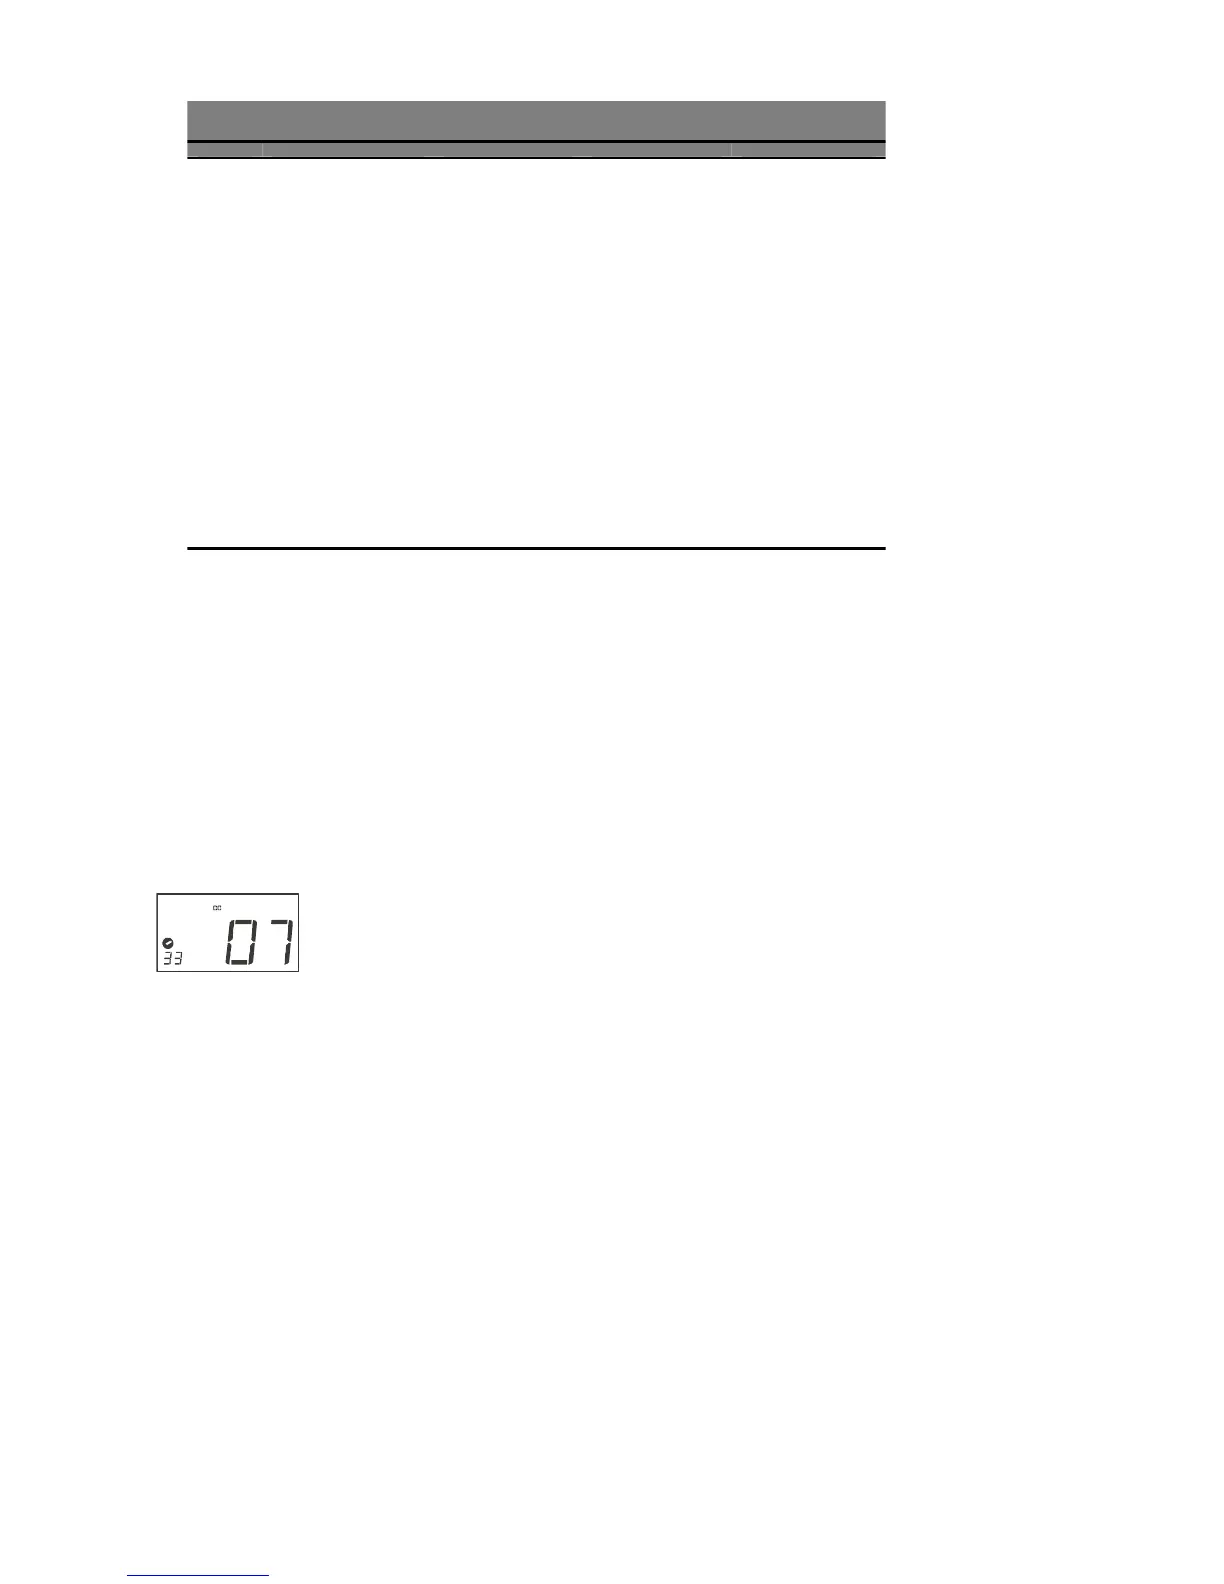
1. Press ASSIGN. The LCD will flash the CC symbol.
The 3 digit display will indicate the currently assigned MIDI cc number.
2. Type in a new MIDI cc value using the numeric keypad or ’+’ and ’-’ buttons.
The MIDI controller number you select will be assigned to the currently selected controller, shown by the number on the small, 2-digit
display.
Example: After pressing ASSIGN, the display shows the cc symbol and in this case displays that currently the MIDI cc 07 is assigned to fader/rotary controller
number 33.