421509-en-GB_v2.6 8/16
5
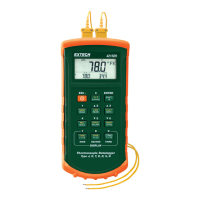
Shift Mode
The operating functions for the shift mode are printed in yellow on the buttons. When in normal
mode, push the SHIFT button to switch to shift mode. The word “Shift” will be displayed in the lower
right corner of the LCD. To switch back to normal mode, press the SHIFT button again.
°C/°F Key
Readings can be displayed in degrees Celsius (°C) or degrees Fahrenheit (°F). Note that the meter
remembers the unit of measure when it is turned off. Press the °C/°F key to change the temperature
units.
SAVE Button
The save function stores T1 and T2 measurements in up to 128 locations in non-volatile memory.
Press the SAVE button to store the current reading, the word “SAVE” is momentarily displayed on
the bottom right LCD to indicate that the data has been saved. Data can be read using the read
function in normal mode.
LOG Button
The data log function continuously records measurement data using the stored sampling interval.
The time interval is set using the interval time setup function [INTV] in the setup mode.
Press the LOG button to activate the log function. “LOG” will be displayed and “MEM” will
continuously flash on the LCD. There are 16 groups that are used for storing the log data and each
group has 64 data locations. If the current session exceeds 64 locations, the log function will
automatically use the next group to continue storing the data. A maximum of 1024 locations can be
saved in one log session.
Press the LOG button again to exit the data log function.
CLR ? Button
The CLR function clears all the saved and logged data in memory. When the CLR button is pressed,
“MEM” is displayed and “CLR” flashes on the upper right of the LCD.
Press the overlay “ENTER” button to clear all saved and logged data, or the “ESC” button to exit the
function.
REL Button
Press the REL key to enter the Relative mode. The meter will store the displayed reading (main
display) as a reference value and display ‘REL’. All subsequent readings will now display the
measured value less the stored reference value.
Press the REL key again to exit the relative mode.
[APO] Button
Press the APO button to enable/disable auto power off. “APO” is displayed on the upper left of the
LCD. When enabled, it will automatically turn the thermometer off if the key switch is inactive for the
preset auto power off time (default time for APO is 5 minutes). The time can be programmed in
Setup Mode. Press the Power button to resume operation.
Type Button (Main display
Press the TYPE button to select the thermocouple type (K, J, T, E, R, S, or N) in the main display. If
the inputs of the main and second display are the same, then pressing this button will change the
thermocouple type for both displays. The selected type becomes the default selection.
Type Button (Second display)
Press the TYPE button to select the thermocouple type (K, J, T, E, R, S, or N) in the second display.
If the inputs of the main and second display are the same, then pressing this button will change the
thermocouple type for both displays. The selected type becomes the default selection.