TM100 V1.2 3/110
4
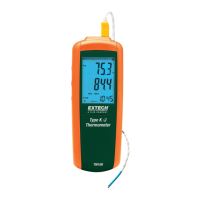
Setup option
The setup option is used to change the thermocouple type, to turn the sleep mode off/on
and to adjust the thermocouple offset.
Note: In the setup mode, the upper display shows menu items and lower display shows
settings.
1. Press the SET button for 3 seconds to enter or exit setup. When the thermometer
is in Setup mode, the display shows SETUP.
Set Type J or K thermocouple
1. Press ▲ or ▼to scroll to the “TYPE” setting (shown bottom left).
2. Press ENTER to choose the option.
3. Press ▼ to toggle between J and K.
4. Press the SET button for 3 seconds to save the setting and return to normal mode.
Set Sleep/Non-sleep mode
The thermometer enters sleep mode by default. The meter will automatically shut off
after 20 minutes if no button press occurs for 20 minutes. When the thermometer is in
Setup mode, the display shows SETUP.
1. Press ▲ or ▼to scroll to the “SLP” setting.
2. Press ENTER to chose the option “
On” or “OFF” will appear in the display.
3. Press ▼ to select on or off..
4. Press ENTER to store the new setting in memory.
5. Press SET button for 3 seconds to return to normal mode.
Set Offset
Use the offset option in Setup (T1menu item) to adjust the thermometer’s readings to
compensate for known temperature offset at a specific temperature. The allowable
adjustment range is ± 5.0°C or ± 9.0 °F.
1. Plug the thermocouple into the input connector.
2. Place the thermocouple into the known, stable temperature environment (such as a
ice bath or dry well calibrator). Allow the reading to stabilize.
3. Press ▲ or ▼to scroll to the “T1” option and press ENTER.
4. Change the offset temperature reading (upper display) by pressing ▼until it
reaches the desired temperature.
5. Press SET button for 3 seconds to return to normal mode.
Replacing the Batteries
1. Turn off the thermometer.
2. Loosen the screw and remove the battery door.
3. Replace the AAA batteries.
4. Replace the battery door and tighten the screw.