EasyManua.ls Logo

Faller TOP SPIN User Manual

Faller TOP SPIN
32 pages
To Next Page IconTo Next Page
Page #1 background imageLoading...
Page #1 background image
Sa. Nr. 227 754 0
KARUSSELL »TOP SPIN«
»TOP SPIN« ROUNDABOUT
CARROUSEL »TOP SPIN«
Art. Nr. 140431
Inhalt Spritzlinge
Contents Sprues
Contenu Moulages
Inhoud Gietstukken
1
1
x
2
1
x
3
1
x
4
1
x
5
2
x
6
1
x
7
2
x
8
2
x
9
1
x
10
1
x
11
1
x
12
1
x
13
1
x
Machen Sie sich bitte vor Beginn des Bastelns mit dem Bausatzinhalt und der Anleitung vertraut und prüfen Sie die Vollständigkeit.
Im Reklamationsfall gilt die gesetzliche Gewährleistungspflicht. Sollte ein Teil fehlen, übersenden Sie bitte den Teilewunsch und den
Kaufbeleg an: Gebr. FALLER GmbH, Kundendienst, Kreuzstraße 9, D-78148 Gütenbach, kundendienst@faller.de. Sollten Sie einmal
weitere Ersatzteile benötigen, senden wir Ihnen den benötigten Spritzling, bei Verfügbarkeit, gerne kostenpflichtig zu.
Bitte beachten Sie, dass produktionsbedingt Einzelteile übrig bleiben können.
Before building your model, please familiarize yourself with the contents of the kit and the instructions for use, also checking whether
the set of parts is complete. In case of any complaint, the legal guarantee obligation shall apply. Should a part be missing, please
send the designation of the part required and the receipt documenting your purchase to: Gebr. FALLER GmbH, Kundendienst,
Kreuzstraße 9, D-78148 Gütenbach, kundendienst@faller.de.
Should you require further spare parts one day, we shall be pleased to send you, with costs, the required sprue, if it is available.
Please note that, on grounds of the production process, some single injection molded parts may be superfluous.
Avant de commencer votre modèle, veuillez vous familiariser avec le contenu du kit et la notice d’emploi, et contrôlez que le lot de
pièces est complet. En cas de réclamation, il s’appliquera l’obligation de garantie légale. Au cas où une pièce manquerait, veuillez
envoyer la désignation de la pièce souhaitée et le bon d’achat à: Gebr. FALLER GmbH, Kundendienst, Kreuzstraße 9,
D-78148 Gütenbach, kundendienst@faller.de. Au cas où vous auriez besoin un jour d’autres pièces détachées, nous vous enverrons
volontiers la grappe requise, si elle est disponible, contre paiement.
Veuillez noter que, pour des raisons de production, il se peut que des pièces détachées soient superflues.
Maak uzelf vóór het bouwen vertrouwd met de inhoud van het bouwpakket en met de handleiding en controleer de volledigheid.
In geval van reclamatie geldt de wettelijke garantieverplichting. Mocht er een onderdeel ontbreken, stuur het verzoek om he
gewenste onderdeel en het aankoopbewijs dan naar: Gebr. FALLER GmbH, klantenservice, Kreuzstraße 9, D-78148 Gütenbach,
kundendienst@faller.de.
Als u ooit meer reserveonderdelen nodig hebt, sturen wij het benodigde gietstuk, indien beschikbaar, graag tegen betaling naar u op.
Let op: om productieredenen kunnen losse onderdelen overblijven.
D
F
GB
NL
Art. Nr. 170688
SPEZIAL-SEITENSCHNEIDER
zum gratfreien Abtrennen von feinsten
Spritzteilen.
Nur für Polystyrol geeignet.
Special side cutter for cutting off ultra-fine
moulded parts without burrs.
Only suitable for polystyrene.
Pince coupante spéciale pour couper sans bavure
les pièces miniatures moulées par
injection. Convient uniquement au polystyrène.
Speciale zijkniptang voor het braamloos
afknippen van de fijnste gietstukdelen.
Alleen geschikt voor polystyrol.
Für den Zusammenbau des Modells empfehlen wir folgende FALLER-Artikel (sind nicht im Bausatz enthalten):
For the assembly of the kit we recommend following FALLER products (not included in the kit):
Pour l’assemblage du modèle, nous vous recommandons les articles FALLER suivants (non inclus dans le kit):
Om dit model te bouwen adviseren wij de volgende FALLER producten (maken geen deel uit van deze bouwset):
Art. Nr. 170492
FALLER-EXPERT
Flüssigkleber in Plastikflasche mit Spezialkanüle
für feinste Klebstoffdosierung.
Liquid cement in plastic bottle with canule
for very fine dosage.
Colle liquide en bouteille plastique
avec bec verseur pour un dosage précis.
Vloeibare lijm in plastic-flacon met doseerbuisje
om nauwkeurig te lijmen.
Question and Answer IconNeed help?

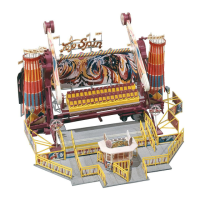
Do you have a question about the Faller TOP SPIN and is the answer not in the manual?

Faller TOP SPIN Specifications

General IconGeneral
BrandFaller
ModelTOP SPIN
CategoryToy
LanguageEnglish

Summary

Carousel Top Spin Model Introduction

Important Safety and Handling Instructions

Provides instructions for handling the model kit, reporting missing parts, and ordering replacements.

Recommended Assembly Tools

Lists essential FALLER products like glue and cutters for model assembly.

Sprue Contents Overview

Details the different types and quantities of sprues included in the model kit.

Window Foil Application

Cutting and Applying Window Foil

Instructions on how to cut and affix the transparent window foil to window frames.

Window Foil Dimensions and Types

Illustrates various sizes of window foil with their corresponding part numbers for application.

Decorative Elements and Assembly Steps

Applying Decorative Parts

Shows the placement of various decorative elements (Deco 31-35, 24) onto the model structure.

Model Component Assembly (A-N)

Illustrates the assembly of specific model components labeled with letters A through N.

Advanced Model Assembly

Detailed Component Assembly (O-Z)

Illustrates the assembly of further model components, labeled O through Z.

Sub-assembly Instructions

Provides step-by-step guidance for assembling key sub-assemblies like 4/7 and 4/9.

Structural Assembly and Details

Chassis and Sensor Integration

Details the assembly of the chassis (c, d) and the integration of the Reed-Sensor.

Decorative Panels and Bridge Assembly

Shows the application of decorative panels (Deco 49-52) and the assembly of the bridge structure (g).

Lighting and Decorative Components

Applying Decorative Elements

Illustrates the placement of decorative parts like Deco 12, 8, 13, 9, 30, 29.

Illumination Unit Information

Notes that the illumination unit (Art. Nr. 180671) is not included with the kit.

Lubrication and Component Details

Lubrication Instructions

Details using special grease for brass wheels and oil for other gears/bearings.

Specific Component Identification

Highlights specific parts like Expert Rapid Art. 170500 and brass wheels.

Mechanical Assembly and Screw Tightening

Gear and Cover Assembly

Instructions for pressing covers onto gear wheels, ensuring pins align correctly.

Proper Screw Tightening Technique

Guides on tightening screws to prevent stripping or damage to plastic parts.

Trailer Assembly and Motor Connection Caution

Trailer Arm Alignment

Ensures the supporting arms are mounted perpendicularly to the trailer.

Motor Connection Warning

Advises against connecting motors directly to the transformer; use supplied circuitry only.

Chassis and Drive Mechanism Assembly

Assembly of Vertical Structures

Details the assembly of vertical components and decorative elements like Deco 20 and 21.

Main Chassis Construction

Shows the assembly of the main chassis, drive components, and wiring connections.

Detailed Assembly and Cement Usage

Applying Instant Modelling Cement

Instructs to use instant modelling cement for specific assembly points.

Component Integration and Wiring

Shows the integration of various components and the routing of wiring, including the Reed-Sensor.

Drive Mechanism and Mounting Aid

Gear and Belt Assembly

Details the assembly of gears and belts, including parts like 9/3, 9/4, 9/5, 9/6, 8/3, 8/2.

Using the Mounting Aid for Curves

Details the use of the mounting aid (13/4) for specific assembly steps.

Final Assembly and Testing

Securing and Testing Components

Instructions for securing screw heads with cement and testing component function.

Decorative Elements and Mounting Aid Removal

Shows placement of Deco 46, 28, 45, 27 and removal of mounting aid.

Decorative Accents and Magnet Details

Applying Decorative Strips

Illustrates the application of various decorative strips (Deco 23, 26, 42, 41, 22, 25, 43).

Magnet Component Information

Details components related to magnets, including their size and type.

Detailed Assembly with Specific Glue Points

Applying Cement to Specific Points

Highlights specific locations where instant modelling cement must be applied.

Assembly of Decorative and Structural Parts

Shows the assembly of parts like Deco 39, 54, and structural elements with glue points.

Chassis Components and Magnet Assembly

Magnet and Plexiglass Container Details

Information on magnets and the plexiglass container for lubrication.

Structural Assembly with Deco Elements

Illustrates the assembly of chassis parts with decorative elements like Deco 1, 44, 5.

Final Chassis Assembly and Finishing

Applying Decorative Elements to Chassis

Shows the application of Deco 2 and other decorative parts to the chassis.

Final Assembly Steps

Illustrates the final assembly stages for the chassis structure.

Curved Structure Assembly

Assembling Curved Frames

Instructions for assembling the curved frame structure using various numbered parts.

Using the Mounting Aid for Curves

Details the use of the mounting aid (2/1) in assembling the curved sections.

Decorative Elements for Curved Structures

Applying Decorative Panels

Shows the application of decorative panels (Deco 53, 47) to the curved structures.

Attaching Cords

Illustrates the process of attaching cords ('Faden') to the model components.

Modular Tower Assembly

Preparing and Assembling Tower Sections

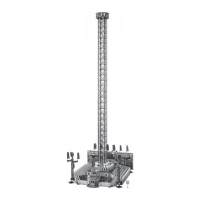
Instructions for cutting marked spots and assembling tower sections with decorative elements.

Left and Right Tower Assembly

Details the assembly of left and right tower sections, including parts like 7/9 and 8/11.

Illumination Unit and Drive Assembly

Illumination Unit Not Included

States that the illumination unit (Art. Nr. 180671) is not included with the kit.

Assembling Drive Mechanisms

Shows the assembly of drive mechanisms with specific instructions regarding glue.

Display Stand Assembly

Applying Decorative Panels to Stand

Illustrates the application of decorative panels (Deco 17, 4, 3, 16, 10, 11, 14, 15, 6, 7) to the display stand.

Final Assembly of Stand Components

Shows the final steps in assembling the display stand structure.

Test Run and Operational Safety

Test Run Procedure

Details how to conduct a test run using the electronic equipment, not mechanical stopping.

Mechanical Stopping Warning

Warns against stopping the model mechanically to prevent gear damage.

Final Component Attachment

Attaching Control Mechanisms

Shows the attachment of control mechanisms and parts like 8/8, 8/7, 1/7, 1/8.

Final Structural Connections

Illustrates the final connections of structural elements and wiring.

Model Completion and Wiring

Connecting Electrical Components

Shows the connection of electrical components and wiring to the main structure.

Finalizing Model Assembly

Illustrates the final stages of model assembly, including specific part placements.

Final Assembly Details

Connecting Structural Elements

Details the connection of key structural elements like 3/15 and 3/14.

Final Model Check

Final Gluing Instructions

Provides final instructions regarding glue application, noting specific areas not to glue.

Electronic Control and Wiring Diagram

Control Unit and Sound Module Connections

Illustrates the wiring connections for the control unit (140431) and sound module (180730).

Motor and Reed Connections

Details the specific connections for Motor 1, Reed 1, Motor 2, and Reed 2.

Digital Control Settings and Programming

CV Configuration for Operation

Details CV settings for software version, manufacturer code, and operating modes.

Button Programming and Mode Selection

Explains how to program the unit using buttons and select between DCC and Motorola formats.

Related product manuals