Do you have a question about the fantastic furniture VISION and is the answer not in the manual?
| Brand | fantastic furniture |
|---|---|
| Model | VISION |
| Category | Indoor Furnishing |
| Language | English |
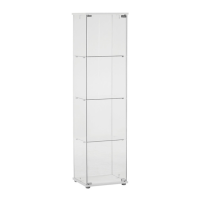
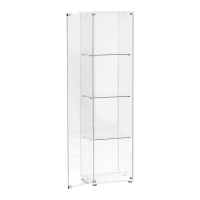
Special care is required when handling tempered glass to prevent damage.
Assembly of the display cabinet requires two people.
Read instructions carefully and verify all parts are present before starting assembly.
Lay out components on a soft surface and organize hardware before fastening.
Avoid fully tightening screws initially and do not apply glue until parts are confirmed to fit correctly.
Lists all necessary parts and hardware for assembly, including their labels.
Specifies the tools needed for assembly, such as a Phillips screwdriver.
Attach feet to the base panel using screws.
Insert the back panel into the groove of the base panel.
Attach strip joiners to the back panel sides with assistance.
Insert side panels into the base groove and strip joiners.
Position the top panel onto the assembled side and back panels.
Secure the cabinet structure using rear and front brackets with screws and bolts.
Insert shelf lugs into side panels and attach magnetic catches to top and base.
Attach door hinges to the door using hinge bolts and a screwdriver.
Insert sleeves into top and base, then mount the door by aligning hinges.
Attach the strike plate and door handle to the door.
Place shelves onto the installed shelf lugs, ensuring they sit firmly.
Fix the unit to the wall using a wall strap, screws, and washer for stability.
The assembly is complete. Dispose of packaging responsibly.