This document serves as a quick start guide for the Feiyu SCORP-Mini 2 3-Axis Handheld Gimbal for Camera, providing an overview of its components, setup instructions, and operational features.
Overview and Components
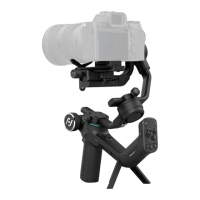
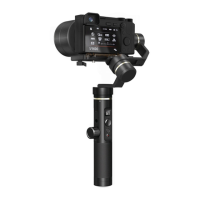
The gimbal is designed to stabilize cameras and smartphones for shooting, with various components facilitating its operation. Key parts include:
- Power button [1]: For turning the device on/off and managing sleep mode.
- Trigger button [2]: Used for face tracking, recentering, selfie mode, and switching roll axis.
- Handle [3]: The main grip for holding the gimbal.
- F2 button [4]: Controls screen lock/unlock, returns to home page, enters FFW mode, and motor power auto tuning.
- Touch screen [5]: Provides an interface for various settings and controls.
- Shutter button [6]: For focusing, starting/stopping recording, and taking photos.
- Mode button [7]: Switches between PF, PTF, and FPV modes, and performs horizon calibration.
- Joystick [8]: Controls tilt and pan axes movement, and album navigation in the Feiyu ON App.
- F1 button [9]: Accesses album, portrait mode, AI power, and AI tracking.
- FPV button [10]: Enters/exits FPV mode.
- Knob function switching button [11]: Switches control objects for the multifunction knob and toggles between electronic focus/zoom.
- Multifunction knob [12]: Controls roll, tilt, and pan axes, electronic focus/zoom, and focus motor, and adjusts parameters on the touch screen.
- Anti-drop lock for slider [13]: Secures the slider.
- Quick release plate lock [14]: Locks the quick release plate.
- Fixed plate [15]: A base for mounting accessories.
- Slider lock [16]: Locks the slider in place.
- Anti-drop lock [17]: Prevents components from falling.
- Quick release plate [18]: For quick attachment and detachment of cameras.
- Slider [19]: Allows for horizontal adjustment of the camera.
- Slide arm [20]: Part of the tilt axis mechanism.
- Slider lock [21]: Locks the slider.
- Roll axis [22]: The axis that controls the camera's roll movement.
- Roll lock [23]: Locks the roll axis.
- Tilt axis [24]: The axis that controls the camera's tilt movement.
- Tilt lock [25]: Locks the tilt axis.
- Cross arm [26]: Part of the roll axis mechanism.
- 1/4 inch thread hole [27]: For attaching additional accessories.
- Camera for tracking module [28]: Where the tracking module camera is located.
- Indicator light for tracking module [29]: Shows the status of the tracking module.
- Extension port [30]: For connecting extensions.
- Camera control port/USB-C Power Output Port [31]: For camera control and power output.
- Anti-drop lock for sliding arm [32]: Secures the sliding arm.
- M6 threaded hole [33]: For attaching accessories.
- Lens holder [34]: Supports the camera lens.
- Lens holder screw [35]: Secures the lens holder.
- Versatile arm [36]: A multi-purpose arm.
- Pan axis [37]: The axis that controls the camera's pan movement.
- Pan lock [38]: Locks the pan axis.
Getting Started and Charging
Before initial use, the gimbal's battery must be fully charged using a USB-C cable, which supports quick charging.
Gimbal Balancing and Mounting Equipment
The gimbal is folded by default. To prepare for use, unlock all three axes and adjust the gimbal to its balancing position, then lock the axes. This ensures proper operation and stability.
Installing Fixing Accessories
When using cameras, phones, or other shooting devices, specific fixing accessories must be installed first. The fixed plate, slider, or smartphone holder can be installed by unlocking, sliding into the slot, and then locking.
Mounting the Shooting Equipment
Before mounting a camera, ensure it is ready for shooting (lens installed, cover removed, memory card and battery inserted and charged). The gimbal should be powered off or in sleep mode and adjusted to its balancing position.
Attach the Quick Release Plate
Attach the quick release plate to the camera by tightening the screw. If the camera lacks a 1/4-20 inch screw hole, use a mount adapter. Smartphones can be mounted using the optional smartphone holder.
Install Lens Holder (Optional)
If needed, install the lens holder on the quick release plate, ensuring the rubber is directly under the lens. This is recommended for long or heavy lenses.
Mount Camera on Gimbal
Unlock the gimbal, slide the camera into the slot, lock it, then loosen and slide it into the slot as indicated. Adjust the camera forward/backward until it is roughly balanced, then tighten. It is recommended to push the camera against the tilt axis. Unlock to adjust the camera left/right according to its width, then lock.
Gimbal Balancing
Proper balancing is crucial before shooting. Hold the camera first, then move the slide arm, cross arm, and vertical arm.
Balancing the Tilt Axis
Balancing the Vertical Tilt
a. Unlock the tilt lock and loosen the slide arm lock.
b. Rotate the tilt axis so the camera lens points upward. Check which way the lens tilts.
c. If the lens tilts to one side, move the slide arm to the opposite direction until the camera points steadily upward.
d. Tighten the slide arm lock while holding the camera.
Adjust Depth for the Tilt Axis
a. Rotate the tilt axis so the camera lens points forward. Check which way the lens tilts.
b. If the lens tilts to one side, unlock the quick release plate lock and move the quick release plate to the opposite direction until the camera points steadily forward.
c. Lock the quick release plate lock while holding the camera.
The tilt axis is balanced when the camera remains steady when tilted up or down by 45°.
Balancing the Roll Axis
a. Unlock the roll lock and check which way the camera tilts.
b. If the camera tilts to one side, loosen the cross arm lock knob and move the cross arm to the opposite direction until the camera stays still and horizontal to the ground.
c. Tighten the cross arm lock knob.
The roll axis is balanced when the camera stays still and horizontal to the ground.
Balancing the Pan Axis
a. Unlock the pan lock. Hold the tripod and tilt the gimbal forward until it is horizontal to the ground.
b. If the camera tilts to one side, loosen the vertical arm lock knob and move the vertical arm to the opposite direction until the camera stays still and horizontal to the ground.
c. Tighten the vertical arm lock knob.
The pan axis is balanced when the camera stays still and horizontal to the ground.
Operation
Power ON/OFF
Before powering on, ensure the gimbal is balanced and all three axes are unlocked. If axes are locked, the gimbal enters sleep mode; single tap the power button to wake it up after unlocking. Set motor power after initial power-on or lens changes. Long press the power button until a beep sound is heard to power on/off.
Follow Mode Introduction
- PF (Pan Follow): Only the pan axis follows user hand movement.
- PTF (Pan and Tilt Follow): Both pan and tilt axes follow user hand movement; roll axis does not.
- FPV (First Person View): Pan, tilt, and roll axes follow user hand movement.
- Lock: All three axes are fixed; gimbal keeps the camera direction fixed.
- FFW (Flash Follow): All three axes follow user hand movement at high speed.
- Power button: Long press for power on/off. Single tap for wake-up (from sleep mode) or battery level display (when powered off). Double tap to enter sleep mode.
- Mode button: Single tap to switch between PF (default), PTF, and FPV modes. Tap five times for horizon calibration.
- Joystick: Pushes to control tilt and pan axes movement, or to control the album in the Feiyu ON App.
- Trigger button: Single tap for face tracking (in Feiyu ON App). Double tap for recentering. Triple tap to enter/exit selfie mode (pan axis turns 180°). Tap four times to switch roll axis to back/front (useful for reducing obstruction). Press and hold for lock mode (release to exit). Functions can be customized via the app.
- Shutter button:
- Camera Connected: Press half way for focus. Single tap (fully) to start/stop recording. Long press (fully) to take a photo.
- Phone Connected: Press half way for focus (Feiyu ON App). Single tap (fully) for shutter. Long press (fully) to switch between video/photo mode (Feiyu ON App).
- FPV button: Single tap to enter/exit FPV mode.
- F1 button: Single tap to enter/exit album (in Feiyu ON App). Double tap to enter/exit portrait mode. Triple tap for AI power on/off. Long press to enter/exit AI tracking (with AI Power enabled).
- Knob function switching button: Single tap to switch the control object while controlling the movement of the 3 axes (Tilt/Pan/Roll). When in electronic focus/zoom control state, single tap to switch between electronic focus and electronic zoom. Long press to switch the control options of the multifunction knob in turn (movement of the 3 axes, electronic focus/zoom).
- Key Combinations: Long press F1 button + F2 button to clear Bluetooth.
Touch Screen Operation
The touch screen allows access to various settings:
- Follow mode: Select between PF, PTF, FPV, Lock, and FFW.
- Scenario: Scenario-based functional application.
- Joystick setting: Adjust joystick parameters.
- Gimbal setting: Configure gimbal-specific settings.
- Bluetooth setting: Manage Bluetooth connections.
- Shooting parameters settings: Swipe from left to right to adjust F, ISO, Shutter, DPI, and FPS.
- Multifunction knob settings: Swipe up to access multifunction knob settings.
- Return to previous menu: Swipe to right.
- Motor power: Use auto tune to adjust motor power automatically, or manually for each axis.
- Follow speed: Select different gimbal follow speed profiles, or custom follow speed.
AI Tracking
When AI Power is on, the following controls are available:
AI Gesture Control
- OK gesture (Left or right hand): Start tracking/Stop tracking. Start tracking with a green light; repeat to stop tracking and enter standby mode with a red light. Two gestures must be separated by 3 seconds.
- Thumbs opposite direction: Stop tracking. Stop tracking and enter standby mode with a red light.
- Spread palm (Left or right hand): Shutter. When the smartphone is in photo/video mode, take a photo or start recording after a 3-second countdown. Repeat the gesture to stop recording.
- Double L-Shaped gestures: Custom framing. Start framing with a fast-blinking green light. When the subject moves to the desired position, perform the gesture again to complete framing, and the green light stays on.
- Long press F1 button: Start tracking/Stop tracking.
- Triple tap F1 button: AI power on/off.
Maintenance Features
- Charging: Fully charge the battery before first use using a USB-C cable.
- Balancing: Always balance the gimbal before shooting to ensure optimal performance and protect the motors.
- Motor Power Adjustment: Set motor power after initial power-on or when changing cameras/lenses. Use auto-tune or manual adjustment for each axis.
- Sleep Mode: If axes are locked when powered on, the gimbal enters sleep mode to protect itself. Unlock axes and single tap the power button to wake up.