6
EN
may significantly increase the exposure level
- thetimeswhenthetoolisswitchedofforwhen
it is running but not actually doing the job, may
significantly reduce the exposure level
Protect yourself against the effects of vibration by
maintaining the tool and its accessories, keeping
your hands warm, and organizing your work
patterns
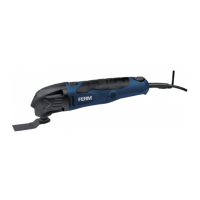
DESCRIPTION (FIG. A)
Your multitool has been designed for light
sanding, sawing and scraping applications.
1. On/offswitch
2. Speed adjustment wheel
3. Mountingpointforaccessories
4. Grip
5. Allen key
6. Allenkeyholder
13.Carbonbrushcover
ASSEMBLY
Before assembly, always switch off the
machine and remove the mains plug from
the mains.
Mounting and removing the sanding pad and
the sanding paper (fig. B)
The sanding pad and the sanding paper must be
used for sanding applications.
Mounting
• Placethemachineonatablewiththemounting
point(3)facingupwards.
• LoosentheAllenscrew(7)usingtheAllenkey(5).
• Mountthesandingpad(9)tothemountingpoint
(3).
• TightentheAllenscrew(7)usingtheAllenkey(5).
• Mountsandingpaper(10)withtherequired
grainsizeontothesandingpad(9).Makesure
thattheperforationinthesandingpaper(10)
corresponds with the perforation on the sanding
pad(9).
- Usecoarsesandingpaper(grain50)for
sanding rough, uneven surfaces.
- Usemediumsandingpaper(grain80)for
removing the remaining scratches from the
coarse sanding paper.
- Usefinesandingpaper(grain120)for
finishing surfaces.
Removing
• Placethemachineonatablewiththemounting
point(3)facingupwards.
• Removethesandingpaper(10)fromthesanding
pad(9).
• LoosentheAllenscrew(7)usingtheAllenkey(5).
• Removethesandingpad(9)fromthemounting
point(3).
• TightentheAllenscrew(7)usingtheAllenkey(5).
Mounting the dust extraction (fig C1 + C2)
The dust extraction piece can be used to connect
the machine to a vacuum cleaner when sanding.
Dustwillbeextractedandyourworkareastays
cleaner.
the dust extraction adapter can only be
used in combination with the sanding
pad (9).
To install the dust extraction adapter:
• Ifnotdoneyet,removetheaccessoriesfrom
themachinespindle(3).
• Assemblethedustextractionparts(15Ato
15D)togetherlikeshownin(Fig.C1andC2)
• Clicktheadaptertothemachinespindleuntil
itfixeswell,makesuretherearfingers(15C)
click into the gaps on the machine housing.
• Addthefeltring(15E)betweenthepadandthe
adapter for a tight sealing and assemble the
sanding pad like instructed in previous chapter.
• Connectavacuumcleanertotheadapterend
(15D).
Mounting and removing the saw blade (fig. B)
The saw blade must be used for sawing applications.
Mounting
• Placethemachineonatablewiththemounting
point(3)facingupwards.
• LoosentheAllenscrew(7)usingtheAllenkey(5).
• Removethespacer(8).
• Mountthesawblade(11)tothemountingpoint
(3).
• Mountthespacer(8).
• TightentheAllenscrew(7)usingtheAllenkey(5).