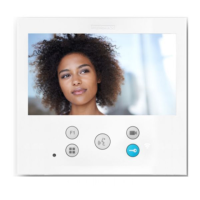
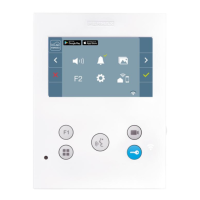
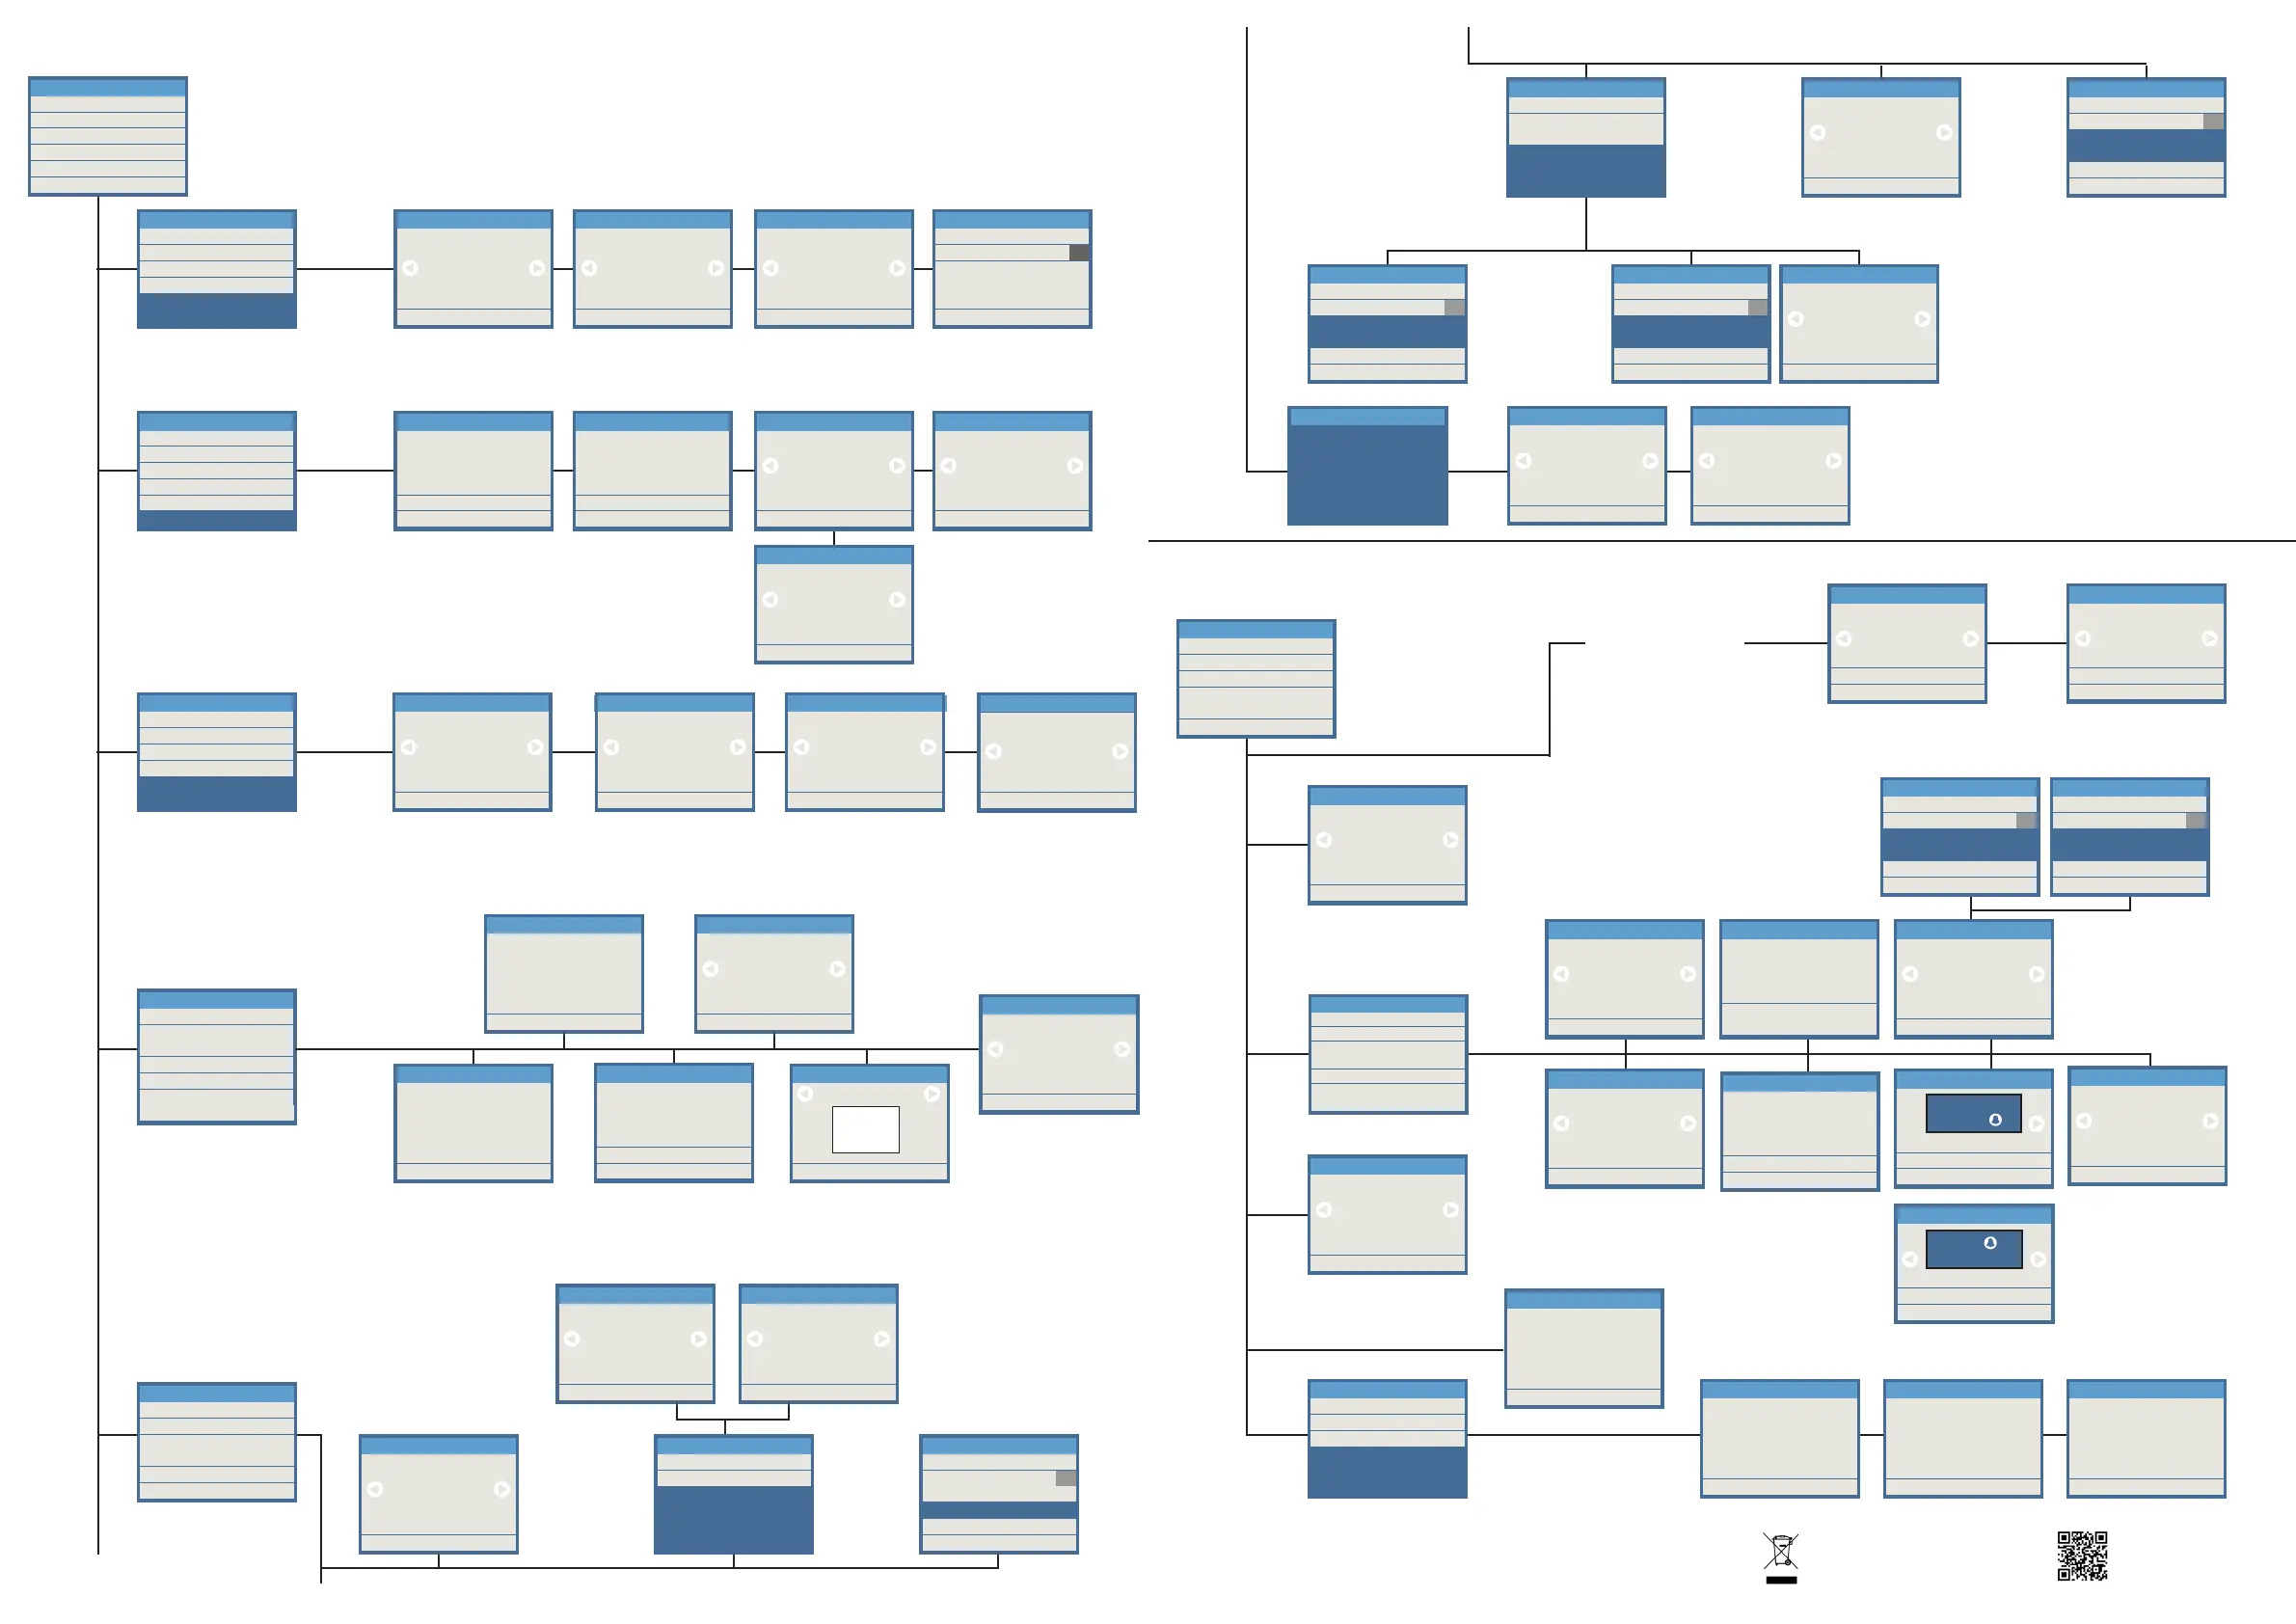
CONFIGURATION MENU
DISPLAY MENU
Select between European,
American or manual
daylight savings
Adjust audio level
nocturnal schedule (0-9)
Enter the start and end
for nocturnal schedule
(reduced audio
volume)
Select the date with
the arrows.
A: Delete marked data
B: Conrm
DISPLAY MENU:
This allows you to set the
display information
Select, via the numeric
keypad, the desired
conguration
Delete the unit’s settings
Use with care.
This option is irreversible
Use the keypad to select the desired
update.
Updates via the RS-485 port
(See advanced Manual for more details)
Enter the current time.
Select the date with
the arrows.
A: Delete marked data
B: Conrm
The CONFIGURATION MENU lets you set the panel´s parameters
Select, via the numeric keypad, the desired conguration
1. CODES
2. ACCESS CONTROL
3. CALL
4. PANEL
5. CLOCK
6. VIDEO QUALITY
2. SETTINGS
This option allows you to congure the identication codes used by different users.
Use the numeric keypad to indicate the desired option, amongst the ones available.
Within each of the options, select with the arrows or enter data via the keypad, and conrm with B
Enter the identication
code length
Enable or disable the
keypad
to use the different
identication codes
1. ENABLE CODE
2. CODE DIGITS
3. INSTALLER
4. ACCESS TIME
1. CODES
Disabled
1. ENABLE CODE
Exit B
6
2. CODE DIGITS
Exit B
Enter the administrator
code
-----
3. INSTALLLER
Exit B
Enter the postman’s code
and the start and end time
between
which you can access
START 09 00
END
-----
4. ACCESS TIME
Exit B
Delete A
01 30
This option allows you to congure
the entrance control parameters
Within each of the options, with the
arrows select or enter data via the
keypad, and conrm with B
Lock-release activation
time in seconds, when
opened from the residence
Lock-release activation
time in seconds, when
opened from the entrance
hall’s button
1. DOOR OPEN TIME
2. HALL TIME
3. PROX READER
4. PIN REQUEST
5. DOOR SENSOR
2. ACCESS CONTROL
Delete A
03
1. DOOR OPENING TIME
Exit B
Delete A
06
2. HALL TIME
Exit B
Type of cards to be use:
Wiegand or Data/Clock
3. PROX READER
Exit B
Data/Clock
Indicate whether a PIN
code associated with the
proximity card will be used
(enabled) or not (disabled)
4. PIN REQUEST
Exit B
Disabled
Exit
B
Delete A
4. SET TIME
Hour 17
Minutes 15
Exit B
Disabled
5. DAYLIGHT SAVING
1. START TIME
2. END TIME
3. VOLUME
6. NIGHT TIME
Exit
B
Delete A
Hour 08
Minutes 00
1. START TIME
Exit
B
Delete A
Hour 20
Minutes 15
2. END TIME
Exit B
1
3. VOLUME
Time and display options
Select the desired option
with the keypad
Time and date
format options
Enabled:
Display time and date
Select if you want a
12h or 24 h format
Select the date
presentation format:
- DD/MM/YYYY
- MM/DD/YYYY
- YYYY/MM/DD
- YYYY/DD/MM
Enter the current date.
Select the date with the
arrows.
A: Delete marked data
B: Conrm
1. SHOW
2. FORMAT
3. SET DATE
4. SET TIME
5. DAYLIGHT SAVING
6. NIGHT TIME
5. CLOCK
Exit B
Disabled
1. SHOW
1. DATE FORMAT
2. TIME FORMAT
2. FORMAT 3. SET DATE
Exit
B
Delete A
Year 20
Day 27
Month 10
Exit B
DD/MM/YYYY
2. FORMAT
Exit B
24H
2. FORMAT
1. MESSAGE
2. BACKLIGHT
3. SETTINGS
4. 4. LANGUAGE
5. RESET SETTINGS
6. UPGRADE
3. DISPLAY
1. PICTURES
2. TEXTS
3. FIRMWARE
6. UPGRADE
Select a user
(or all, with the “All users” option)
Write the message (up to 2 lines
with 16 characters)
MESSAGE. This allows
you to enter a message for
all users or the specied
user.
Modify A
Exit B
JAMES SMITH
001266
1. MESSAGE
Delete A
Exit B
----------------
----------------
1. MESSAGE
A
Exit B
Conrm
Are you sure?
3. FIRMWARE
A
Exit B
Conrm
Are you sure?
2. TEXT
A
Exit B
Conrm
Are you sure?
1. PICTURES
A
Exit B
Conrmar
Are you sure?
5. RESET SETTINGS
Screen brightness settings
as a percentage
Exit B
100%
2. BACKLIGHT
Select the language for
the display information
Exit B
English
4. LANGUAGE
Enabled: Active
the sound of the keypad
Screen settings
1. ALPHA KEYPAD
2. SCREEN TIME
3. SCREEN ACTIVATION
4. AGENDA
5. BUILDING NAME
6. SHOW PICTURES
3. SETTINGS
7. KEYPAD SOUND
Loop time in the
standby screen
Delete A
Exit B
00
2. SCREEN TIME
Indicate the building’s
name or similar
Delete A
Exit B
SKYLINE TOWER
5. BUILDING NAME
Enabled: The numeric
keypad acts as
alphanumeric
Exit B
Disabled
1. ALPHA KEYPAD
The screen will turn on:
- Key pressed
- Key or sensor
Select 1 or 4 names to
display on the screen
Exit B
4 names
per screen
4. AGENDA
Exit B
7. KEYPAD SOUND
Disabled
Exit B
Key or sensor
3. SCREEN ACTIVATION
Exit
B
Delete A
Hour 08
Minutes 00
1. START TIME
Exit
B
Delete A
Hour 20
Minutes 15
2. END TIME
JAMES SMITH
1. CALL FILTER
3. CALL 1. CALL FILTER 2. CALL CODES
3. AUTO HANG UP
This option allows you to congure
the way in which you can make
calls to the homes
Within each of the options, with the
arrows select or enter data via the
keypad, and conrm with B
1. CALL FILTER
2. CALL CODES
3. AUTO HANG UP
4. CALL DIGITS
3. CALL
Enabled, you can only call
homes from the directory, and
if they are not ltered
Exit B
Disabled
1. CALL FILTER
Enabled you can use the
alphanumeric call codes
via the number keypad
Exit B
Disabled
2. CALL CODES
Exit B
Disabled
3. AUTO HANG UP
Automatic hanging up
6
4. CALL DIGITS
Exit B
To select the number of
call digits from the General
Entrance 4 or 6. To select
this option you must choose
4. PANEL / 3. PANEL
TYPE: General Entrance
This option allows you to congure
the way in which you can make
calls to the homes.
Within each of the options, with the
arrows select or enter data via the
keypad, and conrm with B.
(*) NOTE: These options are
displayed or not, depending on the
type of panel chosen.
1. PANEL NAME
2. PANEL NUMBER
3. PANEL TYPE
4. MASTER
5. ZOOM
6. BLOCK
4. PANEL
Indicate the panel number
according
to the installation´s overall
characteristics.
DUOX: Between 0 and 9
Delete A
0
Exit B
2. PANEL NUMBER
Indicate the panel
type according to the
installation’s overall
characteristics:
- General Entrance
- Block Entrance
- Sub-block
Exit B
Block Entrance
3. PANEL TYPE
Indicate the sub-block number
according to the installation’s
overall characteristics.
Between 00 and 99
Delete A
00
Exit B
7. SUB-BLOCK
9. Full screen
5. ZOOM
Exit B
9
Congure the panel as
MASTER to allow for the
programming of terminals.
If there is another MASTER
panel, it would remain
deactivated
Exit B
Disabled
4. MÁSTER
Indicate the block number
according to the installation’s
overall characteristics.
Between 00 and 99
Delete A
00
Exit B
6. BLOCK
7. SUB-BLOCK
Indicates the mode in
which the display will show
the zoom
(*)
(*)
6. VIDEO QUALITY
Exit B
Premium
Exit B
Standard
6. VIDEO QUALITY 6. VIDEO QUALITY
The device you have purchased is identied
under Directive 2012/19/EU on waste electrical
and electronic equipment. More info:
For more information, visit www.fermax.com
Contact: tec@fermax.com / www.fermax.com/contact
Enables conversion
so that the ID screen-
printed on Fermax cards
and keyfobs matches
the code entered from
Display Plus SW.
3. PROX READER
Exit B
CONV. ON
Enable/Disable
the different images
of the carousel
Modify A
Exit B
6. SHOW PICTURES
Enabled
for assistance
Press
Modify A
Exit B
6. SHOW PICTURES
Enabled
Search name
and press
 Loading...