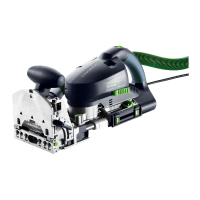
In the upper photo you can see the selec-
tion I made. I decided to have the leaf
become the focal point for the table when
extended. So, instead of building the leaf
with the same grain look of the rest of the
top, I instead built it as two side to side,
but not end to end, book-matched pairs
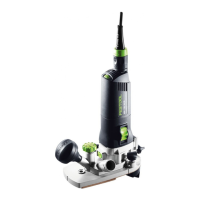
hinged in the middle. I used hidden Soss
hinges (red arrow) to hold the two leaf
parts together and allow them to be tight
when deployed (as shown above) yet
smooth in action as they are deploying.
You can see them in the photo right
where the leaf stack has been turned all
the way around to show the underside
(where the signature block is located) of
the left-most leaf half. The right-most leaf
half is in its normally deployed position.
You can also see the deployment guide
pads (green arrow) that swivel on the
dowel that connects the two pads side to
side.
The leaf halves were also joined with
Domino mortises and tenons the same
way the top glue up was done. I selected
walnut pieces which would produce an
hourglass look when the two pieces were
book-matched side to side. I purposefully
did not make these from the same pieces
of stock so the hinge line
would define two different
leaf halves rather than just
being an interruption to the
flow of the grain. It looks
really good in person, almost
jewel like.
While we are on these pho-
tos, notice how Domino te-
nons are used for the verti-
cal positioning of the two ta-
ble halves and the leaf to
table connections. On the
male side (where the tenon is glued in
place) the mortises are cut with the nar-
row tenon width setting. On the female
side they are cut with the intermediate
tenon width setting.
To locate everything side to side I used
standard leaf dowels. There are two
Domino tenons and one dowel on both
edges in each leaf half so the leaves are
well and properly located with no fear of
breakage over time even if someone
were to lift the table by the center leaf.
The table top and the leaf have grain
running side to side. That means they
 Loading...