Do you have a question about the Festool ETS150/3 EQ and is the answer not in the manual?
Read all safety warnings and instructions before operating the power tool to prevent injury.
Ensure power tool plugs match the outlet and avoid adapter plugs to reduce electric shock risk.
Avoid body contact with earthed surfaces to reduce electric shock risk.
Do not expose power tools to rain or wet conditions to prevent electric shock.
Never abuse the cord for carrying or unplugging and keep it away from hazards.
Use extension cords suitable for outdoor use to reduce electric shock risk.
Use an RCD-protected supply in damp locations to reduce electric shock risk.
Remain alert, watch your actions, and use common sense when operating a power tool.
Always wear eye protection and appropriate PPE for conditions to reduce personal injuries.
Ensure the switch is off before connecting or carrying the tool to prevent accidental starts.
Remove any adjusting key or wrench before turning the power tool on to prevent injury.
Keep proper footing and balance at all times for better control in unexpected situations.
Do not wear loose clothing or jewelry; keep hair away from moving parts.
Use the correct power tool for your application for better and safer results.
Do not use the tool if the switch does not turn it on and off; it must be repaired.
Disconnect power before making adjustments or changing accessories to prevent accidental starting.
Store idle tools out of reach of children and untrained persons.
Maintain tools by checking for misalignment or breakage; repair damaged parts before use.
Keep cutting tools sharp and clean for less binding and easier control.
Use the tool, accessories, and bits according to instructions and working conditions.
Keep handles dry and free of oil/grease for safe handling and control.
Have power tool serviced by a qualified repair person using identical replacement parts.
Hold tools by insulated gripping surfaces to prevent shock from hidden wiring.
Comply with safety regulations and use extraction systems for hazardous dusts.
Wear a P2 protective mask and protective goggles to protect health and against sanding hazards.
Prevent liquid polish from entering the machine to avoid electric shock risk.
Check for damage to machine and sanding pad if dropped; repair damaged parts before use.
Work in ventilated areas and use approved safety equipment to reduce exposure to hazardous dusts.
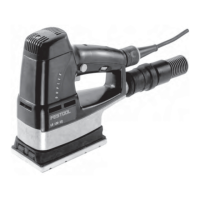
Details on tool's power consumption, no load speed, and number of strokes per minute.
Specifications for sanding stroke length for different models and sanding base diameter.
Information on the tool's weight and its safety level classification.
Symbol indicating a general danger warning.
Symbol prompting the user to read the operating instructions and notes.
Symbol indicating the need to wear protective goggles.
Symbol indicating the need to wear ear protection.
Symbol indicating the need to wear a dust mask.
Designed for sanding wood, plastic, composites, paint, varnish, and filling materials.
Not for processing metal or materials with asbestos content.
Ensure mains voltage matches the voltage on the rating plate for safe operation.
Always switch the machine off before connecting or disconnecting the power cable.
The switch is an on/off switch, with a locking button for continuous use.
Use extension cords with sufficient cross-section to prevent voltage drop or overheating.
Table providing correct cord size (AWG) based on extension cord length for optimal performance.
Regulate speed steplessly between 6000-10500 rpm to optimize sanding for different materials.
Sanding dust is trapped in a turbo-filter; change filter when extraction power diminishes.
Connect a Festool extractor instead of the inbuilt system for longer sanding jobs.
Fasten Stickfix sanding paper and felt quickly and easily onto the Stickfix sanding base.
Select disk hardness (Hard, Soft, Super-soft) based on surface type for optimal grinding.
Ensure the grinding disk is correctly positioned before screwing it tight.
Never overload the tool; moderate pressure yields best sanding results and surface quality.
ETS 150/3 EQ for surface quality/low abrasion; ETS 150/5 EQ for high abrasion/good quality.
Recommended rotary control settings for various sanding tasks like paint, wood, and primer.
Maintenance or repair requiring motor housing opening must be done by an authorized service workshop.
Always remove the plug from the mains supply socket before carrying out any work on the machine.
Always keep the machine and ventilation slots clean for optimal performance.
Sanding base is braked by a collar; replace collar if braking effect is reduced due to wear.
For safety reasons, only use original Festool accessories and tools.
Provides protection and storage for tools and accessories; stackable and connectable.
Instructions on how to open and lock the Systainer using the T-loc mechanism.
How to connect two Systainers together or a new generation Systainer to a previous one.
Tool is warranted free from defects for 3 years from purchase date, if used per instructions.
Details on the 1+2 year warranty, shipping responsibilities, and service validity.
Excludes normal wear, misuse, abuse, neglect, and damage from non-defect causes.
Warranty void if non-Festool accessories or consumables are used; user assumes risk.
Explains specific legal rights and limitations on implied warranties based on state/province.
| Orbit Diameter | 3 mm |
|---|---|
| Pad Size | 150 mm |
| Power Consumption | 310 W |
| Weight | 1.8 kg |
| Dust Extraction Connection Diameter | 27 mm |
| Speed | 4, 000 - 10, 000 RPM |
| Interchangeable sanding pad diameter | 150 mm |
| Cable Length | 4 m |
| Dust Extraction | Yes |