17
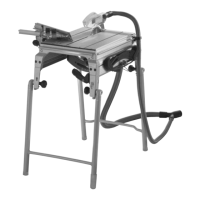
CS 50 EB
After cooling down, the machine accelerates again
automatically.
6.5 Brake
After switching-off the tool, the saw blade is elec-
tronically brought to a standstill in 1.5 – 2 seconds
(only for 230 V - 240 V configuration).
6.6 Restart protection
The built-in undervoltage release prevents that
the machine restarts on its own in the continu-
ous operation mode following a power cut. In this
case, the machine must first be switched off and
then on again.
7 Machine settings
Prior to any setting, maintenance or re-
pair, pull the mains plug!
To make setting easier, the saw unit can be locked
in the front position (Fig. 5): pull the saw unit
forwards as far as it will go and place the switch
[5-1] in the lower position.
The machine must not be used in the front
position!
7.1 Cutting depth
The cutting depth can be set steplessly (0 - 50 mm
with 90° position of the saw blade) by turning the
crank handle [5-4].
7.2 Mitre
The saw blade can be pivoted between 0° and 45°:
- Open the rotary knob [5-3].
- Set the mitre using the scale [5-6] by turning
the handle [5-2].
- Close the rotary knob [5-3].
For exact fitting work (relief cutting on the bor-
dering), the saw blade can be pivoted 2° beyond
the two end positions. To do so, the button [5-5]
is pressed in the end position; the saw blade can
then be pivoted up to -2° or 47°. On pivoting back,
both end positions are active once again.
7.3 Changing tools
Safety Instructions Fast-Fix Tension Nut
(see Fig. 7 A).
After tensioning, close the handle bow.
Only tighten or loosen the Fast-Fix Ten-
sion Nut by hand. Under no circum-
stances use the handle bow with aid of
screwdrivers, pliers, or other tools for
tightening or loosening.
If the nut cannot be loosened by hand, only
use a pin-type face spanner for support.
Never continue to use the Fast-Fix nut, in
case the handle bow is loose or damaged.
Due to the special shank, only the saw
blades offered by Festool for this machine
may be used.
- Open the locking mechanism [1-3] and remove
the bench insert [1-2] upwards.
- Open the locking mechanism [6-1] and swing
the saw blade cover [6-2] down. This automati-
cally locks the tool spindle.
- Shift the lever [7-5] and turn clockwise (left-
hand thread) to open the Fast-Fix clamp [7-4].
- Change the tool. In doing so, bear in mind:
• The Fast-Fix clamp [7-4], flange [8-1] and saw
blade must be clean.
• The direction of rotation on the saw blade [7-
6] must match the direction of rotation of the
machine [7-7].
• Place the saw blade on the centre of the flange
[8-1] and turn until the contour of the flange
and the saw blade hole lock.
- Firmly tighten the Fast-Fix clamp [7-4] anti-
clockwise; shift the lever [7-5].
- Swing the saw blade cover [6-2] upwards and
close the locking mechanism [6-1].
- Insert the bench insert with the rear edge first
(see Fig. 9) and close the locking mechanism
[1-3].
7.4 Setting the riving knife
The spacer wedge [7-1] is to be set in such a way
that the gap to the chuck of the saw blade is 3 to
5 mm.
- Use the Allen key [6-3] to remove the screw
[7-3] and take it out together with the clamping
element [7-2].
- After both of the screws [8-3] have been opened,
the guide element [8-2] can be shifted vertically
to set the gap between the spacer wedge and
saw blade.
- After completion of the setting, fit the spacer
wedge and clamping element again and tighten
all screws.
7.5 Guide
As shown in Fig. 3, the supplied guide can be se-
cured to all four sides of the machine. The guide
offers the following adjustment options:
• Adjustment parallel to the bench edge - open
the rotary knob [3-5].
• Adjustment vertical to the bench edge - open
the rotary knob [3-6].
• Adjustment of the sliding fence [3-1] in a lon-
gitudinal direction - open the rotary knob [3-2].
 Loading...