18
CS 50 EB
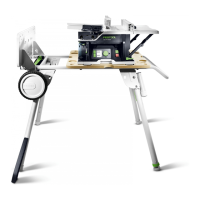
The sliding fence can be clamped onto the holder
in a low position for thin workpieces (Fig. 1), or
in a high position for thick workpieces (Fig. 3).
• Angle adjustment using the scale [3-7] - open
the rotary knob [3-3] and raise the fixing pin
[3-4]. The rotating fixing pin locks into place in
the most common angle positions.
This means that the guide can be used as a par-
allel guide (Fig. 1) or as a cross guide or angle
guide (Fig. 3).
Prior to all work, make sure that all rotary
knobs of the guide are tightened. The
guide may only be used in a fixed position
and not to shift the workpiece.
7.6 Scale for cutting width
The two scales [1-5] specify the cutting width for
longitudinal cuts.
If required, the scales can be realigned after open-
ing the screws [1-4].
7.7 Mounting the splinterguard
The splinterguard [10-2] prevents breakouts on
the lower cutting edge of the workpiece.
The splinterguard can be used for all mitres, but
a separate splinterguard must be fitted and sawn
in for each angle:
- Set saw blade to minimum cutting depth.
- Open the locking mechanism [1-3] and remove
the bench insert [1-2] upwards.
- Open the locking mechanism [6-1] and swing
the saw blade cover [6-2] down. This automati-
cally locks the tool spindle.
- Push splinterguard [10-2] from the side into the
holder [10-3] up to the stop.
- Swing the saw blade cover [6-2] upwards and
close the locking mechanism [6-1].
- Insert the bench insert with the rear edge first
(see Fig. 9) and close the locking mechanism
[1-3].
- Switch on tool and slowly move the saw blade
up to the maximum cutting depth – this cuts the
splinterguard to shape.
For a optimum function the raised part [10-1] of
the splinterguard should protrude slightly (approx.
0.3 mm) above the surface of the base runner. For
this purpose the height of the holder [10-3] can
be adjusted after releasing both screws [10-4].
8 Working with the machine
When working with the machine, comply
with all safety instructions.
Adjust the protective hood so that it rests on the
workpiece and clamp it in this position with the
knob [1-1].
For safety reasons, NEVER work without
an upper guard [6-4] fitted.
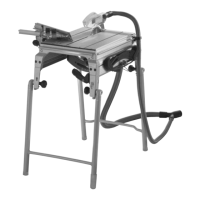
8.1 Bench-mounted circular saw
Use the guide as a parallel guide (Fig. 1) to guide
the workpiece. The cutting width can be set using
the scales [1-5]. Guide the workpiece into place
by hand. Use the workpiece holder [2-4] to guide
the workpiece safety past the saw blade. When not
in use, place the work-piece holder in the storage
compartment [2-1].
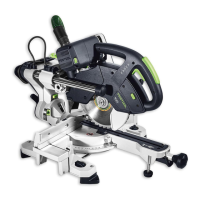
8.2 Circular trimming saw
Use the guide as a cross guide or as an angle
guide (Fig. 3) to apply and secure the workpiece.
Alternatively, clamps (489570) can be inserted in
the grooves [3-8] to secure the workpiece. Per-
form the sawing cut by swinging the hand grip
[3-9] downwards and using the hand grip to pull
the saw unit forwards. After making the sawing
cut, move the saw unit right back again into its
initial position before you take the workpiece from
the guide.
9 Maintenance and care
Prior to any setting, maintenance or re-
pair, pull the mains plug!
All maintenance and repair work which
requires the motor casing to be opened
may only be carried out by an authorised
service centre.
Damaged safety devices and parts should
be repaired or replaced by an authorised
service centre unless otherwise specified
in the operating instructions.
Customer service and repair. Only
through manufacturer or service work-
shops: Please find the nearest address
at: www.festool.com/Service
EKAT
1
2
3
5
4
Use only original Festool spare parts!
Order No. at: www.festool.com/Service
The saw is fitted with special carbon brushes
with automatic-switch-off. When the brushes
reach their wear limit the current is interrupted
automatically and the saw comes to a standstill.
Service your machine regularly to ensure that it
functions properly:
- Vacuum off dust deposits
- Keep the guide bars [1-10] clean and grease
them regularly
 Loading...