The risk from these expo
sures varies, depending on
how often you do this type of
work. To reduce your expo
sure to these chemicals:
work in a well ventilated
area, and work with approved safety equipment,
such as dust masks that are specially designed
to filter out microscopic particles. Wash hands
after handling.
WARNING
TO REDUCE THE RISK OF INJURY, USER
MUST READ INSTRUCTION MANUAL.
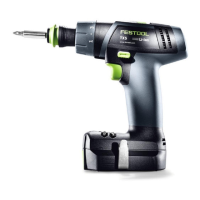
4 Intended use
Cordless drill suitable
– for screwing in and tightening screws,
– for drilling in metal, wood, plastics and
similar materials.
Not intended for clamping tools other than
drills and drill bits, e.g. compass saws, stirring
rods, metal brushes.
Charger MXC suitable
– for charging the listed battery packs.
– only for indoor use.
The user is liable for improper or non-in
tended use; this also includes continuous
industrial operation.
5 Technical data
Cordless drill TXS
Motor voltage 10.8 V
No-load speed*
1st gear
2nd gear
0–430 rpm
0–1300 rpm
Max. torque
soft/hard screwdriving appli
cation 10/16 Nm
Adjustable torque 0.3–3.4 Nm
Chuck clamping range 1/16" - 3/8"
1–10 mm
Max. drill diameter
Wood/metal
1/2" / 5/16"
12/8 mm
Tool holder in drill spindle 1/4"
Cordless drill TXS
Weight (incl. battery pack and
chuck) as per EPTA proce
dure 01:2014
2.4 lbs (1.1 kg)
Weight incl. battery pack and
Centrotec
2 lbs (0.9 kg)
* Speed values based on fully charged battery
pack.
More technical data about the charg
er and the supplied battery pack can
be found on page .
6 Functional description
The pictures for the functional description are
on a fold-out page at the beginning of the in
struction manual. While reading the manual
you can fold out the page for comparison and
quick reference.
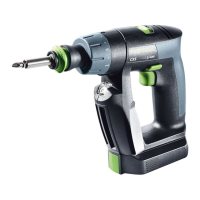
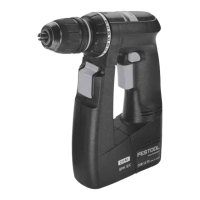
[1-1]
Drilling symbol
[1-2]
Torque thumbwheel
[1-3]
Torque/drilling position marking
[1-4]
Gear switch
[1-5]
Right/left switch
[1-6]
On/Off switch
[1-7]
Belt clip
[1-8]
Insulated gripping surfaces (grey
shaded area)
[1-9]
Button for releasing the battery pack
[1-10]
LED lamp with capacity indicator
[1-11]
Bit store
7 Commissioning
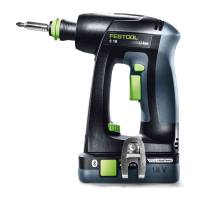
7.1 Changing the battery pack [2]
Battery pack is ready for use immedi
ately upon delivery and can be charg
ed at any time.
Removing the battery pack
► Press and hold the button [2-1].
► Slide the battery pack downwards to re
move.
Inserting the battery pack
► Slide the battery pack upwards into the ma
chine like shown in [2] until it engages.
English
10