5
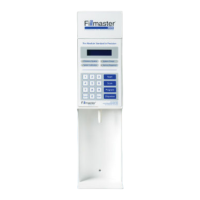
Part Three: Installing the Battery
The Digital Fillmaster ships with the battery removed.
The battery should not be installed until the Fillmaster
has been connected to the Water Purication System
and mounted on the wall in accordance with the
installation steps. The average life of the battery is
approximately nine months to one year under normal
use. The Digital Fillmaster will notify you when it is
time to order a new battery.
NOTE: Before inserting the battery for the rst time, make sure you have a cup under the
dispensing tip to catch any water that might come out. If the unit begins to dispense water
when the battery is inserted, press START key immediately.
1. Place a container under the Digital Fillmaster’s dispensing tip to catch any water
that may dispense during initial power up of unit.
2. Remove the top cover of the Fillmaster unit by sliding it up. Align the battery with the
connection slot on the dispenser. If the battery is in a position that would prevent the
cover from being put back on, it is backwards.
3. Push down rmly and squarely, inserting the battery card edge into the slot. When it
is in place, the Fillmaster will power on and begin its startup routine. Press the
START key on the keypad to reset the machine.
4. Slide the cover back on, concealing the battery.
5. Continue to Section6oftheWaterPuricationSystemInstallationsteps
(page XX) to nish activating the system.
 Loading...