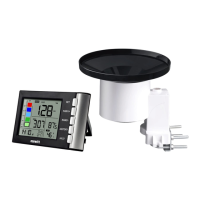
This document describes the WH5360B High Precision Digital Rain Gauge with Indoor Temperature and Humidity, a device designed for home use to provide indications of weather conditions. The rain gauge system consists of two main components: a Display Console (receiver) and a Wireless Rain Collector (transmitter).
Function Description
The primary function of this device is to measure and display rainfall data, along with indoor temperature and humidity. The Wireless Rain Collector, an outdoor sensor, collects rainfall data and transmits it wirelessly to the Display Console. The Display Console then processes and presents this information to the user.
The Display Console offers various modes and displays to provide comprehensive weather information:
- Rainfall Data Display: Shows current rainfall data, including rain rate, rain event, 1-hour rainfall total, and 24-hour rainfall total.
- Rainfall Grade Graph: A visual representation of rainfall intensity.
- Rainfall of Day/Week/Month/Year Display: Allows users to view rainfall totals for different time periods, including daily, weekly, monthly, yearly, and total rainfall.
- Time and Date Display: Shows the current time and date, with options for 12/24 hour format and different date formats (D-M/M-D).
- Indoor Temperature and Humidity: Measures and displays the indoor temperature and humidity. The unit takes measurements every 60 seconds.
- MAX/MIN Records with Timestamp: Tracks and displays the maximum and minimum indoor temperature and humidity values, along with the time they occurred.
- HI/LO Alarm Set Mode: Allows users to set alarms for various parameters, including time, rainfall rate (HI alert), rainfall event (HI alert), indoor temperature (HI/LO alert), and indoor humidity (HI/LO alert). When an alarm value is reached, the corresponding alarm icon flashes, and a buzzer rings for 2 minutes.
- Rain History Mode: Provides access to historical rainfall data, including 24 monthly rain history records and 730 days of daily rainfall records.
- Wireless Signal Strength Indicator: Shows the strength of the wireless signal between the outdoor sensor and the display console. During synchronization, the indicator adjusts based on signal reception.
Usage Features
Setting up the rain gauge involves a specific power-up sequence to ensure correct function. Batteries should be inserted into the Display Console first, followed by the Remote Sensor. It's crucial to use fresh batteries and ensure correct polarity to avoid damaging the outdoor sensor. Lithium batteries are recommended for cold weather climates, while alkaline batteries are sufficient for most other climates. Rechargeable batteries are not recommended due to lower voltages, limited temperature range performance, and shorter lifespan, which can lead to poorer reception.
The Wireless Rain Collector can be mounted using U-bolts on a 1" to 2" diameter pole or with screws on a flat surface. A bubble level on the sensor helps ensure it is leveled for accurate readings.
The Display Console features several buttons for navigation and setting adjustments:
- SET Button: Used to enter the setting mode, allowing users to configure time format, manual time, date format, date, temperature unit, and rainfall unit. A long press enters the setting mode, and subsequent presses skip through steps.
- RAIN 1/+ Button: In Normal Mode, this button alternates the display of rain rate, event, 1-hour, and 24-hour rainfall. In programming mode, it increases values. A long press clears the current rainfall data.
- RAIN 2/- Button: In Normal Mode, this button alternates the display of daily, weekly, monthly, yearly, and total rainfall. In programming mode, it decreases values. A long press clears the current rainfall data.
- HISTORY Button: In Normal Mode, a short press enters Day Rain History Mode, and a second press enters Month Day History View Mode. It also serves to return to Normal Mode from other modes.
- HI/LO Button: In Normal Mode, this button displays MAX/MIN values with timestamps. A long press enters the HI/LO Alarm Set Mode, allowing users to configure various alarms.
The console's screen is divided into 5 segments for selection, offering seven program modes: normal, setting, day rain history, month rain history, max/min, HI/LO alarm set, and factory reset/clear memory. All modes can be exited by pressing the HISTORY key or after a 15-second timeout.
For optimal wireless communication, it's advised to keep the console several feet away from electronic devices that generate electromagnetic interference (EMI), such as computer monitors and TVs. If other 915 MHz devices are present and communication is intermittent, temporarily turning them off can help troubleshoot radio frequency interference (RFI). The device has a line of sight rating of 300 feet, but real-world performance is typically around 100 feet due to barriers. Metal barriers like aluminum siding can block radio signals, so aligning the remote sensor and console through a window may be necessary.
Maintenance Features
Regular maintenance is essential for the longevity and accuracy of the rain gauge:
- Cleaning the Rain Gauge: The rain gauge mechanism should be cleaned every 3 months. This involves rotating the funnel counter-clockwise and lifting it to expose the mechanism. It should then be cleaned with a damp cloth to remove dirt, debris, and insects. If bug infestation is a recurring issue, lightly spraying the array with insecticide is recommended.
- Battery Replacement: Batteries should be replaced every 1-2 years. In harsh environments, a more frequent inspection (every 3 months) is advised to prevent battery leakage. When replacing batteries, applying a corrosion preventive compound to the battery terminals can help.
- Snow Prevention: In snowy environments, spraying the top of the rain collector with anti-icing silicon spray can prevent snow buildup, ensuring continuous operation.
Troubleshooting Guide
The manual provides a troubleshooting guide for common issues, such as the wireless remote not reporting to the console or dashes appearing on the display. Solutions include checking the remote-transmitter LED for flashing (which indicates battery status), replacing batteries, checking polarity, and performing a power cycle on the console. If the remote sensor search icon turns off and dashes persist, the remote sensor may be defective.
To prevent intermittent wireless communication, users are advised to install fresh batteries, ensure proper distance between the sensor and console (not too close or too far), avoid transmitting through solid metal or earth barriers, and move the display console away from electrical noise-generating devices. Moving the remote sensor to a higher or closer location can also improve signal reception.
For issues with temperature readings being too high, ensuring the console is placed in a shaded area on a north-facing wall is recommended. If the display console contrast is weak, replacing the console batteries with a fresh set is the solution.
Factory Reset/Clear Memory
The device supports a factory reset function. By pressing the "SET" and "HI/LO" buttons simultaneously while powering up the display, all previously set values will revert to their default settings. Additionally, pressing the "RAIN1/+" and "RAIN2/+" buttons for 5 seconds will initiate a 3-minute registration period for the transmitter signal.