EasyManua.ls Logo

Fish Tuning CSP5 - User Manual

Fish Tuning CSP5
6 pages
Print Icon
To Next Page IconTo Next Page
Loading...
Using Your Fish Tuning Digital CSP5 Switch
The first section covers the functions of the switch when the
ignition is on. The second section covers configuring the switch by
pressing buttons while you turn on the ignition.
The Features of Your New Digital CSP5 Switch
Instantly change to any tune with one button press
Lock in any tune till the password is entered
Always be on your chosen tune when you turn the key on. No
more cold morning starts on the wrong tune!
May be configured to start with a password required so strangers
can’t easily change tunes
May be logically removed from the CAN bus for testing.
May be used as a tune indicator for testing other switches
Effectively prevents other devices from changing the tune. Not
really, but it will generally change it back where it belongs within
1/20 of a second.
The current tune will be shown with , , , , or . The
displays shows the tune reported by the ECM so if it doesn’t yet
know the tune, it will show a .
The switch will not allow any other device to successfully change
the tune. Well, more correctly, if it sees the tune has been
changed, it will immediately change it back. Ive always thought
that if the driver installs a switch, that the passenger should not be
able to use the scan tool to mess with him.
Document conventions
Button presses will be shown using: 1, 2, 3, 4 or 5.
The current display will be shown using: , , , , , , etc....
Default Settings
Start locked off
Startup tune set to 1
Password length set to four
Password set to: 1, 2, 3, 4
Question and Answer IconNeed help?

Do you have a question about the Fish Tuning CSP5 and is the answer not in the manual?

Summary

Features and Defaults

The Features of Your New Digital CSP5 Switch

Overview of the key functionalities and advantages of the digital CSP5 switch.

Default Settings

Describes the factory default configurations for the switch operation.

Switch Operation

Button Combinations That Work With the Ignition On

Details on using button combinations for tune changes and settings.

Advanced Operations and Configuration

Button Combinations That Work at Power-On

Instructions for configuring settings during power-on.

Password Management

Password Functionality

Explains how password entry and validation works.

Installation and Maintenance

Installing Your Digital CSP5 Switch

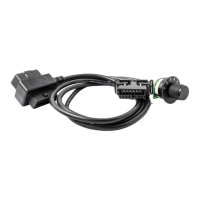
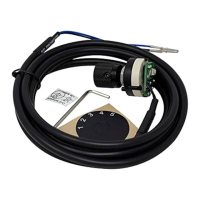
Step-by-step guide for physically installing the switch.

Overview

The Fish Tuning Digital CSP5 Switch is a device designed to allow users to control and monitor engine tunes in a vehicle, primarily through interaction with the Engine Control Module (ECM) via the CAN bus. It offers various features for tune selection, security, display customization, and diagnostic messaging.

Function Description

The primary function of the Digital CSP5 Switch is to enable instant switching between different engine tunes (up to five, plus a diagnostic mode indicated by '7'). It communicates with the ECM to report the currently selected tune and can override other devices attempting to change the tune, ensuring the driver's chosen setting is maintained. The switch also provides security features like password protection to prevent unauthorized tune changes and a "start locked" mode for enhanced vehicle security. Beyond tune control, it can display internal messages for diagnostic purposes and can be logically removed from the CAN bus for testing or flashing the ECM.

Important Technical Specifications

  • Tune Range: 1, 2, 3, 4, 5, or 7 (diagnostic mode).
  • Password Length: Adjustable from four to eight digits.
  • Default Password: 1, 2, 3, 4 (for a four-digit length).
  • Power Requirement: Switched 12V.
  • Connectivity: OBD cable to the OBD connector, red wire to switched 12V.
  • Display: Segmented display showing numbers (1-5, 7) for tunes, and letters/symbols (A, b, C, D, E, F, 7, L, P, -, =, H, u, r, 8) for various modes and prompts.
  • Buttons: Five physical buttons (1, 2, 3, 4, 5) for interaction.

Usage Features

General Operation (Ignition On):

  • Changing Tunes: Press any single button to instantly switch tunes. The display shows the current tune.
  • Locking a Tune: Press and hold any single button until 'P' appears. The switch will lock into that tune, overriding the default startup tune, until the password is entered. This lock persists through key off/on cycles.
  • Adjusting Brightness:
    • Increase brightness: Press buttons 1 and 2 together.
    • Decrease brightness: Press buttons 4 and 5 together.
    • Enable backlight: Press buttons 1 and 2 for 3 seconds.
    • Disable backlight: Press buttons 4 and 5 for 3 seconds.
    • Settings are saved 50 seconds after the last adjustment.
  • Disabling Start Locked Mode: If enabled, press and hold buttons 3 and 5 until 'L' appears, then enter the password. A 'u' will confirm it's disabled.
  • Showing Firmware Version: Press and hold buttons 2 and 4 until the display goes blank, then release. The version will be displayed, followed by '-' and then return to normal.
  • Tune Display Only Mode: Press and hold buttons 1 and 5 until 'r' appears, then quickly release. The display will show the current tune reported by the ECM. This mode is useful for testing other switches and will exit upon pressing any other button.
  • CAN Off Mode: Press and hold buttons 1 and 5 past 'r' until '=' appears. Releasing the buttons will display "Fi Sh Eunınú" repeatedly, indicating the switch is logically removed from the CAN bus. This mode is useful for flashing the ECM. To exit, press any button.
  • Show Internal Messages: Press and hold (2, 3, 4), (1, 2, 4), or (2, 3, 5) to display "NOCAN," "NOCSP5," or "F. Sh Eunınú" messages for diagnostic purposes.

Power-On Button Combinations (Switch Not Locked):

  • Accessing Functions: If the switch is wired in or powering off is not feasible, press and hold buttons 1, 2, 4, and 5 until 't' is displayed. Enter the lock code at 'L' until 't' appears again. Then press and hold the specified keys for the desired function.
  • Setting Default Start-Up Tune: Hold any single button during power-up until that number appears to set the default startup tune.
  • Setting Start Locked Flag: Press and hold buttons 1 and 2 at power-up, then enter the password. Once set, the switch will always start in the chosen tune, display 'L', and require a password to accept commands.
  • Setting Password Length: Press and hold buttons 4 and 5 at power-up, then enter the password.

Password Functionality:

  • Locked Indication: When locked, the display shows 'L'.
  • Password Entry: During password entry, the display shows 'A, b, C' (and potentially D, E, F, 7 for longer passwords) to indicate the digit being entered.
  • Incorrect Password: If 'A, b, C' followed by '1' is displayed, the password was incorrect.
  • Password Request Acknowledgment: When holding buttons for a password-protected function, 'P' will appear.

Changing the Password:

  • Press buttons 1 and 4 together for five seconds.
  • At 'L', enter the current lock code.
  • At 'E', enter the new lock code.
  • At '11', enter the new lock code a second time.
  • A successful change displays 'H' (Happiness); a failure displays 'F'.

Adjusting Password Length:

  • First, turn off start locked mode.
  • Press and hold buttons 4 and 5 while turning on the key until '-' is displayed.
  • Release buttons and enter the password.
  • Wait for '8' to show.
  • Press one of the following buttons to set the length:
    • 1: Four digits (625 combinations)
    • 2: Five digits (3,125 combinations)
    • 3: Six digits (15,625 combinations)
    • 4: Seven digits (78,125 combinations)
    • 5: Eight digits (390,625 combinations)
  • The password will reset to the default 1, 2, 3, 4, 1, 2, 3, 4, using only the necessary digits for the chosen length. Users should change this default password immediately.

Maintenance Features

  • Restoring to Factory Defaults: This is possible with manufacturer assistance.
  • Installation: Mount the switch in an available gauge location, ensuring wires are secure. Run the OBD cable to the OBD connector and plug it in. Connect the red wire to a switched 12V source.
  • Password Security: It is strongly recommended to change the default password (1, 2, 3, 4, 1, 2, 3, 4) after adjusting password length or initial setup, as it is not secure.

Fish Tuning CSP5 Specifications

General IconGeneral
BrandFish Tuning
ModelCSP5
CategorySwitch
LanguageEnglish

Related product manuals