CHARGING THE SYSTEM
CHARGING THE SYSTEM
..................................................................................................................................................................................................................................
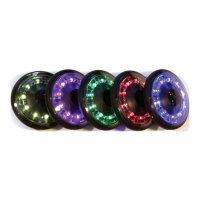
The Lights should be inserted into the Charger with the two contact points facing downwards to match the
contact points in the Charger. Make sure that the contacts are in line with the contacts in the Charger
Case and the “White Dots” are aligned with the top of the foam insert.
Note: If the Lights are not inserted correctly into the charger case, the Power Supply will shut off and there
will be no power to the Charger until the Lights are inserted correctly.
Interrupted power to the Charger is easily determined by removing one light at a time and the remaining
Lights will come on once the misaligned Light is removed. Reposition the Lights in the Charger until the
Lights are all illuminated.
White dots
Contacts
Quick tips to ensure the Lights are placed correctly.
Insert the Lights so that the
contacts on the Lights are
properly aligned with the
contacts in the Charger.
1. Make sure the Lights are properly centered onto the contacts of the Charger.
2. Should the Light not illuminate, check to make sure that the Light is correctly positioned.
3. As the system is used continuously, the contacts may be pushed out of contact with the Lights, they can
easily be adjusted by pulling them forward until contact is made with the Light.
4. Always charge the Lights with the Velcro attachment on, as this aligns the Lights in the Charger slot.
INSERTING THE LIGHTS INTO THE CHARGER CASE
12