symbol will be seen indicating a newly allocated
track exit (Fig. 9).
➜ Confirm!
The first allocated track exit must now be given a
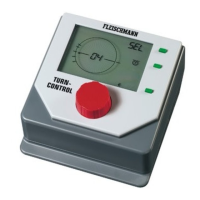
number, in our case, the number "1".
➜ Turn the red knob until the number "01" blinks in
the display in place of the indication "00" (Fig.
10).
Advice:
turning the red knob to the right will give
ascending numbers, turning to the left will give
descending numbers.
➜ Confirm!
The track exit number "01" has now been put in
and remembered.
In the same way, we can now put the next track
exits (Nos. 2 to 4) into the TURN-CONTROL.
Advice:
Once you have no further track exits to
put in, then you can get out of the programming
menu "Pro" by pressing the green key C, which
will automatically return you to the operating
menu "SEL" (Select).
➜ Using the red knob, turn the bridge hut symbol
to the position of the next track exit (No. 2),
which you wish to put into the TURN-CONTROL
(Fig. 11).
In our example, this is the next track exit in a
clockwise direction which we wish to give the
number "02".
37
Fig. 10 Give the first exit a number