………………………………………………………………………………………………………………………………………………
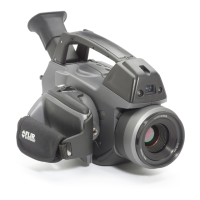
QuickStart FLIR GF309 [Cooled, 3.8-4.05 μm (Flame)]
GF 306 [Cooled, 10.7 μm (SF6)]
© 2016 The Snell Group / 322 N. Main St. / Suite 8 / Barre, VT 05641 / 800.636.9820 / www.thesnellgroup.com
1. MEMORY: Open the rear Memory cover on the back of the camera. (upper cover) The camera might come with two SD
memory cards one marked with the Roman numeral I and II.
• Place the card marked I in the lower slot marked I (card contacts facing up)
• Place the second card marked II in the upper II slot (contacts facing down)
• If you only have one SD card place it in the I slot.
2. POWER: Open the lower cover on the back of the camera and insert a fully charged battery.
• Power can also be supplied with the provided power converter into the connector under the same cover.
3. START: To start the camera press and release the ON/OFF button on the Right side thumb controls.
• NOTE: you will hear mued motor sound as the camera starts and begins the cool the infrared detector. This process should
take approximately 7 minutes.
4. MODE: You will need to select a mode of operation. For normal infrared image scanning turn the Mode Selector to Camera
mode Fig.1.
• NOTE: For furnace and other high-temperature applications, mount the heat shield on the camera. You must also enter the
correct external optics transmission value of the heat shield into the camera. The external optics transmission value is
printed on a label on the inside of the heat shield. You enter the external optics transmission value in the object parameters
dialog on the Edit tab. When you remove the heat shield you must reset the external optics transmission to 1.0.
5. FOCUS: In Live mode you can focus the camera by three methods, Autofocus, Electric or Manual.
V 2016.6
Mode Wheel
Battery
Back Covers
Memory Cards
Diopter Adj.
Manual Focus Ring
Laser
IR/Digital Camera Mode
Viewfinder
Temperature Range
Programmable Button
LED (power)
D
Right Side Thumb Controls
Menu/Back
Joystick
ON/OFF
Right Side Rotating Hand Grip
Preview/Save
Focus/Zoom
uto/Manual (High
Sensitivity)
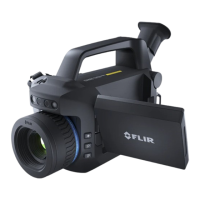
Fig 2. Flir 309 Image modes
Fig 1.
• To Autofocus push and release the center of the Focus/Zoom button.
If this method does not give you a perfect focus use one of the
following methods to further adjust.
• Electric (motor driven) focus is achieved by push the Focus Button to
the left or right.
• Manually adjust focus by turning the IR Focus Ring on the camera
lens either clockwise or counterclockwise.