Do you have a question about the FLIR P60 and is the answer not in the manual?
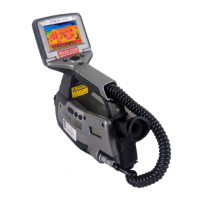
Insert a Compact Flash memory card in to its slot under the rubber cover below the eyepiece.
Slide the release tab forward, pivot the battery door open and insert a fully charged battery.
Briefly press the green ON/OFF button to switch on the camera; adjust eyepiece for crisp display.
Momentarily pressing the "A" button performs a one time auto adjustment of thermal Level and Span.
Adjust Level and Span using the Joystick by toggling its function via the "C" button.
Momentarily pressing the “S” button will Pause or Freeze the displayed image.
Save a paused image by pressing "S" or save from live mode by pressing and holding "A".
Access saved images by navigating through the [File] > [Images] menu.
Select different color palettes for display via the [Image] > [Palette] menu.
Select a different Temperature Range using the Joystick in the [Image] > [Range] menu.
Adjust the current emissivity value via the [Analysis] > [Object Parameters] menu.
Adjust the T. Reflective (Background) value via the [Analysis] > [Object Parameters] menu.
| Brand | FLIR |
|---|---|
| Model | P60 |
| Category | Thermal cameras |
| Language | English |