QuickStart: FLIR P-640
© 2011 The Snell Group / 322 N. Main St. / Suite 8 / Barre, VT / 05641 / 800.636.9820 / www.thesnellgroup.com
FLIR P-640 Page 1
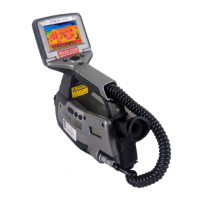
SD Memory Slots
On/Off Button
LED (power)
LCD Screen
Handgrip & Controls
(Rotates)
Battery
Dioptric Adj.
Data Ports
Joystick
Mode Button
Viewfinder
Preview/Save
User Defined Buttons
F1 &F2
Focus Button
Auto Manual
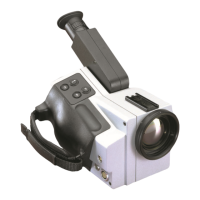
IR Lens &
Focus Ring
Digital Camera
Lens & Focus
Lase
Laser On/Of
1. MEMORY: Open the rear Memory/Data Port cover and insert a SD memory card into the upper slot marked “I”
and reclose.
2. POWER: Insert a fully charged battery by aligning the battery with the battery slots under the camera body and
sliding it forward until it locks into position.
To remove the battery you must first fully rotate the Handgrip counter clockwise to reveal the battery release
button.
3. START: To start the camera push and release the On/Off button on the back of the handgrip, the LED will glow
green.
To turn the camera off, push and hold the On/Off button for more than two seconds then release.
4. FOCUS: You can focus the camera by three methods, Autofocus, Electric or Manual.
To Auto adjust push and release the center of the Focus Button. If this method does not give you a perfect
focus use one of the following methods to further adjust.
Electric (motor driven) focus is achieved by push the Focus Button to the left or right.
Manually adjust focus by turning the IR Focus Ring on the camera lens either clockwise or counterclockwise.
5. AUTO ADJUST: To allow the camera to adjust the temperature scale’s Level and Span, first
push the Mode Button to show the mode selector menu. Make sure the “Camera” mode icon is
selected (Fig. 1). Push in on the joystick to return to a live image.
Push the Auto/Manual button so that “Auto” appears in the upper right corner of the viewing
screen. The camera will now continuously auto correct the Level and Span settings.
6. MANUAL ADJUST: (Preferred Mode) As above, make sure that the camera is in “Camera” mode.
Push the Auto/Manual button so that “Manual” appears in the upper right corner of the viewing screen.
The temperature scale Span can now be manually increased or decreased by pushing the Joystick left or
right.
The temperature scale Level can now be manually raised or lowered by pushing the Joystick up or down.
A one time auto adjust can be performed (while still remaining in manual mode) by momentarily pressing in
on the joystick.
Fig. 1