2 EN-US English
9. Push the Save button to save an image.
10. If automatic upload is enabled, new images will automatically be uploaded to
your FLIR Ignite account when the camera is connected to the internet. You
can also upload images manually. To access your FLIR Ignite account, go to
https://ignite.flir.com.
You can also move images from the camera using the USB cable or the
memory card.
11. Import the images into a FLIR Thermography software and create an inspec-
tion report.
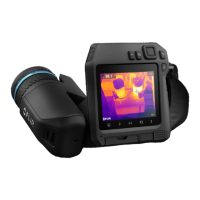
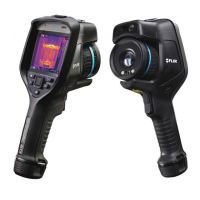
2.9 View from the front
See Figure 1.1 View from the front, page 1.
1. Autofocus button.
2. Save button.
3. Viewfinder.
4. Knob to change the dioptric correction for the viewfinder.
5. Attachment point for the neck strap.
6. Laser receiver.
7. Laser transmitter.
8. Camera lamp (left and right sides).
9. Infrared lens.
10. Digital camera.
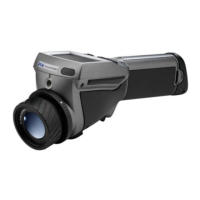
2.10 View from the rear
See Figure 1.2 View from the rear, page 1.
1. Focus ring.
2. Speaker.
3. Programmable button.
4. Image archive button.
5. Navigation pad with center push.
6. Back button.
7. On/off button.
8. Hand strap.
9. Multi-touch LCD screen.
10. Light sensor.
11. Microphone.
12. Attachment point for the neck strap.
#T810412; r. AE/80342/80342; mul 6
 Loading...