EasyManua.ls Logo

Flower House PlantHouse 2 - User Manual

Flower House PlantHouse 2
9 pages
Print Icon
To Next Page IconTo Next Page
Loading...
Self-erecting portable greenhouses Set up Instructions
Page 1
Step 1: Remove your
PlantHouse 2'™ from the
pack.
Step 2: Allow your
PlantHouse 2' ™ to spring
open.
CAUTION: Be
Sure to hold your
PlantHouse™ away from
your face as it will
Spring open.
Step 3: Unfold
your PlantHouse
2'™ into 2 panels.
Step 4: Grab the
center steel band and
lift up to separate the
two sides of your
PlantHouse™.
Smooth and unfold
the skirting.
Step 5: Assemble
the fiber pole
provided. Insert the
capped ends into the
pockets above the
doorway and
opposite end.
Step 6: The doorway
and screen can be
secured open either
together or
separate. Simply
unzip the doorway
and/or screen. Roll
them long way.
Secure with the
straps provided.
Attach your shade
cover for added
protection.
Question and Answer IconNeed help?

Do you have a question about the Flower House PlantHouse 2 and is the answer not in the manual?

Summary

PlantHouse 2 Set up Instructions

Step 1: Remove from Pack

Remove the greenhouse from its carrying pack.

Step 2: Allow to Spring Open

Carefully let the greenhouse spring open, holding it away from your face.

Step 3: Unfold into 2 Panels

Unfold the greenhouse structure into two distinct panels.

Step 4: Separate and Smooth

Separate the two sides by lifting the center steel band and smooth the skirting.

Step 5: Assemble Fiber Pole

Insert the fiber pole into the designated pockets at the top of the greenhouse.

Step 6: Secure Doorway and Screen

Zip and roll the doorway and screen, securing them with provided straps.

PlantHouse 2 Take Down Instructions

Step 1: Remove Stakes

Begin by removing all ground stakes from the greenhouse.

Step 2: Close Doors and Remove Pole

Zip doors closed, place unit on side, and remove the fiber pole from the ceiling.

Step 3: Fold into Two Panels

Push the center steel band and force top bands onto bottom bands to fold into two panels.

Step 4: Fold into Flat Panel

Fold one panel on top of the other to create a single flat panel.

Step 5: Fold into Taco Shape

Fold the unit in half, then continue folding under to resemble a taco shape.

Step 6: Continue Folding

Continue the folding process as demonstrated in the previous steps.

Step 8: Fold Right Side Over Left

Fold the right side of the structure over onto the left side.

Step 9: Form Three Rings

Achieve a state where the structure forms three rings stacked on top of each other.

Step 10: Slide Carry Pack Over

Hold the folded structure, prevent it from opening, and slide the carry pack over it.

Step 11: Store Components in Pack

Continue sliding the pack, then store stakes and fiber pole inside.

Important Storage Precautions

Allow greenhouse to dry completely before storing to prevent mold and mildew.

PlantHouse 3 Set up Instructions

Step 1: Remove from Pack

Remove the greenhouse from its carrying pack.

Step 2: Allow to Spring Open

Carefully let the greenhouse spring open, holding it away from your face.

Step 3: Unfold into 2 Panels

Unfold the greenhouse structure into two distinct panels.

Step 4: Separate and Smooth

Separate the two sides by lifting the center steel band and smooth the skirting.

Step 5: Assemble Fiber Pole

Insert the fiber pole into the designated pockets at the top of the greenhouse.

Step 6: Secure Doorway and Screen

Zip and roll the doorway and screen, securing them with provided straps.

PlantHouse 3 Take Down Instructions

Step 1: Remove Stakes

Begin by removing all ground stakes from the greenhouse.

Step 2: Close Doors and Remove Pole

Zip doors closed, place unit on side, and remove the fiber pole from the ceiling.

Step 3: Fold into Two Panels

Push the center steel band and force top bands onto bottom bands to fold into two panels.

Step 4: Fold into Flat Panel

Fold one panel on top of the other to create a single flat panel.

Step 5: Fold into Taco Shape

Fold the unit in half, then continue folding under to resemble a taco shape.

Step 6: Continue Folding

Continue the folding process as demonstrated in the previous steps.

Step 8: Fold Right Side Over Left

Fold the right side of the structure over onto the left side.

Step 9: Form Three Rings

Achieve a state where the structure forms three rings stacked on top of each other.

Step 10: Slide Carry Pack Over

Hold the folded structure, prevent it from opening, and slide the carry pack over it.

Step 11: Store Components in Pack

Continue sliding the pack, then store stakes and fiber pole inside.

Important Storage Precautions

Allow greenhouse to dry completely before storing to prevent mold and mildew.

PlantHouse 3 Parts List

List of components included with the PlantHouse 3 greenhouse.

PlantHouse 4 Set up Instructions

Step 1: Remove from Pack

Remove the greenhouse from its carrying pack.

Step 2: Allow to Spring Open

Carefully let the greenhouse spring open, holding it away from your face.

Step 3: Unfold into 2 Panels

Unfold the greenhouse structure into two distinct panels.

Step 4: Separate and Smooth

Separate the two sides by lifting the center steel band and smooth the skirting.

Step 5: Assemble Fiber Pole

Insert the fiber pole into the designated pockets at the top of the greenhouse.

Step 6: Secure Doorway and Screen

Zip and roll the doorway and screen, securing them with provided straps.

PlantHouse 4 Take Down Instructions

Step 1: Remove Stakes

Begin by removing all ground stakes from the greenhouse.

Step 2: Close Doors and Remove Pole

Zip doors closed, place unit on side, and remove the fiber pole from the ceiling.

Step 3: Fold into Two Panels

Push the center steel band and force top bands onto bottom bands to fold into two panels.

Step 4: Fold into Flat Panel

Fold one panel on top of the other to create a single flat panel.

Step 5: Fold into Taco Shape

Fold the unit in half, then continue folding under to resemble a taco shape.

Step 6: Continue Folding

Continue the folding process as demonstrated in the previous steps.

Step 8: Fold Right Side Over Left

Fold the right side of the structure over onto the left side.

Step 9: Form Three Rings

Achieve a state where the structure forms three rings stacked on top of each other.

Step 10: Slide Carry Pack Over

Hold the folded structure, prevent it from opening, and slide the carry pack over it.

Step 11: Store Components in Pack

Continue sliding the pack, then store stakes and fiber pole inside.

Important Storage Precautions

Allow greenhouse to dry completely before storing to prevent mold and mildew.

PlantHouse 4 Parts List

List of components included with the PlantHouse 4 greenhouse.

Overview

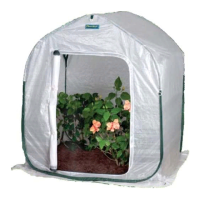
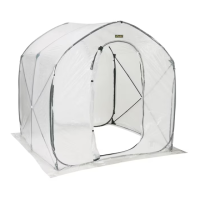
This document provides instructions for setting up and taking down the FlowerHouse PlantHouse 2', PlantHouse 3', and PlantHouse 4' self-erecting portable greenhouses. These greenhouses are designed for ease of use, offering a convenient solution for plant protection and cultivation.

Function Description

The PlantHouse series of portable greenhouses are self-erecting structures designed to provide a controlled environment for plants. Their primary function is to protect plants from harsh elements, extend growing seasons, and facilitate optimal growth conditions. The self-erecting design means the greenhouse springs open quickly, minimizing setup time. Each model comes with a shade cover for added protection, allowing users to regulate light exposure and temperature within the greenhouse. The inclusion of a fiber pole helps maintain the structure's shape and stability.

Usage Features

The PlantHouse greenhouses are engineered for straightforward setup and takedown, making them highly portable and user-friendly.

Setup Instructions:

  1. Unpacking: To begin, remove the PlantHouse unit from its carry pack. The self-erecting nature of the greenhouse means it will spring open quickly. Users are cautioned to hold the PlantHouse away from their face during this step to avoid injury as it expands.
  2. Unfolding: Once sprung open, the PlantHouse needs to be fully unfolded. This involves unfolding the unit into two distinct panels.
  3. Separating Sides: After unfolding the panels, locate the center steel band. Lift this band to separate the two sides of the PlantHouse. Simultaneously, smooth out and unfold the skirting around the base of the greenhouse. This ensures the structure is fully extended and stable.
  4. Assembling the Fiber Pole: The provided fiber pole is crucial for the structural integrity of the greenhouse. Assemble the pole by connecting its sections. Once assembled, insert the capped ends of the pole into the designated pockets located above the doorway and at the opposite end of the greenhouse. This step helps maintain the dome shape and provides additional support.
  5. Securing the Doorway and Screen: The PlantHouse features a doorway and a screen, both of which can be secured in an open position, either together or independently. To do this, simply unzip the doorway and/or screen. Roll them up lengthwise and secure them using the provided straps. This allows for easy access and ventilation.
  6. Attaching the Shade Cover: For enhanced protection against intense sunlight or other harsh elements, attach the shade cover. This cover helps regulate the internal temperature and light levels, creating a more suitable environment for plants.

Take Down Instructions:

  1. Removing Stakes: Before collapsing the greenhouse, ensure all ground stakes are removed. It may be helpful to use one stake to leverage and remove another.
  2. Closing Doors and Screens: Zip closed all doors and screens on the PlantHouse. This helps to contain the structure and prevents parts from snagging during the folding process.
  3. Removing the Fiber Pole: Lay the PlantHouse on its side and carefully remove the fiber pole from the ceiling pockets.
  4. Folding into Panels: The next step involves collapsing the greenhouse into two flat panels. Push on the center steel band. The two top bands must be guided to lay uniformly on top of the two bottom bands. This action will cause the PlantHouse to fold into two distinct panels.
  5. Creating a Flat Panel: Once folded into two panels, place one panel directly on top of the other. The goal is to achieve one single, flat panel.
  6. Folding into a Taco Shape: Choose a top corner of the flat panel. Begin to fold the PlantHouse in half. Users will feel the tension of the spring steel during this process. Continue folding under while bringing the left side up and over. The structure should begin to resemble a "taco" shape.
  7. Continuing the Fold: Continue folding the PlantHouse, progressively reducing its size.
  8. Forming Rings: As the folding continues, the PlantHouse will eventually form three distinct rings, stacked on top of each other. This compact form is ideal for storage.
  9. Securing for Storage: To prevent the folded PlantHouse from springing open, hold it firmly between your knees.
  10. Sliding into Carry Pack: Carefully slide the carry pack over the folded PlantHouse.
  11. Storing Accessories: Once the PlantHouse is in the carry pack, store the ground stakes in their designated pouches within the pack. Place the fiber pole alongside the stakes. This ensures all components are kept together for future use.

Maintenance Features

Proper maintenance is essential to prolong the life of the PlantHouse greenhouse and prevent issues such as mold and mildew.

  • Drying Before Storage: Before storing the PlantHouse GreenHouse, it is crucial to allow both the interior and exterior surfaces to dry completely. This prevents the growth of mold and mildew, which can lead to unsightly stains on the walls and potentially damage the material.
  • Storage Conditions: Store the PlantHouse in a cool, dry place. This helps maintain the integrity of the materials, especially the spring steel frame and the fabric, ensuring it remains in good condition for future use.

The PlantHouse series offers a practical and efficient solution for gardening enthusiasts seeking a portable and easy-to-manage greenhouse system.

Flower House PlantHouse 2 Specifications

General IconGeneral
Dimensions6 ft. 3 in. W x 4 ft. 3 in. D x 6 ft. 7 in. H
MaterialPolyethylene
Frame MaterialSteel
ColorGreen
Assembly RequiredYes
VentilationRoll-up zippered door

Related product manuals