84 5A
ON
2-1.
INTRODUCTION
2-2.
This section
of
the
manual
contains information
necessary
to operate
the
Model
845
High
Impedance
Voltmeter-Null Detector. Should
any
difficulties be
encountered
during operation
of
your
instrument, feel
free to contact
your
nearest John Fluke
Sales Repre-
sentative or write directly
to
the John Fluke Mfg. Co.
Inc.
2-3.
CONTROLS,
TERMINALS,
AND
INDICATOR
2-4.
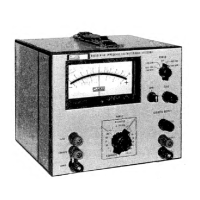
The location and function of the
front-panel
controls are described in Figure
2-1.
Detailed
oper-
atii^ descriptions are given in the following pars^raphs.
2-5.
PRELIMINARY
OPERATION
2-6.
Connect
tlie
Model
845 line plug
to
a
115
volt
ac
power
outlet
or
to 230 volts ac,
if the instrument
is so
wired.
K your
instrument
is a Model
845A,
proceed
with
steps
a and b, if your instrument
is
a
Model 845AB,
check
the
batteries
as
outlined in
paragraph
2-7.
Upon
completion of
a
satisfactory battery check,
proceed
with
steps
c and d.
The round pin on
the polarized three-prong
plug connects the instrument case to power
system ground. Use a three-to-two pin
adapter
when connecting to
a
two-contact
outlet. For personnel safety, connect
the
short lead from
the
adapter to
a
high-quality
earth ground.
a. Place the Model 845A controls
as
follows:
POWER
ON
RANGE 10
MICROVOLTS
OPR
ZERO
b. Adjust the
ZERO
control
for
an
initial zero
meter
deflection. Place the RANGE switch to the
1
MI-
CROVOLT RANGE
and
re-zero
with
the ZERO
control.
c. Place the Model 84
SAB controls
as
follows:
POWER
LINE
OPR or BAT OPR
RANGE
10 MICROVOLTS
OPR ZERO
d. Adjust the ZE.RO control for
an
initial
zero
meter
deflection.
Place
the
RANGE switch to the
1
MI-
CROVOLT
RANGE and re-zero with the
ZERO
control.
2-7,
MODEL 845AB BATTERY
CHECK
2-8.
The
Model 845AB batteries must be in
the
proper
charge
state
for the instrument to operate properly in
the
BAT OPR mode. To check the batteries
proceed
as
follows:
a.
Place the POWER switch to BAT CHK position.
b. The
Model 845AB
meter
needle should
deflect
with-
in the BATTERY OK region. If the
meter
needle
does not stay
within the BATTERY OK region for
at least
10 seconds,
charge
the batteries
as
indi-
cated in paragraph
2-9.
K the
batteries
are ade-
quately charged, refer
to
paragraph
2-5.
2-9.
MODEL
845AB
BATTERY CHARGING
2-10.
If the
Model 845AB
is
left
in
the
BAT OPR
mode
for
an extended period of time, the batteries
will be-
come discharged. If the batteries
are fully
discharged,
the
instrument
will not operate properly in the
LINE
OPR mode until the battery voltage can
be brought
up to
3/4
of
full voltage. This will require
about 15
minutes
of charging. To charge the
Model
845AB batteries pro-
ceed
as
follows:
a.
Connect
the
line plug to a
115
volt ac power outlet
or
to 230
volts ac, if the instrument
is so
wired,
b.
Place
the
POWER
switch
to BAT-CHG LINE OPR.
After 16 hours the batteries will be fully charged
and capable of operating the Instrument for
at least
40
hours.
2-1