EasyManua.ls Logo

Flybar Spark - STEP 4: Prepare Frame Segments; STEP 5: Join Frame Segments

Flybar Spark
24 pages
Print Icon
To Next Page IconTo Next Page
To Previous Page IconTo Previous Page
Loading...
A A
B B
C C
D D
E E
F F
G G
H H
12
12
11
11
10
10
9
9
8
8
7
7
6
6
5
5
4
4
3
3
2
2
1
1
DRAWN
CHK'D
APPV'D
MFG
Q.A
UNLESS OTHERWISE SPECIFIED:
DIMENSIONS ARE IN MILLIMETERS
SURFACE FINISH:
TOLERANCES:
LINEAR:
ANGULAR:
FINISH:
DEBURR AND
BREAK SHARP
EDGES
NAME
SIGNATURE
DATE
MATERIAL:
DO NOT SCALE DRAWING
REVISION
TITLE:
DWG NO.
SCALE:1:5
SHEET 1 OF 1
A2
WEIGHT:
N-ASSM_1 - 10FT
A
DETAIL A
SCALE 2 : 5
A A
B B
C C
D D
E E
F F
G G
H H
12
12
11
11
10
10
9
9
8
8
7
7
6
6
5
5
4
4
3
3
2
2
1
1
DRAWN
CHK'D
APPV'D
MFG
Q.A
UNLESS OTHERWISE SPECIFIED:
DIMENSIONS ARE IN MILLIMETERS
SURFACE FINISH:
TOLERANCES:
LINEAR:
ANGULAR:
FINISH:
DEBURR AND
BREAK SHARP
EDGES
NAME
SIGNATURE
DATE
MATERIAL:
DO NOT SCALE DRAWING
REVISION
TITLE:
DWG NO.
SCALE:1:5
SHEET 1 OF 1
A2
WEIGHT:
N-ASSM_1 - 10FT
Frame Segment
Frame Tube
Frame Joiner
A A
B B
C C
D D
E E
F F
G G
H H
12
12
11
11
10
10
9
9
8
8
7
7
6
6
5
5
4
4
3
3
2
2
1
1
DRAWN
CHK'D
APPV'D
MFG
Q.A
UNLESS OTHERWISE SPECIFIED:
DIMENSIONS ARE IN MILLIMETERS
SURFACE FINISH:
TOLERANCES:
LINEAR:
ANGULAR:
FINISH:
DEBURR AND
BREAK SHARP
EDGES
NAME
SIGNATURE
DATE
MATERIAL:
DO NOT SCALE DRAWING
REVISION
TITLE:
DWG NO.
SCALE:1:10
SHEET 1 OF 1
A2
WEIGHT:
N-ASSM_2 - 10FT
Frame Segment
Frame Segment
6
Ellenville, NY 12428
Ph: 845-647-8400
Email: spark@flybar.com
Web: www.flybar.com
Distributed by:
STEP 4: Prepare Frame Segments
STEP 5: Join the Frame Segments and Form a Circle
6
Frame Segment 1 Frame Segment 2
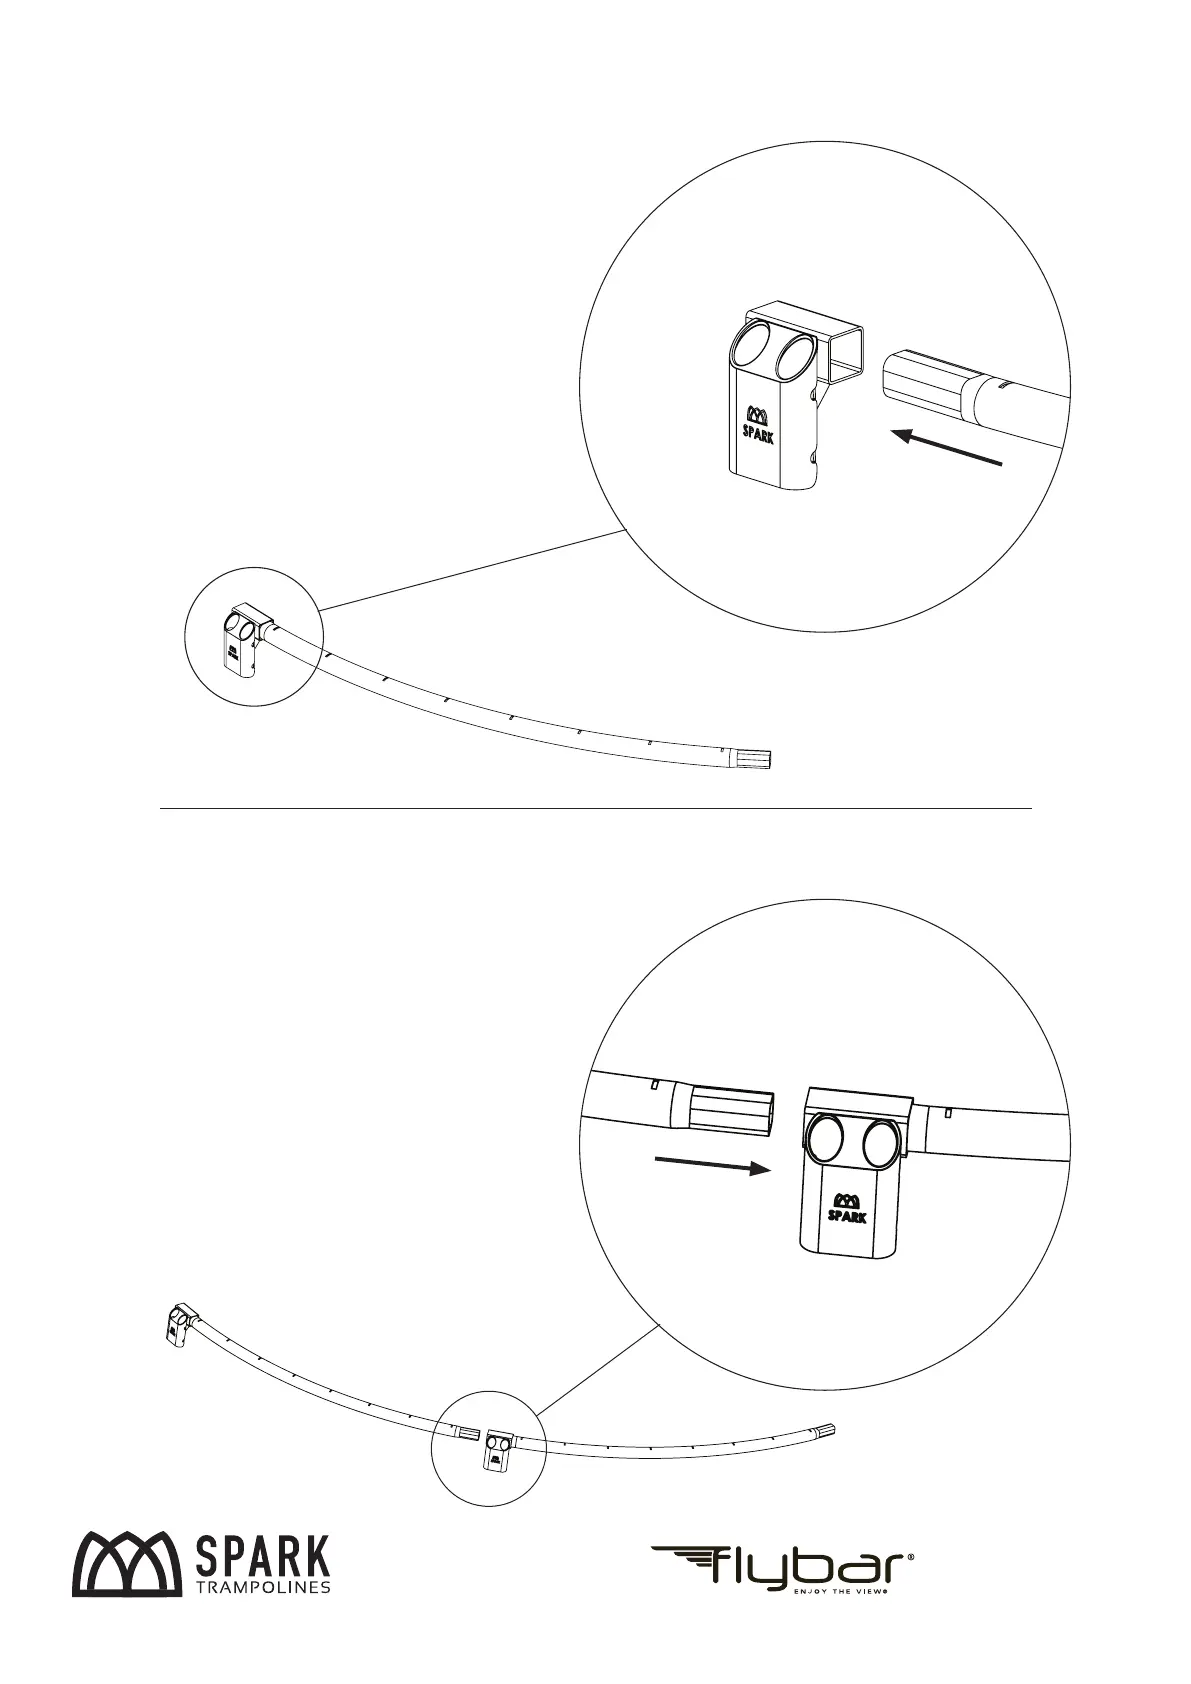
STEP 3: Prepare the FRAME SEGMENTs
Pick up a FRAME JOINER and a FRAME TUBE, and then insert the larger square end
of the FRAME TUBE into the square tube of the FRAME JOINER to form a FRAME
SEGMENT. Please make sure the holes of the FRAME TUBE are facing upward before
you insert it into the FRAME JOINER. Please be aware the round tubes of the FRAME
JOINER should be vercal to the surface and facing outward.
Repeat this process, and prepare all FRAME SEGMENTs.
STEP 4: Join the FRAME SEGMENTs and form a circle
Pick up two FRAME SEGMENTs and Insert the small square end (without the FRAME
JOINER) of one FRAME SEGMENT into the larger square end (with the FRAME
JOINER) of the other FRAME SEGMENT.
Frame Tube Frame Joiner
Frame Segment
*If you have any problems by this stage, please do not try to install the trampoline and call 1300 782 661
*Do not fully ghten the bolts
A bit of force might be needed to push the larger ends of
frame tubes into frame joiners at this stage
Version 1.0

Related product manuals