6
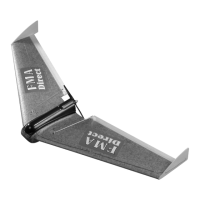
STEP 7: FMA Direct recommends 5 minute epoxy for joining the
RAZOR wing halves. Review STEP 8 before continuing. Test fit the
wing halves to verify proper installation of the wing spar and correct
alignment of all parts. Observe where the wing sections contact each
other so that you know where to apply adhesives. Mix a large
amount of 5 minute epoxy. Start by holding the right wing upright
and dribbling epoxy down into the hole for the spar. Next, coat the
rod protruding from the left wing panel. Finally, apply approximately
1/16” thick to the inside of the right wing half as illustrated. Include
adhesive in the slot where the horizontal “key” joins the two wing
halves.
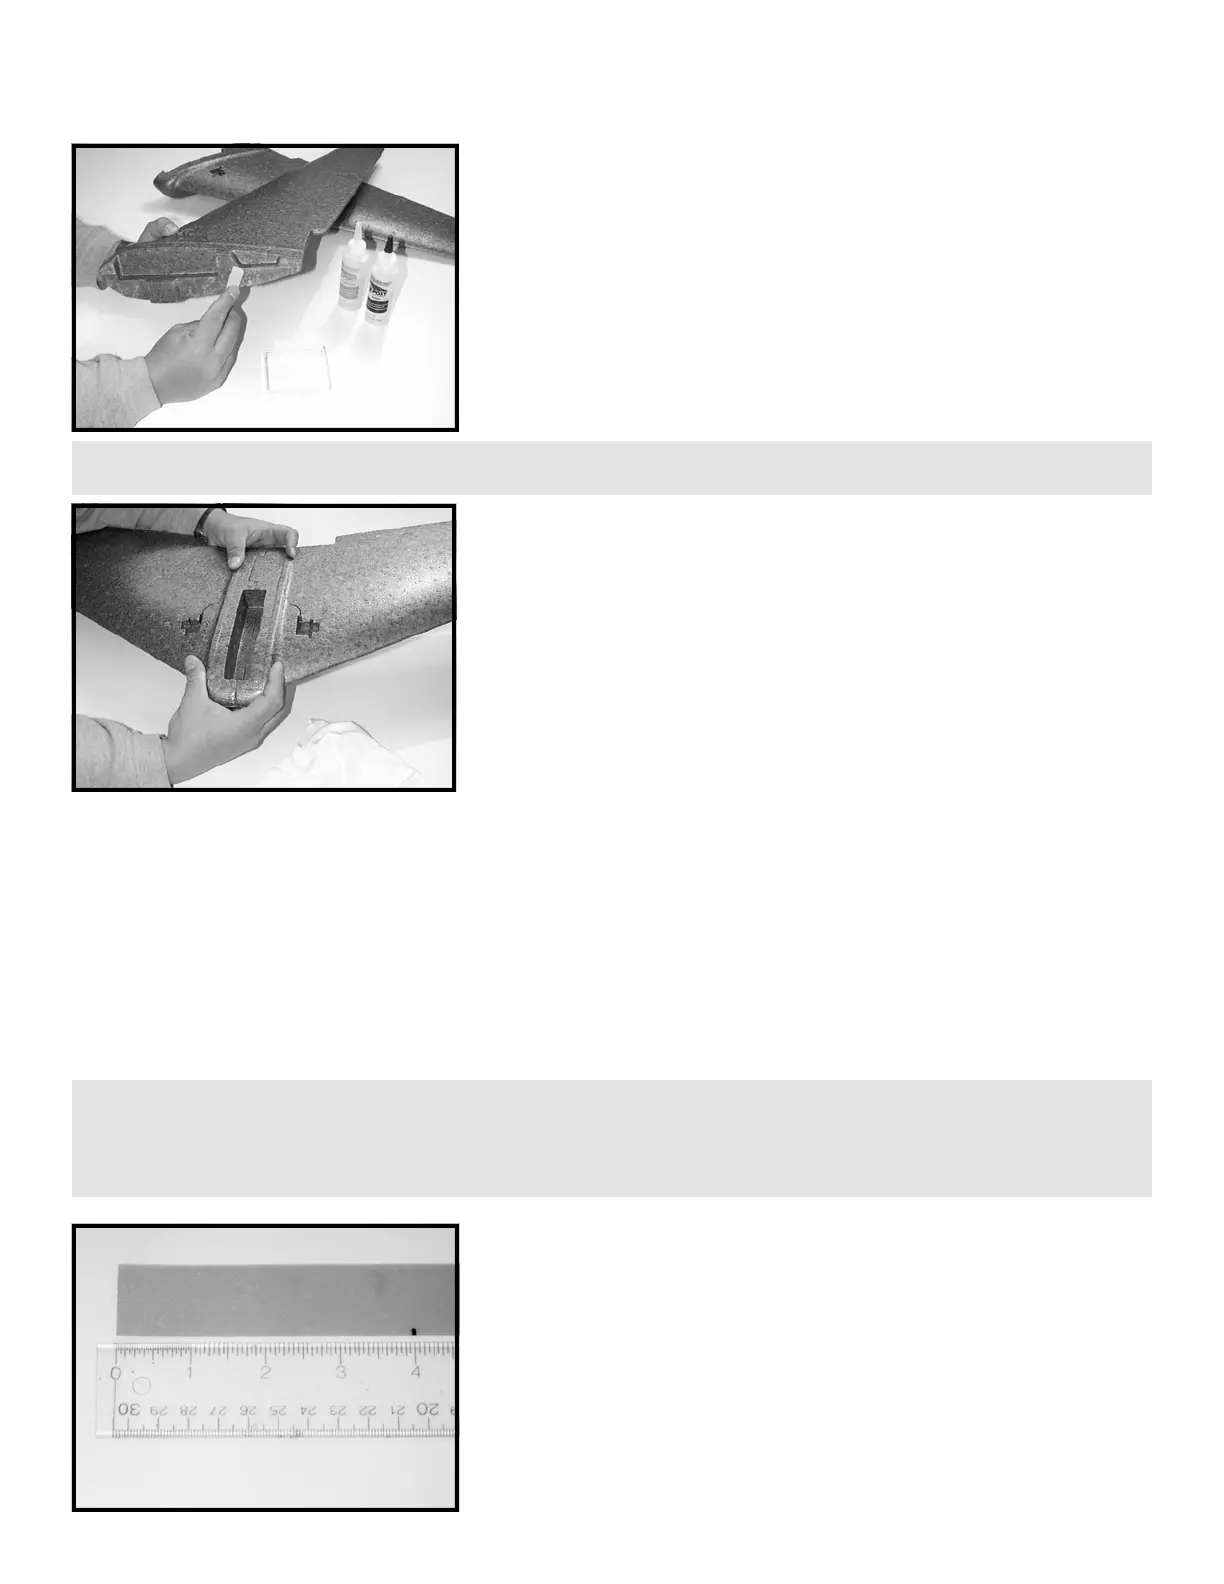
STEP 8: Hold the two wing halves together firmly as illustrated until
the adhesive cures. Keep a soft, alcohol-soaked cloth handy to wipe
away any excess adhesive. Once the adhesive has cured, you may
wish to sand the wing joint and apply a light weight filler if necessary.
TIP: For best results, use masking tape to mask off the joint on the two wing halves before applying adhesive. This will prevent glue from getting on
the visible portions of the airframe. Then after the two wing halves are joined, apply more tape to “capture” the glue and seal the joint!
BEFORE CONTINUING: The concept behind the FMA Direct RAZOR is to provide R/C or potential R/C enthusiasts with an inexpensive, highly
versatile, easy-to-build aircraft that can meet the various skill levels and tastes of many different pilots through the fourteen kit and ARF
versions available. In keeping with this concept, RAZOR does not require paint or special covering of any kind, thanks to the revolutionary
ARCEL
(TM)
foam and the injection molding process. In designing and flight-testing RAZOR, FMA engineers discovered that with the application
of a proprietary LEXAN
(TM)
tape used as a structural, quasi-spar, the airframe could withstand tremendous flight stress and impact. This
manual is intended for use with any of the slope, park, 400 class, or 600 class kits and ARFs available. All kits are supplied with two pieces of
0.005” thick LEXAN
(TM)
tape to be used for hinging the elevons and also for the hinge that joins the equipment tray to the canopy. The slope,
park, and 400 class kits are supplied with four pieces of 0.010” thick LEXAN
(TM)
tape for structural spars. The 600 class kits include two
additional pieces of 0.010” thick LEXAN
(TM)
tape for added support at high speeds. It is important that you locate and identify the different
thickness adhesive tapes supplied so that you use the proper tapes during assembly. Furthermore, unlike other foams, ARCEL
(TM)
is not
attacked by most paint types. For best results, if you intend to paint your RAZOR, use Krylon
(TM)
enamel from your local hardware store. Be
sure to apply a light coat of primer on the airframe before adding colors. Mist on one or two fine coats of pigment. Use only enough paint to
add color. Too much paint and you will add excess weight and possibly warp the foam wings. If you intend to paint your RAZOR, be sure to
carefully review the following CAUTION:
STEP 9: Steps 9 and 10 apply to 600 class kits only! If you do not
have a 600 class kit, please proceed to step 11. If you have a 600 class
kit, please locate one of the six pieces of 0.010” (thick) LEXAN
(TM)
tape.
Using a measuring stick, mark 4 inches off the tape. Using scissors,
cut the tape straight across. You will end up with a 20” piece of tape.
Mark the center of the tape.
CAUTION: PLEASE NOTE THE FOLLOWING - WHILE ARCEL
(TM)
IS NOT ATTACKED BY MOST PAINTS, THE PROPRIETARY LEXAN
(TM)
TAPE
USED IN ASSEMBLY IS! IF YOU INTEND TO PAINT YOUR AIRPLANE, COMPLETE ASSEMBLY OF THE RAZOR PER THE MANUAL, THEN USE A
PAINTABLE TAPE TO MASK OVER THE LEXAN TAPE USED IN ASSEMBLY TO PREVENT ANY PAINT FROM COMING IN CONTACT WITH THE
LEXAN TAPE. THIS INCLUDES THE TAPE HINGE BETWEEN THE TRAY AND CANOPY WHICH IS SUSCEPTIBLE TO DAMAGE FROM PAINTS
AS WELL! IF PAINT COMES IN CONTACT WITH THE LEXAN
(TM)
TAPE, THE TAPE WILL BECOME BRITTLE AND WILL TEAR OVER TIME.
600 CLASS ONLY
 Loading...