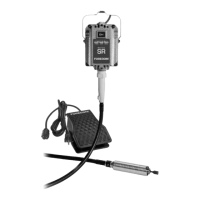
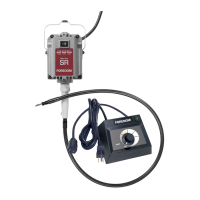
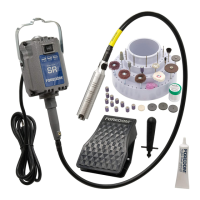
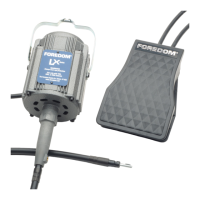
The Foredom Flexible Shaft Power Tool is a versatile device designed for a wide range of tasks, including grinding, sanding, carving, engraving, brushing, cutting, buffing, and polishing. It consists of a motor, a flexible shaft and sheath, a speed control (foot or manual), and a handpiece. The tool is manufactured to high standards of precision and performance, promising years of trouble-free operation with proper use and regular maintenance.
Safety Instructions:
Before operating the Foredom power tool, users must read and follow all safety instructions to reduce the risk of personal injury or damage to the tool. Key safety precautions include:
- Eye and Face Protection: Always wear safety glasses or face shields to prevent serious eye or face injuries from flying debris, chips, or sparks.
- Dust Collection/Respirator: Use a proper dust collection system or wear a respirator to prevent inhalation of dust particles, polishing compounds, or other debris.
- Clothing and Jewelry: Avoid wearing loose-fitting clothing or jewelry, as these can become entangled in the rotating flexible shaft. Long hair should be tied back or secured.
- Tool Security: Secure the power tool to a motor hanger or work surface to prevent it from vibrating off during operation.
- Accessory Speed Ratings: Never operate any accessory at speeds above its maximum rated speed. All Foredom accessories have listed speed ratings in the accessory catalog or on their packaging. For non-Foredom accessories, always ascertain the manufacturer's speed rating.
- Accessory Inspection: Do not use any accessory that appears damaged, loose, vibrating, or out of balance. Inspect each accessory for cracks or flaws before use.
- Accessory Insertion: Insert the shank or arbor of an accessory or mandrel into the collet or chuck of the handpiece as far as possible for proper support and secure tightening.
- Pressure Application: Avoid excessive side pressure, which can bend or break the accessory shank or arbor. Let the speed of the tool do the work.
- Motor Stalling: Do not stall the motor by jamming or using excessive pressure on the accessory, as this can damage the motor or flexible shaft.
- Sheath Operation: Never operate the motor with the outer sheath removed from the flexible shaft.
- Power Disconnection: Always disconnect the power cord before servicing the motor or removing the flexible shaft or sheath.
- Power Decrease: Do not operate the power tool during a perceptible power decrease. Turn it off and wait for full power to be restored.
- Grounding Procedures: The tool must be grounded while in use to protect the operator from electric shock. It is equipped with an approved 3-conductor cord and plug. The green (or green and yellow) conductor is the grounding wire and should never be connected to a live terminal. For units used on less than 150 volts, an adapter (sketches B and C in the manual) can be used for 2-prong receptacles, ensuring the rigid ear/lug is connected to a permanent ground. Only use 3-wire extension cords with 3-prong grounding type plugs and 3-pole receptacles.
- Cord Maintenance: Replace or repair worn cords immediately.
Technical Specifications and Usage Features:
The Foredom power tool motors, including Series CC, DD, MM, S, SB, SM, SR, SRB, and SRM, are designed for variable speed operation. The motor has a maximum speed rating of 18,000 RPM.
Assembly and Adjustment:
Proper assembly and adjustment of the flexible shaft and sheath are crucial for correct operation. The exposed tip (handpiece end) of the flexible shaft, with the handpiece removed, must extend 3/4" beyond the sheath. This adjustment should be checked even if the unit was received pre-assembled.
- Handpiece Removal: Pull the handpiece off the shaft and sheath with a firm grip.
- Shaft/Sheath Adjustment: Place the unit on a flat surface with the shaft and sheath extended straight. Loosen the set screw on the motor connector. Adjust the flexible shaft so its tip extends 3/4" beyond the sheath by moving the sheath in or out of the motor connector.
- Re-tighten and Re-attach: Re-tighten the set screw in the motor connector and re-attach the handpiece, ensuring the keyed tip of the flexible shaft aligns with the slot in the handpiece's back end.
Speed Control Connection:
- Foot Speed Control (FCT-1, SCT-1, CFL): The motor's 3-prong plug connects to the socket connector on the foot control's shorter power cord. With the motor switch "off," the foot control's longer 3-prong plug connects to a 3-wire power outlet. The motor should not run when the foot control is not depressed.
- Table-Top Dial Speed Control (EM-1, EM-2): Connect the motor's 3-prong plug to the socket connector on the dial control's shorter power cord. With both motor and dial control switches "off," plug the dial control's longer 3-prong plug into a 3-wire outlet. Hold the handpiece securely before turning the motor switch "on."
Handpieces and Accessory Attachment:
Foredom offers various handpiece types, each with specific accessory attachment methods:
- Collet Types (8, 8D, 25, 28, 28SJ, 35, 35SJ, 44T, 44TSJ): Use the correct shank size that fits snugly. Never tighten an empty collet. To change collets in Nos. 25, 28, 28SJ, 35, 35SJ, 44T, and 44TSJ, insert the provided pin into the pilot hole, unscrew the chuck nut, remove the old collet, insert the new one, and screw on the chuck nut. For Nos. 8, 8D, pull back the chuck guard sleeve, insert the pin, loosen the chuck nut, insert the accessory, and tighten.
- Chuck Type (25C, 30®, 30SJ): These have Jacob's® type chucks. Open jaws with the provided key, insert the accessory as far as possible, and tighten with the chuck key.
- Hammer Type (15, 15D, 15SJ): These have threaded spindles. Thread the anvil or stylus into the spindle, insert the pin into the cross hole, and tighten.
- Latch Type (55A, 55D, 56A, 56D): Slide the latch, insert the accessory shank, and slide the latch back into place.
- Quick Change Type (7A, 7AD, 10, 10D, 18, 18D, 18SJ, 52, 52D, 52SJ): Always keep an accessory in these handpieces during operation and storage.
- 7A and 7AD: Pull the handpiece grip back, insert the 3/32" accessory shank, and push the front portion forward firmly.
- 10 and 10D: Operate only with a 3/32" shank bur. Move the lever 180° clockwise to insert/change the bur, then move it 180° forward to lock.
- 18, 18D, 18SJ: Push the spring-loaded lever to open the collet, insert the 3/32" accessory, and release the lever. Never push the lever while rotating.
- 52, 52D, 52SJ: Wait for the motor, shaft, and accessory to stop. Pull the outer grip forward while holding the back of the handpiece, remove the accessory, insert the new one, and pull the grip back until the chuck snaps closed.
General Operation Guidelines:
- Motor Position: The motor can be operated vertically or horizontally but should not be enclosed to restrict air circulation. Secure it to a wall or motor hanger. The motor may become hot during prolonged use, which is normal.
- Flexible Shaft Bending: Avoid sharp bends or loops in the shaft and sheath to prevent wear. Maintain a 4" or larger radius for shafts on all motors. Excessive heat and wear will occur with too great a bend.
- Tool Pressure: Let the speed of the tool do the work; avoid excessive pressure. Slower speeds are for rougher, heavier, or precise work, while higher speeds are for buffing, cutting, and polishing.
- Voltage Decreases: Turn off and unplug the tool during a perceptible power decrease until full power is restored.
Series SR Reversible Motor Instructions (only):
- Direction Change: Never change motor direction while it is running, as this can damage the motor or flexible shaft. Turn the motor off, wait for it to stop, then set the rocker switch to forward or reverse.
- Accessory Tightness: Securely tighten the chuck nut or jaws for both forward and reverse operation. Insert the accessory shank as far as possible for maximum support.
- Bur Usage: Use the forward motor direction for fluted burs and cutters. Mounted abrasive points, sanding bands, tungsten carbide burs, buffs, and brushes can be used in either direction.
- Protective Gear: Wear a heavy canvas or leather apron for added safety and comfort during carving or other applications to protect against dust, debris, chips, and entanglement with loose clothing.
Maintenance Procedures:
Always ensure the power tool is unplugged before performing maintenance.
- Motor Lubrication: Ball bearing universal motors (CC, DD, MM, S, SB, SM, SR, SRB, SRM) do not require lubrication.
- Motor Cleaning: In high-dust environments, clean the motor every 40 hours of use. Remove brushes, clean them, and blow air through the motor to remove dirt/dust buildup.
- Flexible Shaft Cleaning and Lubrication:
- Routine: Wipe clean and relubricate with Foredom flex shaft grease (p/n 10006) every 50 hours.
- Thorough: Every 200 hours, thoroughly clean with solvent and relubricate.
- Procedure: Remove the handpiece, loosen the set screw on the connector, and slide the sheath out. Apply a very light coating of grease to the shaft, starting from the top and working downward, stopping about one inch from the end. Replace and adjust the sheath (tip extends 3/4"), retighten the set screw, and clean the exterior. Run the motor for 4-5 minutes before re-attaching the handpiece to allow grease to spread and drain.
- Handpiece Lubrication:
- 7A and 7AD: Unscrew the front housing, clean the spindle with solvent, and apply several drops of Foredom oil (Part Nos. 10005 or 10010) every 20 hours.
- 8, 8D, 18, 18D, 25, 25C, 28, 30, 35, 44T, 52, 53: These handpieces are permanently lubricated with greased-shielded ball bearings and should not be lubricated.
- 10: Lubrication not required for the first 2-3 months. Then, approximately every two weeks, remove the sheath connector, clean dirt/old lubricant, and apply 1-2 drops of Foredom oil to the spindle where it attaches to the slotted shaft.
- 10D (Duplex Spring Connection): Apply 1-2 drops of Foredom oil into the hole in the duplex spring collar next to the sheath connector every 20 hours.
- 15 and 15D: Before disassembling, clean off dirt. Remove the threaded nosepiece assembly, put two drops of Foredom oil into the bottom of the threaded hole of the housing and one drop into the nosepiece assembly. Replace the nosepiece, hold the handpiece upright, and run it slowly. Lubricate every 100 hours.
- Duplex Spring Connections (marked with asterisk): Lubricate with about two drops of Foredom® Hypodermic type oiler (Part No. 10005) into the hole on the rear of the connection collar every 20 hours.
- Replacement of Worn Shafts and Sheaths: Shafts and sheaths will eventually wear out. To replace: remove the motor connector (left-hand thread, turn clockwise to remove), loosen the set screw on the flexible shaft motor coupling, and slide the shaft off. For installation, slide the new coupling onto the motor shaft, tighten the set screw, slide the motor connector back on (tighten counter-clockwise), grease the shaft, slide the sheath over, adjust the shaft to extend 3/4", and tighten the sheath set screw.
- Replacement of Motor Brushes: Check brushes periodically. Replace when worn to 1/4" (new brushes are approximately 3/4" long). Disconnect the power cord, unscrew brush caps, and ensure the new brush tip's curvature matches the housing curve.
Recommended Spare Parts and Supplies:
- All Series (115v and 230v): 1 flexible shaft (Part No. 93), 1 outer sheath (Part No. 77), 1 neoprene sheath (Part No. 77N), 1 Foredom flexible shaft grease (Part No. 10006).
- Series CC, DD, MM Motors: 1 pair motor brushes (Part No. 119P for 115v, Part No. 117P for 230v).
- MK-9 Maintenance Kit (115v): Includes 1 flexible shaft (Part No. 93), 1 Foredom flexible shaft grease (Part No. 10006), 1 pair motor brushes (Part No. 119P), and an instruction manual.
- MK-9A Maintenance Kit (230v): Includes 1 flexible shaft (Part No. 93), 1 Foredom flexible shaft grease (Part No. 10006), 1 pair motor brushes (Part No. 117P), and an instruction manual.
- Series S, SB, SM, SR, SRB, SRM Motors (115v and 230v): 1 pair motor brushes (Part No. 2019P).
- MK-8 Maintenance Kit: Includes 1 flexible shaft (Part No. 93), 1 Foredom flexible shaft grease (Part No. 10006), 1 pair motor brushes (Part No. 2019P), and an instruction manual.
Repair Services:
Authorized repair service is available at The Foredom Electric Company factory in Bethel, CT. Items for repair should be sent with a packing list and information regarding the problem. Estimates are provided upon request, and repairs will not proceed without approval if the cost exceeds fifty percent of a new replacement.
Storage:
Store Foredom power tools in a dry, clean, dust-free area, out of reach of children.