3
GB
Keypad Security Settings
Access the ‘Keypad Security’ screen as described above.
The screen will show the current status, initially preset to ‘ ’, with ashing. Press and
release and will show constantly. (If you modify this setting with to show ‘ ‘ the keypad
will be locked, will show constantly and the cabinet will not be able to be put into standby,
carry out a manual defrost, adjust temperature set point, download data or switch on/off the units
lights. To conrm any change you must press again so the next screen ‘ ‘ shows).
Exit any of the ‘Adjustment Modes’ as described above.
Internal Light (where tted)
To switch on the lights press and release so that the switch backlight is on continuously.
To switch off press and release and the switch backlight will ash/pulse.
To exit this mode scroll back to the adjustment screen and press or wait for 30 seconds and
the display will revert to the normal display showing the operating temperature.
Set Point and Other Mode Adjustments
Access the adjustment mode as described above. Using the or switches to scroll to the
mode that requires adjustments i.e ‘Set Point’ this is the minimum temperature the cabinet is
allowed to cool down to (the display shows the temperature and ash/pulsing icon ).
To adjust this press and release the icon will show constantly. Adjust the setting with the
or switch. Conrm the change by pressing and releasing again, the next mode will
automatically show.
Scroll through the modes with the or switch until you return to the adjustment screen and
press and release to exit and save.
If at any point the display is left for 30 seconds it will revert to the normal display and no
changes will be saved.
Shelves and Supports
G2 shelving for low, high or meat temperature cabinets consist of two trayslides per shelf. These
slot directly into the rear of the cabinet’s airduct and have ladderacking to support the front.
Shelves are the standard wire gastronorm style that slide onto the trayslides. Fish cabinets come
with xed racking and sh bins, wine cabinets with the required bottle racking/holder assembly.
Both of these are tted instead of standard shelving.
Chef and Standard Drawers (on counter models only)
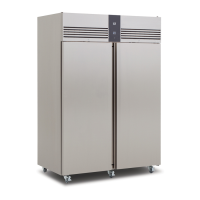
To Remove a Chef Drawer
Pull out the drawer to its full extent. Lift the side release
lever upwards (as shown in the 2nd diagram).
With the lever lifted the drawer can be removed from the
sliders and the counter.
To Remove a Standard Drawer
Pull out the drawer to its full extent. Lift the drawer body upwards and then retract the drawer
body towards you again.
Food
Cover all foods and separate raw and cooked foods to avoid cross contamination.