Do you have a question about the Fostex 380S and is the answer not in the manual?
Essential safety guidelines for operating the Fostex 380S to prevent hazards.
Instructions on handling cables before connecting or disconnecting devices.
Safety warnings regarding the use and handling of power cables.
Warnings about avoiding electrical shock from internal components or liquids.
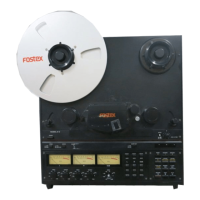
Explanation of the multitrack recording format used by the MODEL 380S.
Guidelines on selecting appropriate cassette tapes for optimal performance.
Specifies environmental conditions to avoid when operating the unit.
Instructions for cleaning the unit and maintaining its condition.
Explains the fundamental signal paths and concepts within the MODEL 380S.
Clarifies the distinction between 'track' and 'channel' in the context of the unit.
How to monitor input signals or tape playback through individual channels.
Function of the PAN control for stereo image placement.
Differentiates the functions of the stereo bus and monmix bus for signal routing.
Role of the ASSIGN switch in routing signals to buses.
Explains the three options for monitoring signals in stereo and monmix buses.
Describes the function and use of the auxiliary bus for effects processing.
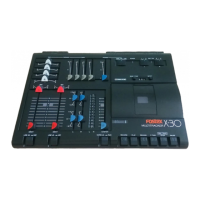
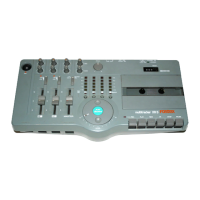
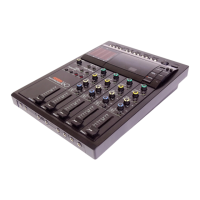
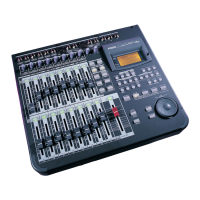
Identifies and labels the controls on the main control panel.
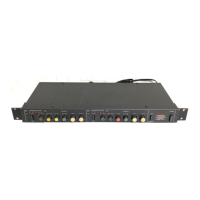
Details the input/output jacks and controls located on the front of the unit.
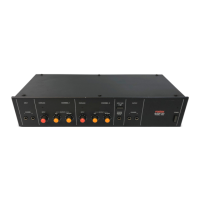
Outlines the connectors and ports available on the rear panel.
How to route input signals or tape playback to different sections.
Function of the ASSIGN switch for signal routing.
Adjusts the stereo image of a channel's signal.
Controls for adjusting the tonal quality of input signals.
Controls for sending signals to external effect units.
Adjusts the volume of the SUB Mix section signals.
Controls input signal levels and matches external device output.
Controls for AUX return signals and monitor/headphone output levels.
Switches for monitoring, tape speed, pitch, Dolby NR, and transport operations.
Details input jacks, headphone jack, and punch-in/out jack.
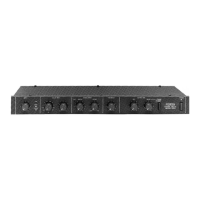
Lists XLR inputs, monitor outputs, AUX send/return, stereo out, tape out, and sync jacks.
Explains the purpose and use of the locate function for rehearsal and mixdown.
Details how to use Auto Repeat for practicing specific song sections.
Key functions for locate and punch-in/out operations.
Explains indicators for locate, punch-in/out, and tape speed functions.
Explains bargraph meters, record track, locate, and punch indicators.
Details indicators for auto play, repeat, speed, Dolby NR, and transport controls.
Step-by-step guide to setting locate points 1 and 2.
Procedure for resetting and re-registering locate points.
How changes to locate point 0 affect other points.
How the tape automatically stops at specified locate points.
How the tape automatically plays back from specified locate points.
Enables repeated playback of a section between locate points.
Combines auto play and auto repeat for seamless looping.
Explains re-recording a section of a pre-recorded track.
Details using foot switch or REC button for manual punch-in/out.
Steps to set IN and OUT points for auto punch-in/out.
How to reset and re-enter punch-in/out points.
Setting up for rehearsal punch-in/out.
Performing actual punch-in/out recording.
Table showing indicator states during auto punch-in/out.
Using Auto Repeat for looping sections after punching in.
Repeating rehearsal sections using Auto Repeat.
Introduction to direct recording and multi-track overdubbing.
Simple recording method using channels 1-4.
Recording new material over existing tracks.
Setting up and recording a drum machine on Track 1.
Recording electric bass onto Track 2 while monitoring drums.
How to monitor the recorded drum track.
Setting up to monitor and connect the electric bass.
Recording electric guitar onto Track 3 while monitoring tracks 1 and 2.
Recording synthesizer onto Track 4 while monitoring previous tracks.
Explanation of blending recorded tracks into a stereo composite signal.
How to connect the 380S to a master recorder.
Connecting and using external effect units during mixdown.
Setting pan positions and equalization for mixdown.
Checking the final mix through headphones or monitors.
A checklist to review settings and performance before mixdown.
A template for planning mixdown settings and timing.
Method for recording four sound sources simultaneously.
How to connect sound sources for four-channel recording.
Configuring effects for individual channels.
Adjusting recording levels and performing the recording.
Recording multiple stereo and mono sources using the stereo bus.
Configuring effect units for simultaneous use.
Fine-tuning sound quality, pan, and levels for multiple sources.
Performing rehearsal and recording for the setup.
Overdubbing synth sound onto Track 3 while monitoring other tracks.
Configuration of switches for stereo bus overdubbing.
Adjusting input levels and monitoring synthesized audio.
Method for transferring tracks to layer new sounds.
Setting up instruments and switches for ping-pong recording.
Performing rehearsal and recording for ping-pong technique.
Synchronizing the 380S with external MIDI devices.
Configuration of switches for synchronizing with external devices.
Connecting instruments and rehearsing for tape sync.
Solutions for pitch, tonal quality, distortion, and recording problems.
Troubleshooting tape transport and monitoring sound problems.
Resolving issues with effects and tape sync functionality.
Procedures for cleaning the tape recorder's heads and rollers.
Importance and method of demagnetizing the tape head and capstan.
Explanation of the Dolby S NR system and its benefits.
Technical details for the mixer inputs, outputs, and EQ.
Technical details for tape speed, noise reduction, and recording formats.
Power, weight, dimensions, and Dolby licensing information.
Visual representation of signal paths through the unit.
Details of optional headphones and microphones.
Information on color-coded cables and personal monitors.
| Tape Width | 1/4 inch |
|---|---|
| Weight | 12 kg |
| Type | Reel-to-Reel Tape Recorder |
| Tape Speed | 7.5 and 15 ips |
| Reel Size | 7 inch |
| Frequency Response | 30 Hz - 20 kHz |
| Inputs | XLR |
| Outputs | XLR |
| Power Supply | AC 120V |