- 38 - - 39 -
4. During installation, switch off the circuit
breaker in the fuse box during installation.
If the supply cord is damaged, it must be
replaced by a special cord or assembly
available from the manufacturer or its service
agent.
5. The appliance should only be installed,
removed and maintained by qualified
technicians to prevent risks like electric
shocks, falling or res from occurring.
Risk of Injury:
• Unplug the appliance from the mains or switch
off the circuit breaker in the fuse box before
installation, cleaning, maintenance and repair
in order to avoid electric shock.
• The range hood may have sharp edges. Be
careful to avoid cuts and abrasions during
installation and cleaning. Do wear qualified
protective gloves.
Warning Before Installation
• Prior to installation, ensure that the exhaust
outlet is free of debris, as they may damage
the range hood.
• A straight and short ducting run will ensure a
high performance of the range hood.
• A curving and long ducting run should be
avoided, as it will lower the performance of
the range hood.
• Strictly seal the connection between the duct
and duct hole with duct tape. Ensure that the
connection between the duct and the duct cover
is secure, and seal it with aluminum tape.
• A small duct hole will lower the performance
of the range hood. Therefore, it is highly
recommended that you cut a duct hole equal
to or larger than 6"(152.4mm) of the size.
• The bolts used in this product are metric-size
bolts, please do not apply any unqualified
bolts.
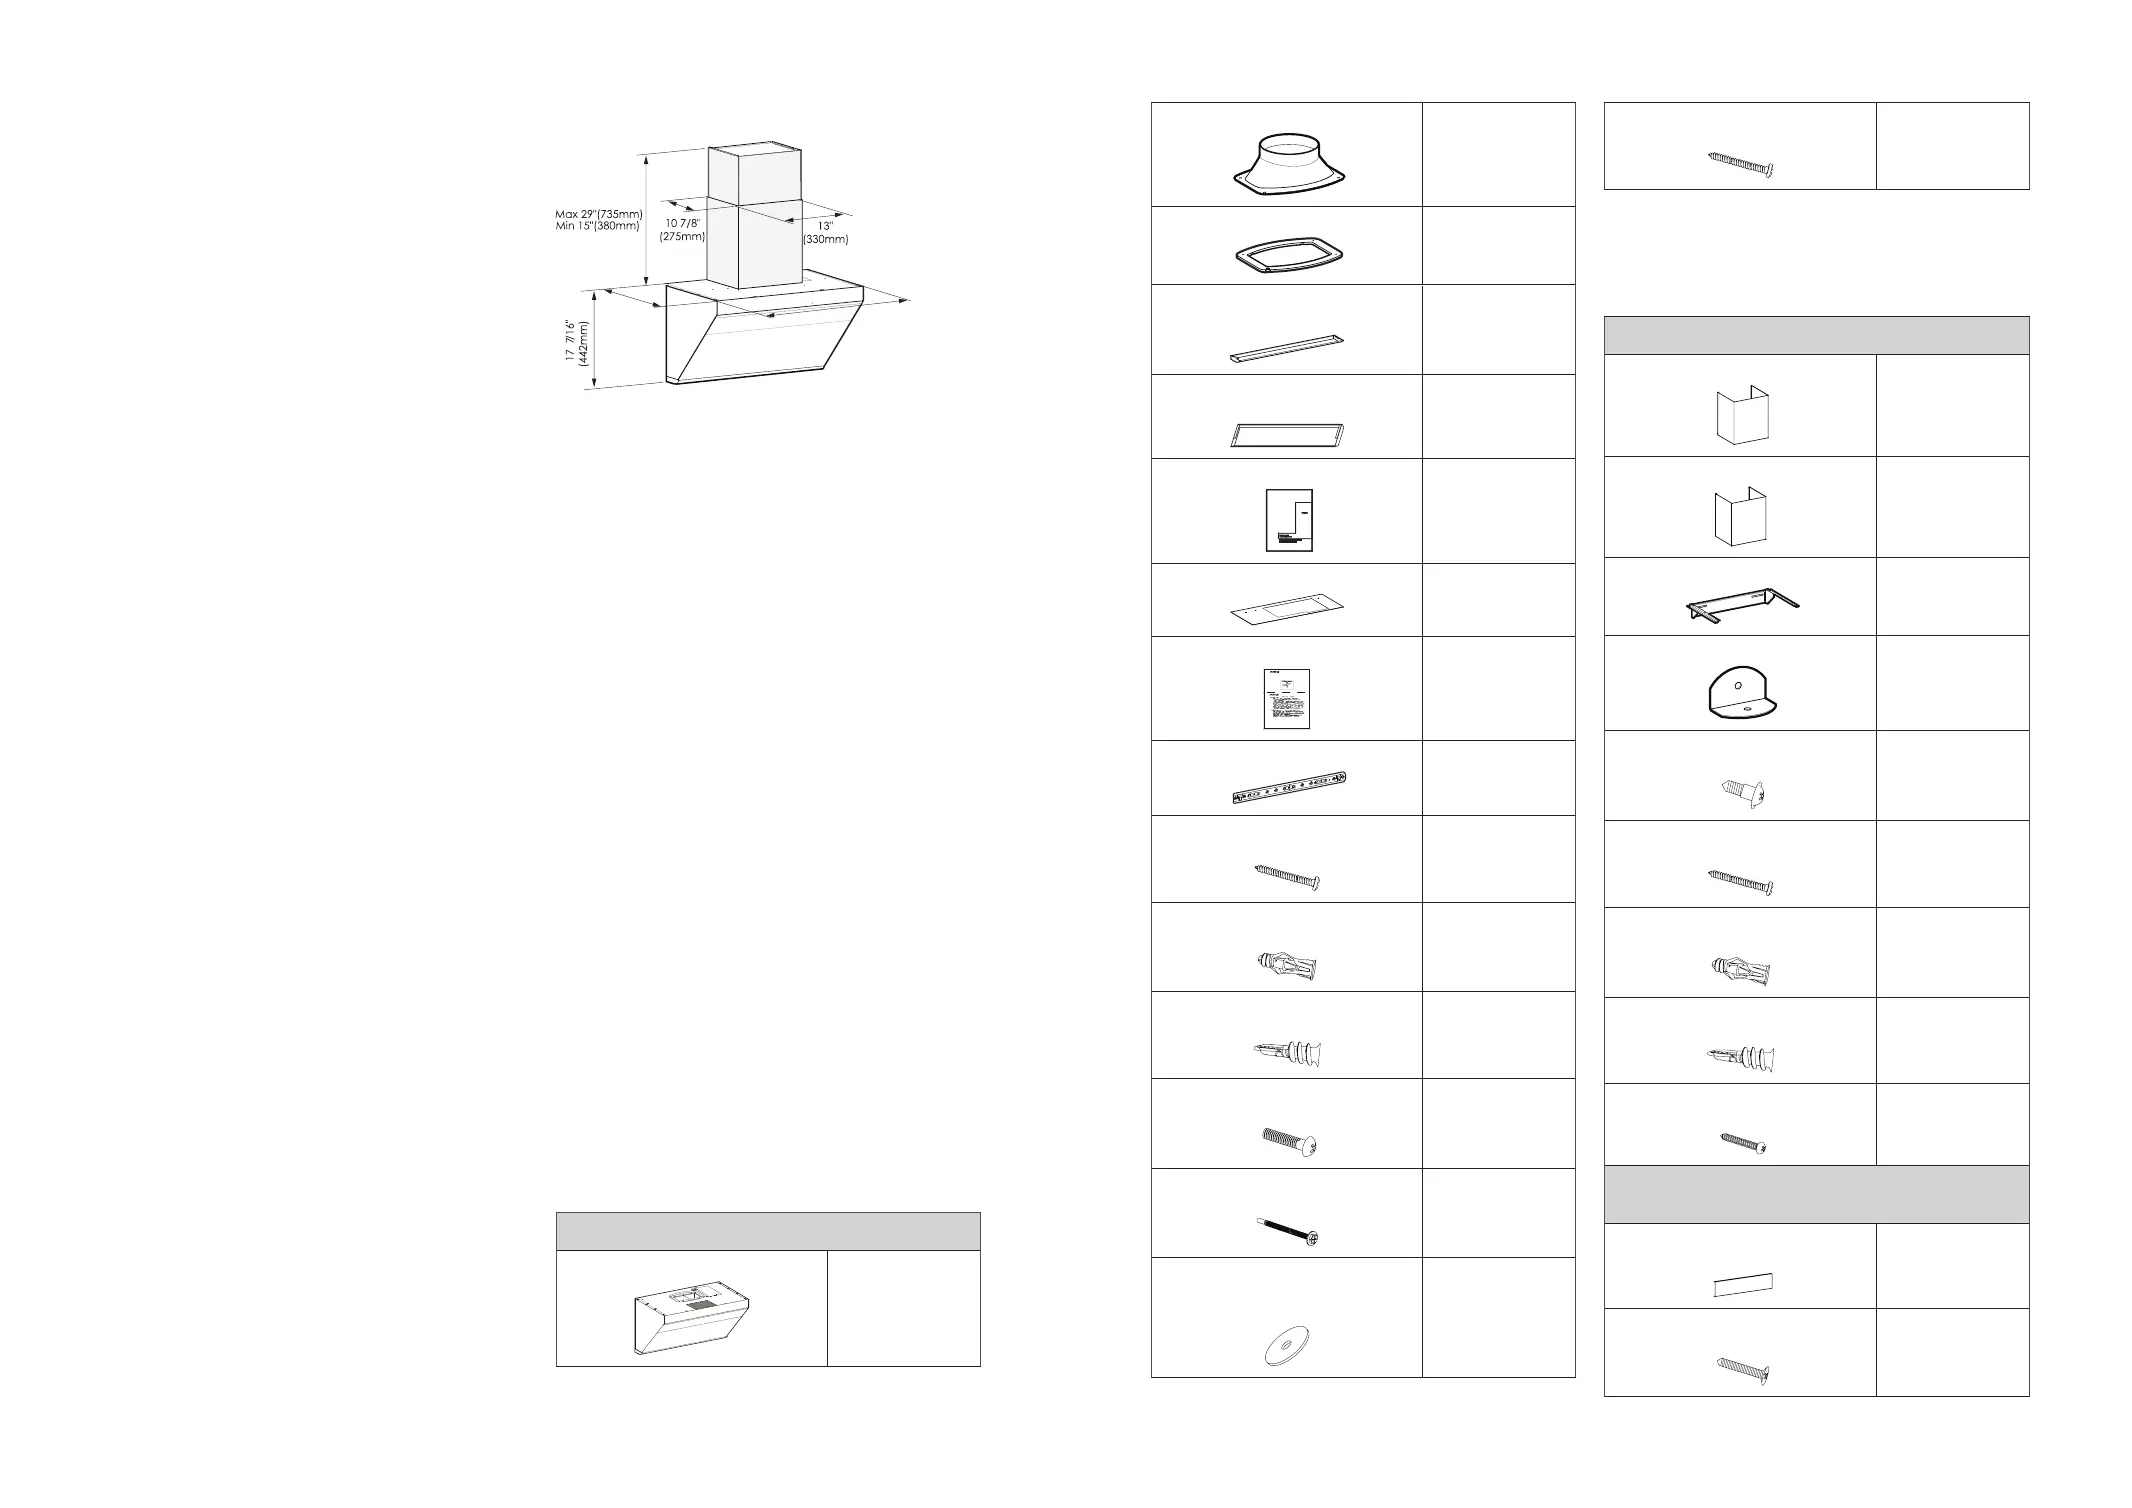
6.2 Product Dimensions
187/16"
(467mm)
297/8"(758mm)
(JQG7505/JQG7505-W)
357/8"(910mm)
(JQG9006/JQG9006-W)
Wall Preparation
The wall should be strong enough to support the
range hood. As for hollow wall or hollow plate, The
minimum thickness of the lumber should be 13/16"
(30mm). As for concrete wall, the installation can be
directly operated. The range hood should be rmly
xed on the wall.
Ductwork Installation
Risk of Injury:
• Unplug the appliance from the mains or switch
off the circuit breaker in the fuse box before
installation, cleaning, maintenance and repair
in order to avoid electric shock.
• The range hood may have sharp edges. Be
careful to avoid cuts and abrasions during
installation and cleaning. Do wear qualified
protective gloves.
• When cutting or drilling into walls or ceilings,
do not damage electrical wiring and other
hidden utilities.
• Ducted fans must always be vented to the
outdoors.
• To reduce the risk of fire and to properly
exhaust air, always duct air outside. Do not
vent exhaust air into spaces within walls,
ceilings, into attics, crawl spaces or garages.
6.3 List of Accessories:
Packing List
Standard Conguration
Product
1
Duct Cover
1
Gasket
1
Grease Cup
(JQG7505/JQG7505-W)
1
Grease Cup
(
JQG9006/JQG9006-W
)
2
Product Manual
1
Installation Paper Template
1
Warranty Card
1
Duct Bracket
1
Hook Screw
#8×1 7/16"(ST4.2×36mm)
4
Expansion Tubes for Tiles
φ1/4"×1 5/16"(φ5.3×32mm)
4
Expansion Tubes for Plasterboards
φ3/16"×1 5/8"(φ4×40mm)
4
Duct Cover Screws
#8×3/4"(M4×18mm)
4
Upper Plate Fastening Screws
#10×2 13/16"(M5×70mm)
4
(One of them is
for standby)
Set Screw Gasket for Upper
Cabinet Boards
φ1 5/16"(φ32mm)
4
(1 for standby)
Housing Assembly Accessories (optional)
Blower Housing
1
Decorative Cover
1
Decorative Cover Bracket
1
Safety Buffer Bafe
1
Duct Cover Screws
#8×7/16"(M4×10mm)
4
Hook Screw
#8×1 7/16"(ST4.2×36mm)
3
Expansion Tubes for Tiles
φ1/4"×1 5/16"(φ5.3×32mm)
3
Expansion Tubes for Plasterboards
φ3/16"×1 5/8"(φ4×40mm)
3
Screws
#4×3/4"(ST2.9×19mm)
3
Decorative Plate Assembly Accessories (with upper
cabinet)
6"(152.4mm) or 4"(101.6mm)
Decorative Plate
1
Fixed Decorative Plate Screws
#6×1 7/16"(ST3.5×35mm)
4
The following accessories must be purchased
separately (please contact the authorized
Fotile
branch
Wood Screws
#10×2 9/16"(ST5×65mm)
4